
Creating a Custom Location List in Travelify
Learn how to create a custom location list in Travelify and enhance your employee training process with this comprehensive guide.
Go to www.travelify.io
1. Introduction
Follow the precise instructions to efficiently set up custom locations for a seamless experience
Before we start if you wish to see subtitles in addition to this voiceover then please ensure "Captions" are enabled on your screen
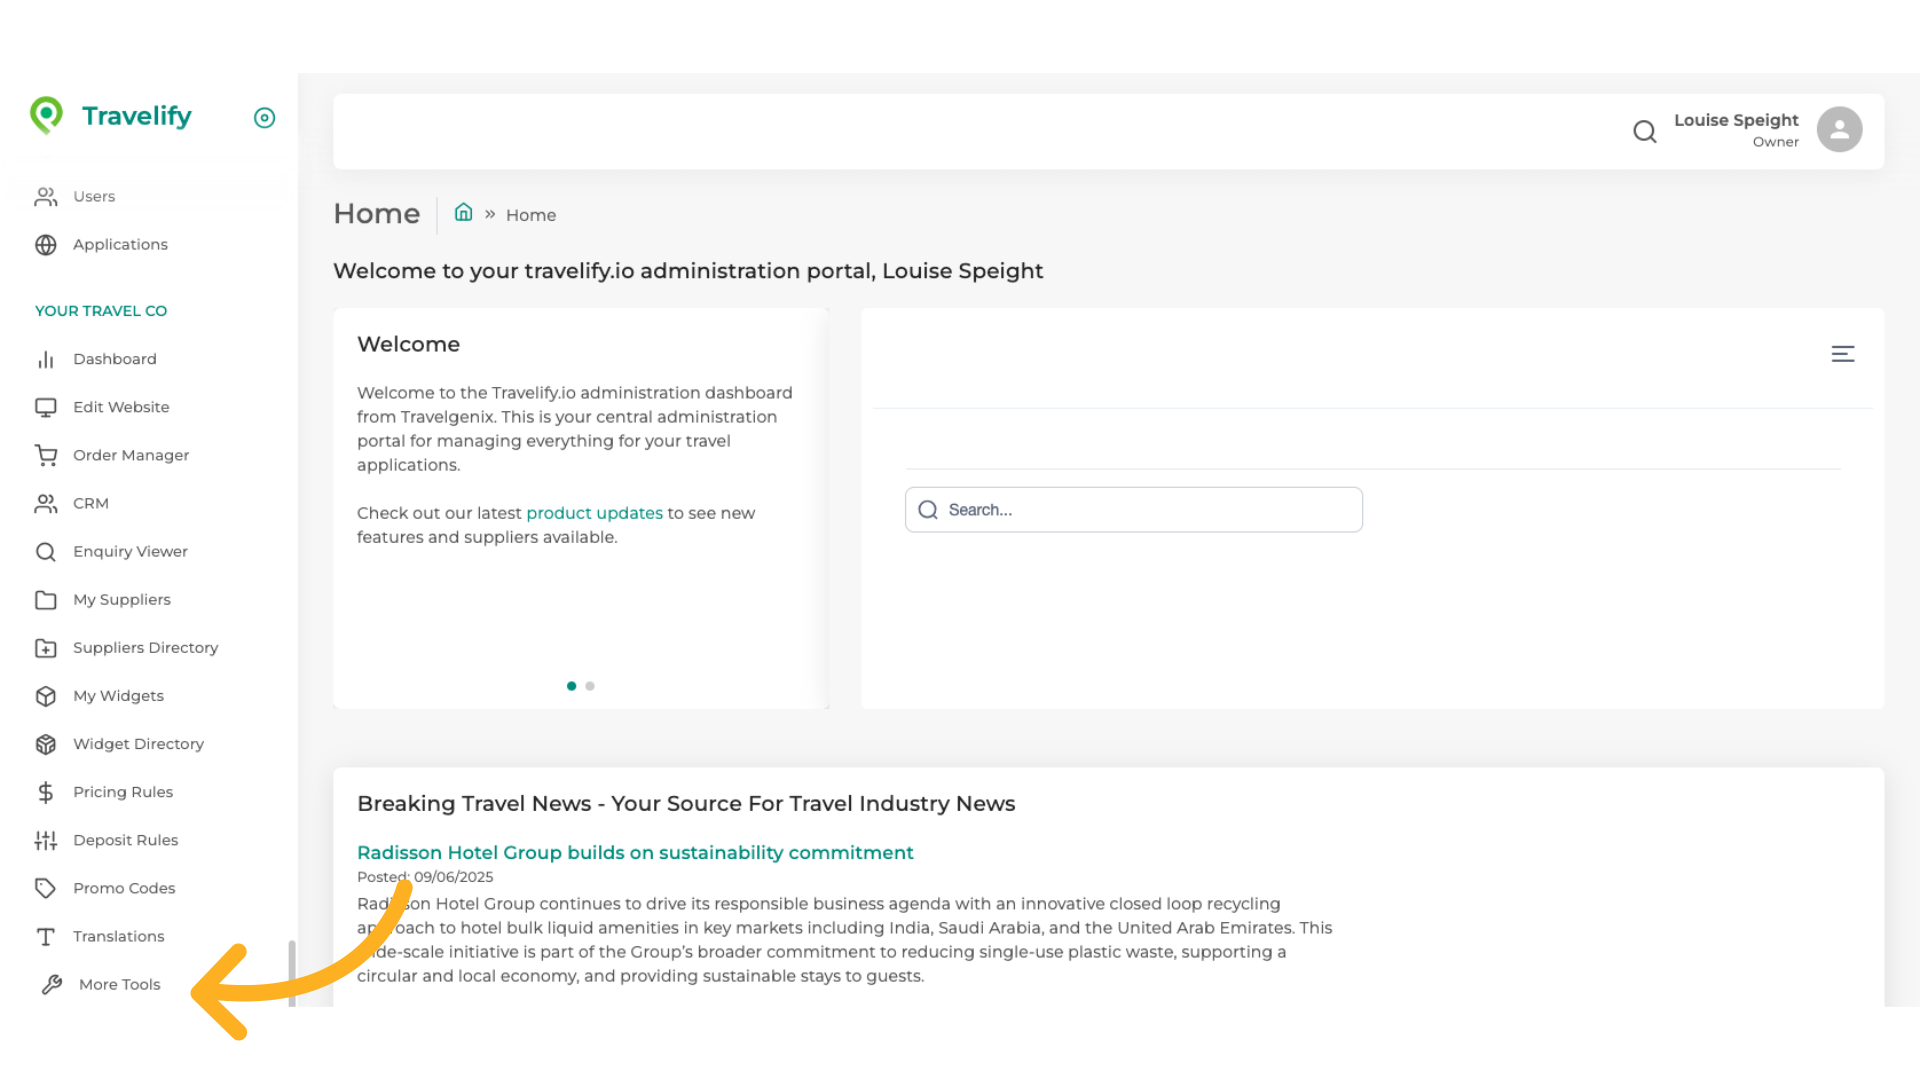
2. Click "More Tools"
Access the More Tools section
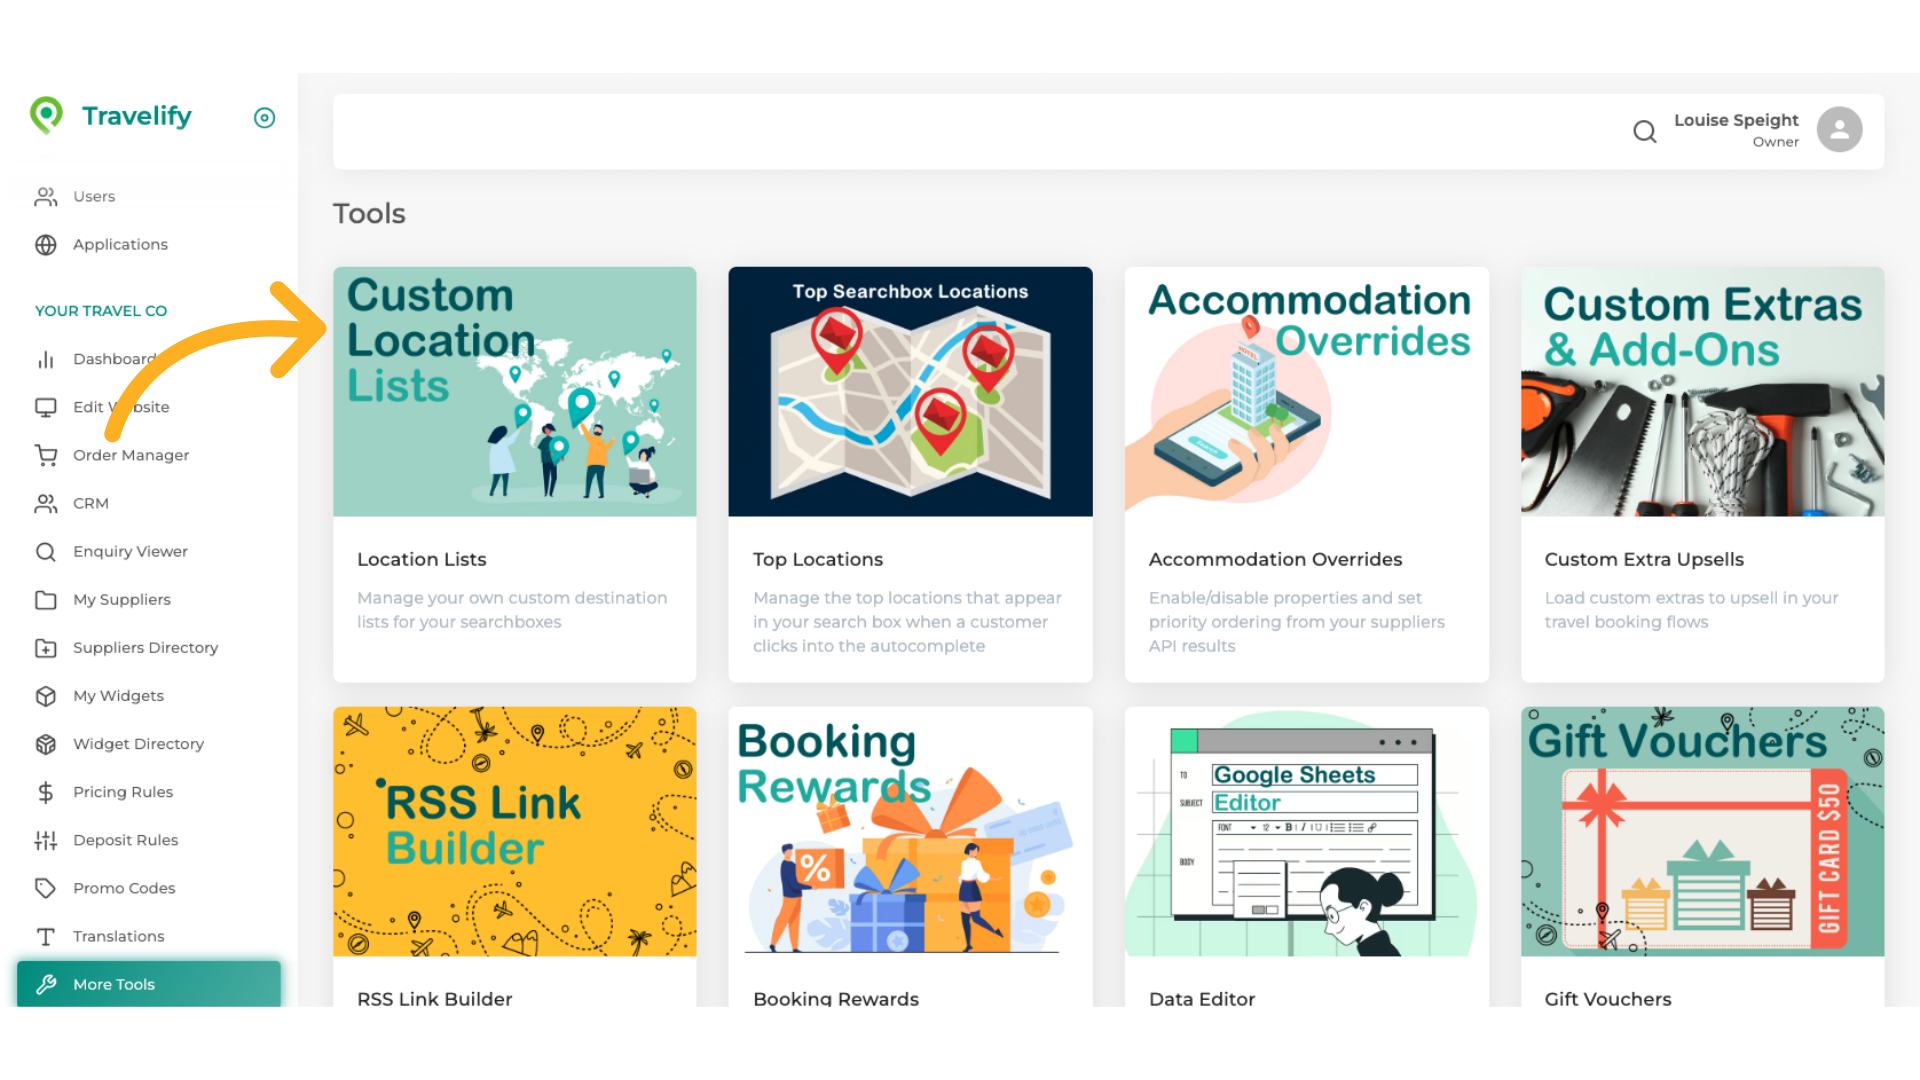
3. Click on Custom Location Lists
Click on Custom Location List This tool will enable you to create a curated list of locations that you wish your customers to search by, allowing you to limit searches or guide them to certain areas It is not advised to use this on your main search page as you wish to give your customers as many search options as possible but it does work well on Destination pages
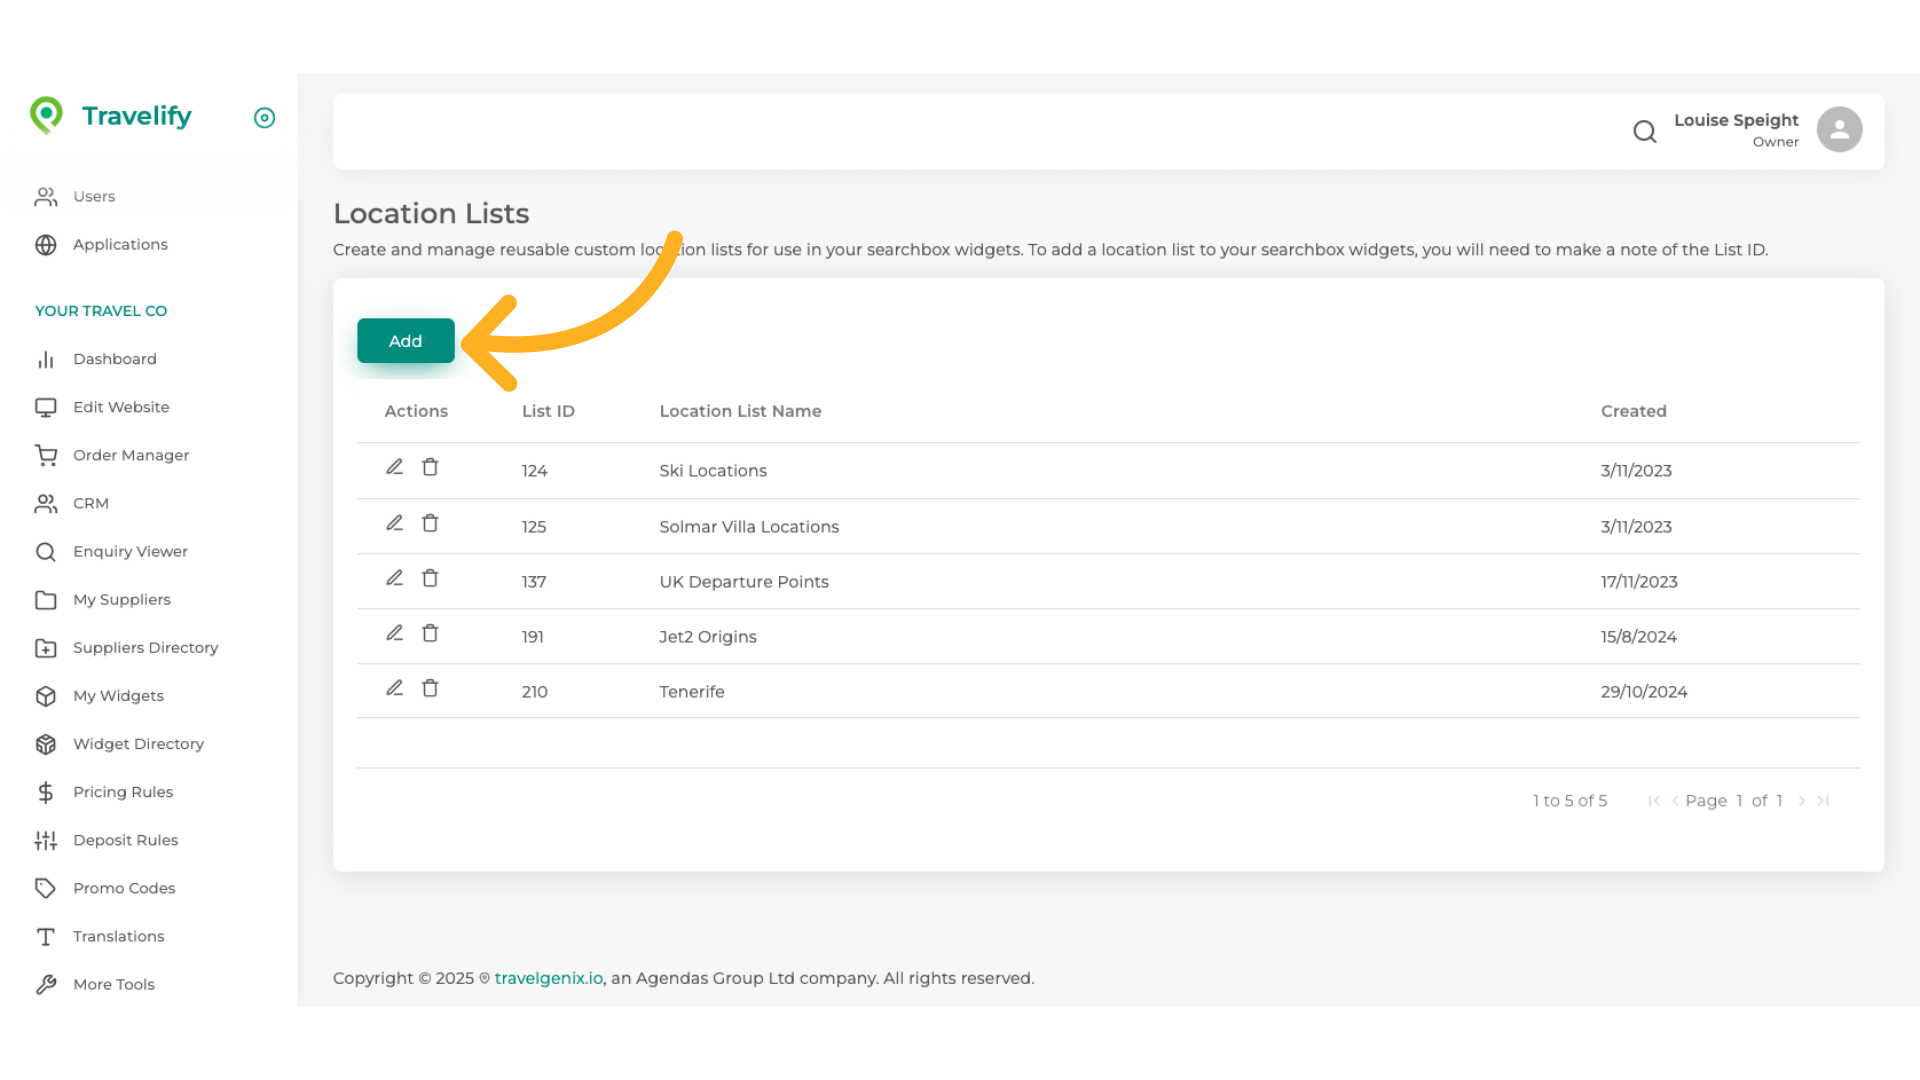
4. Click "Add"
Click Add to start the process of adding a new customised location list
5. Click here
Give your list a name
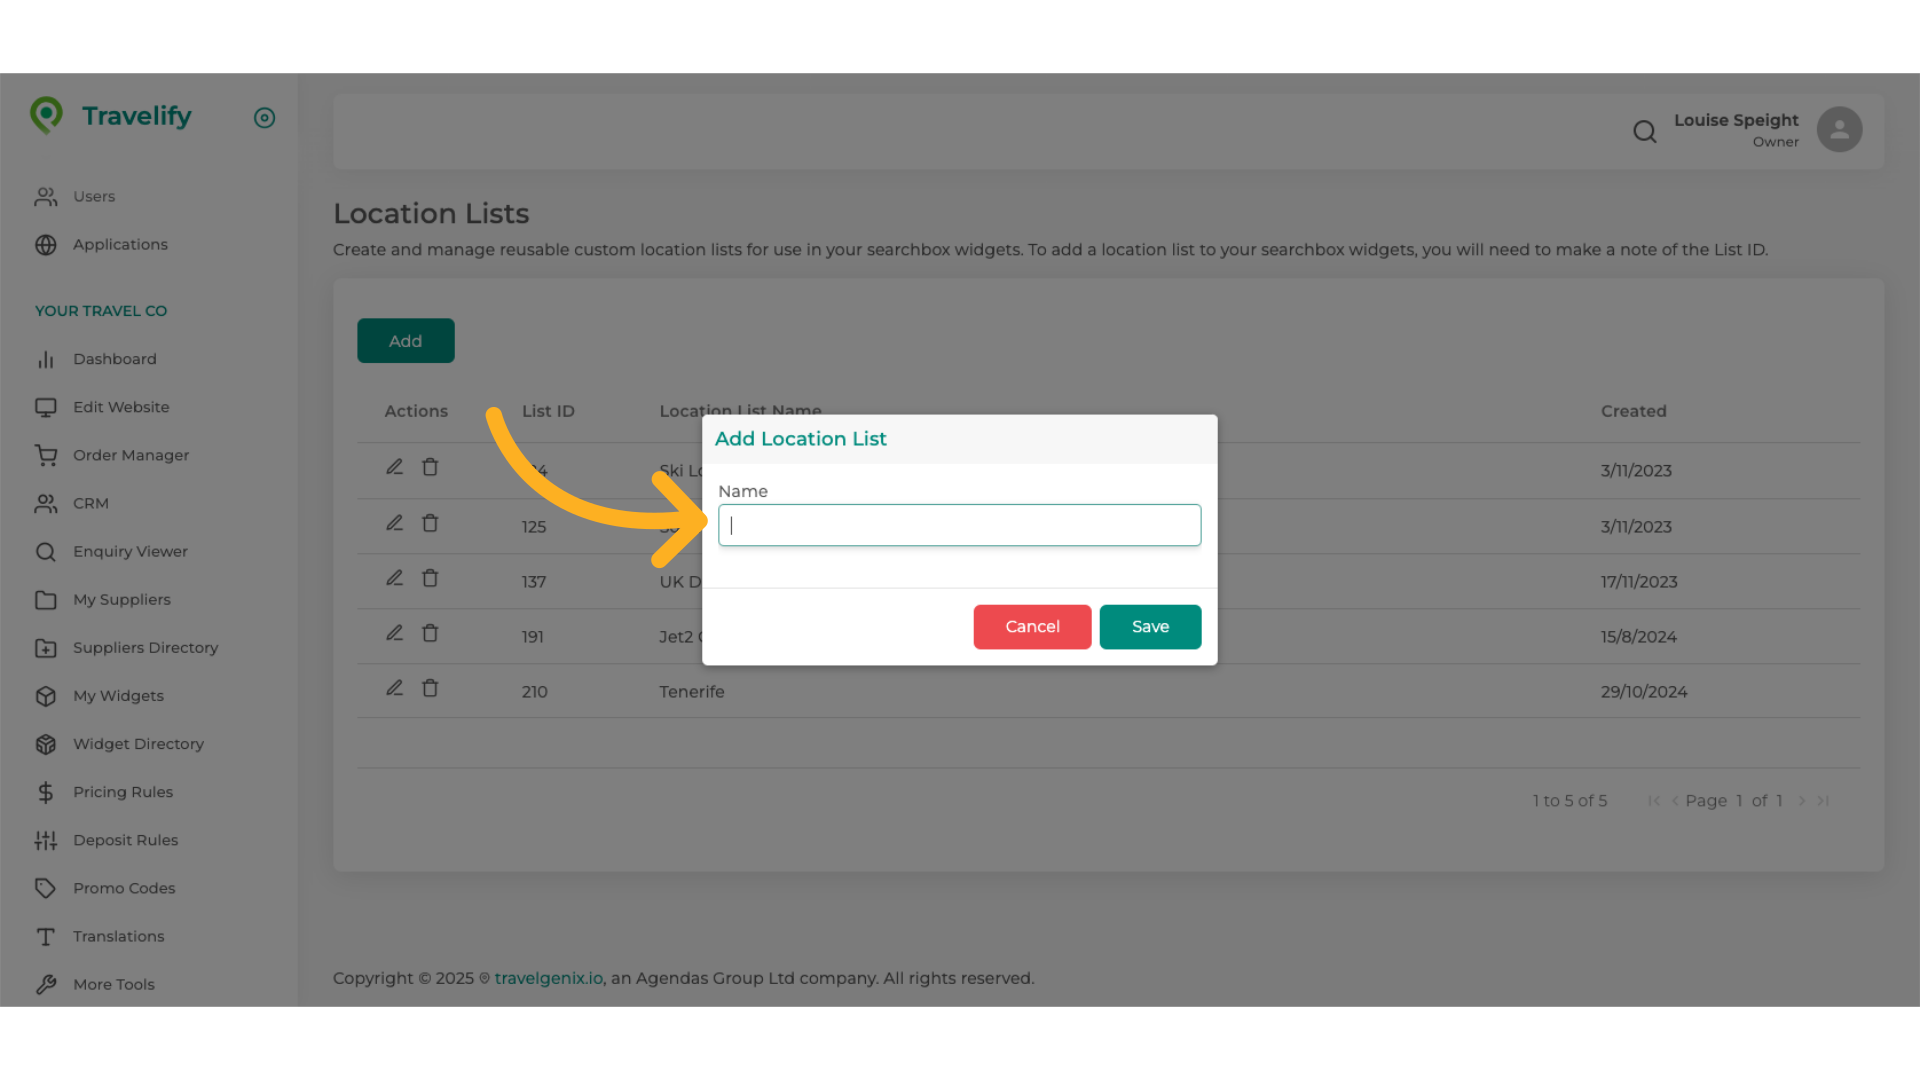
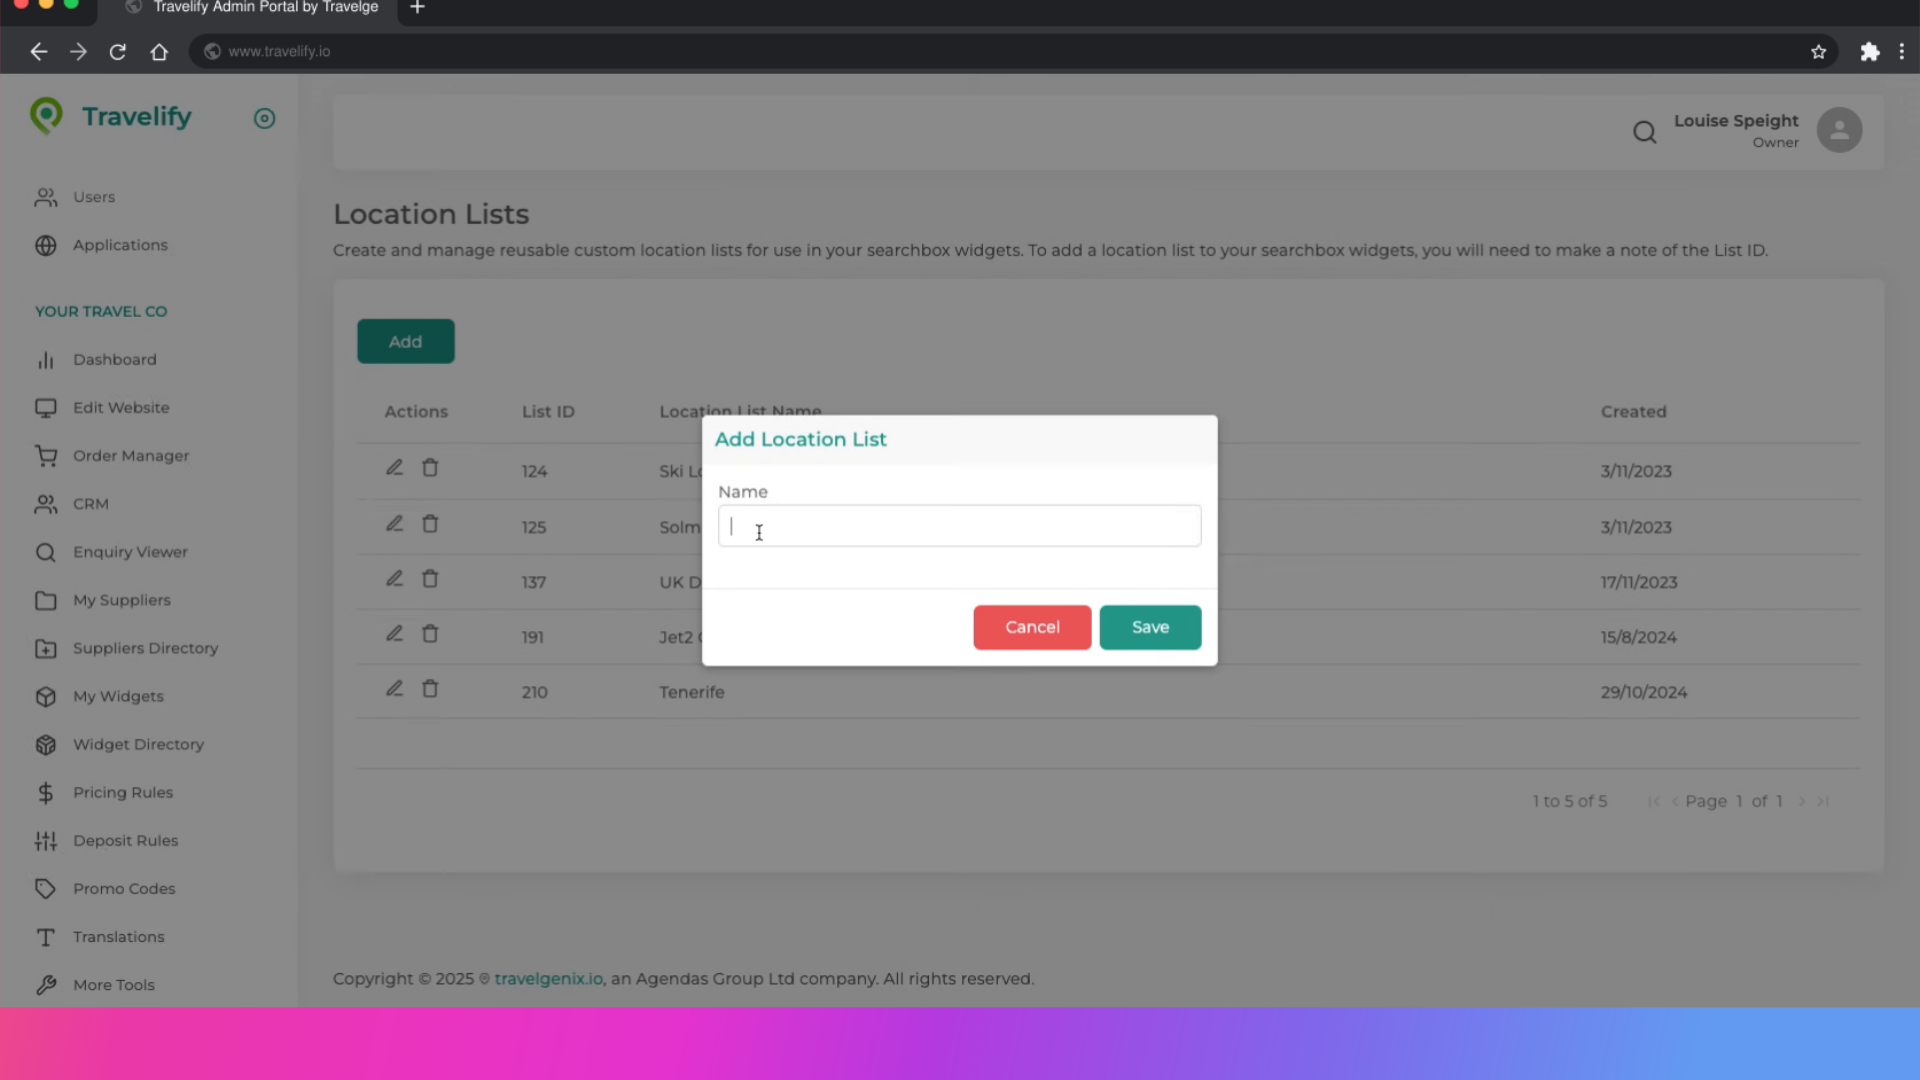
6. Fill in desired name
Fill in desired name
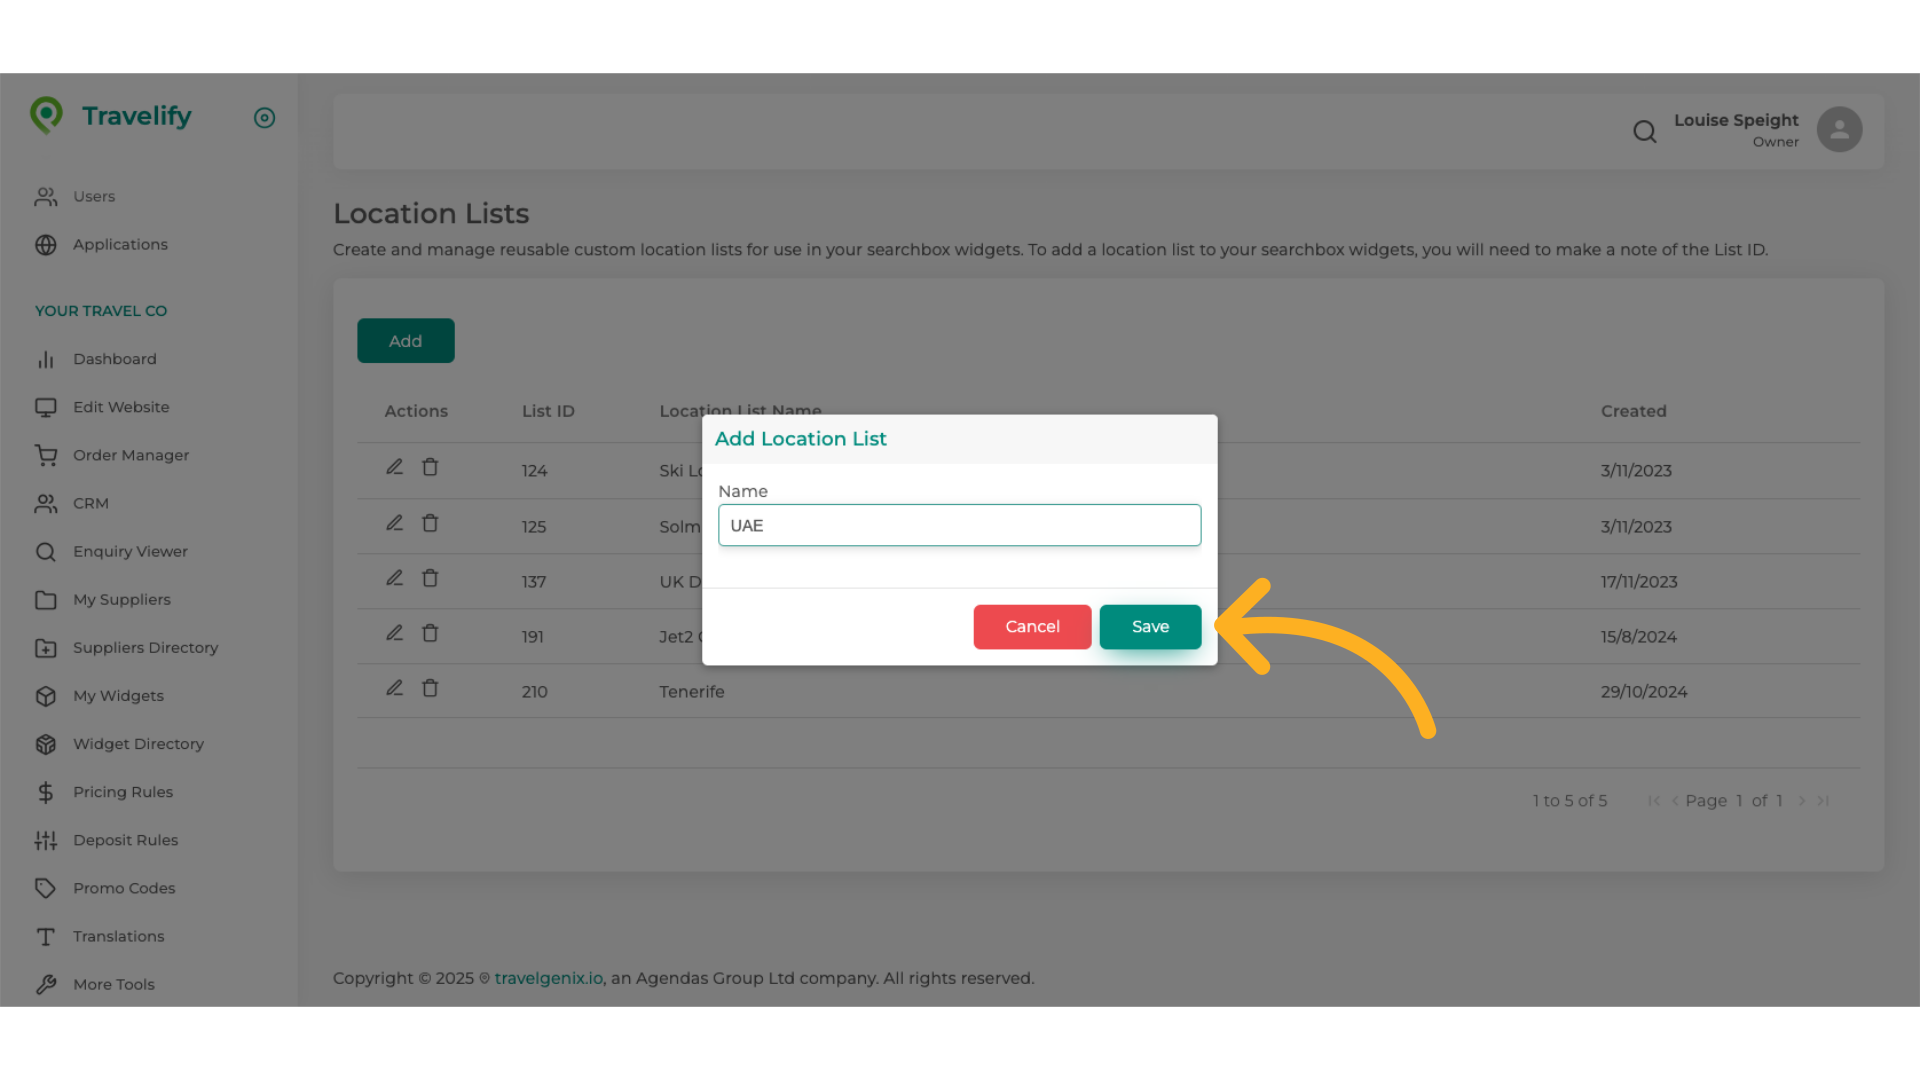
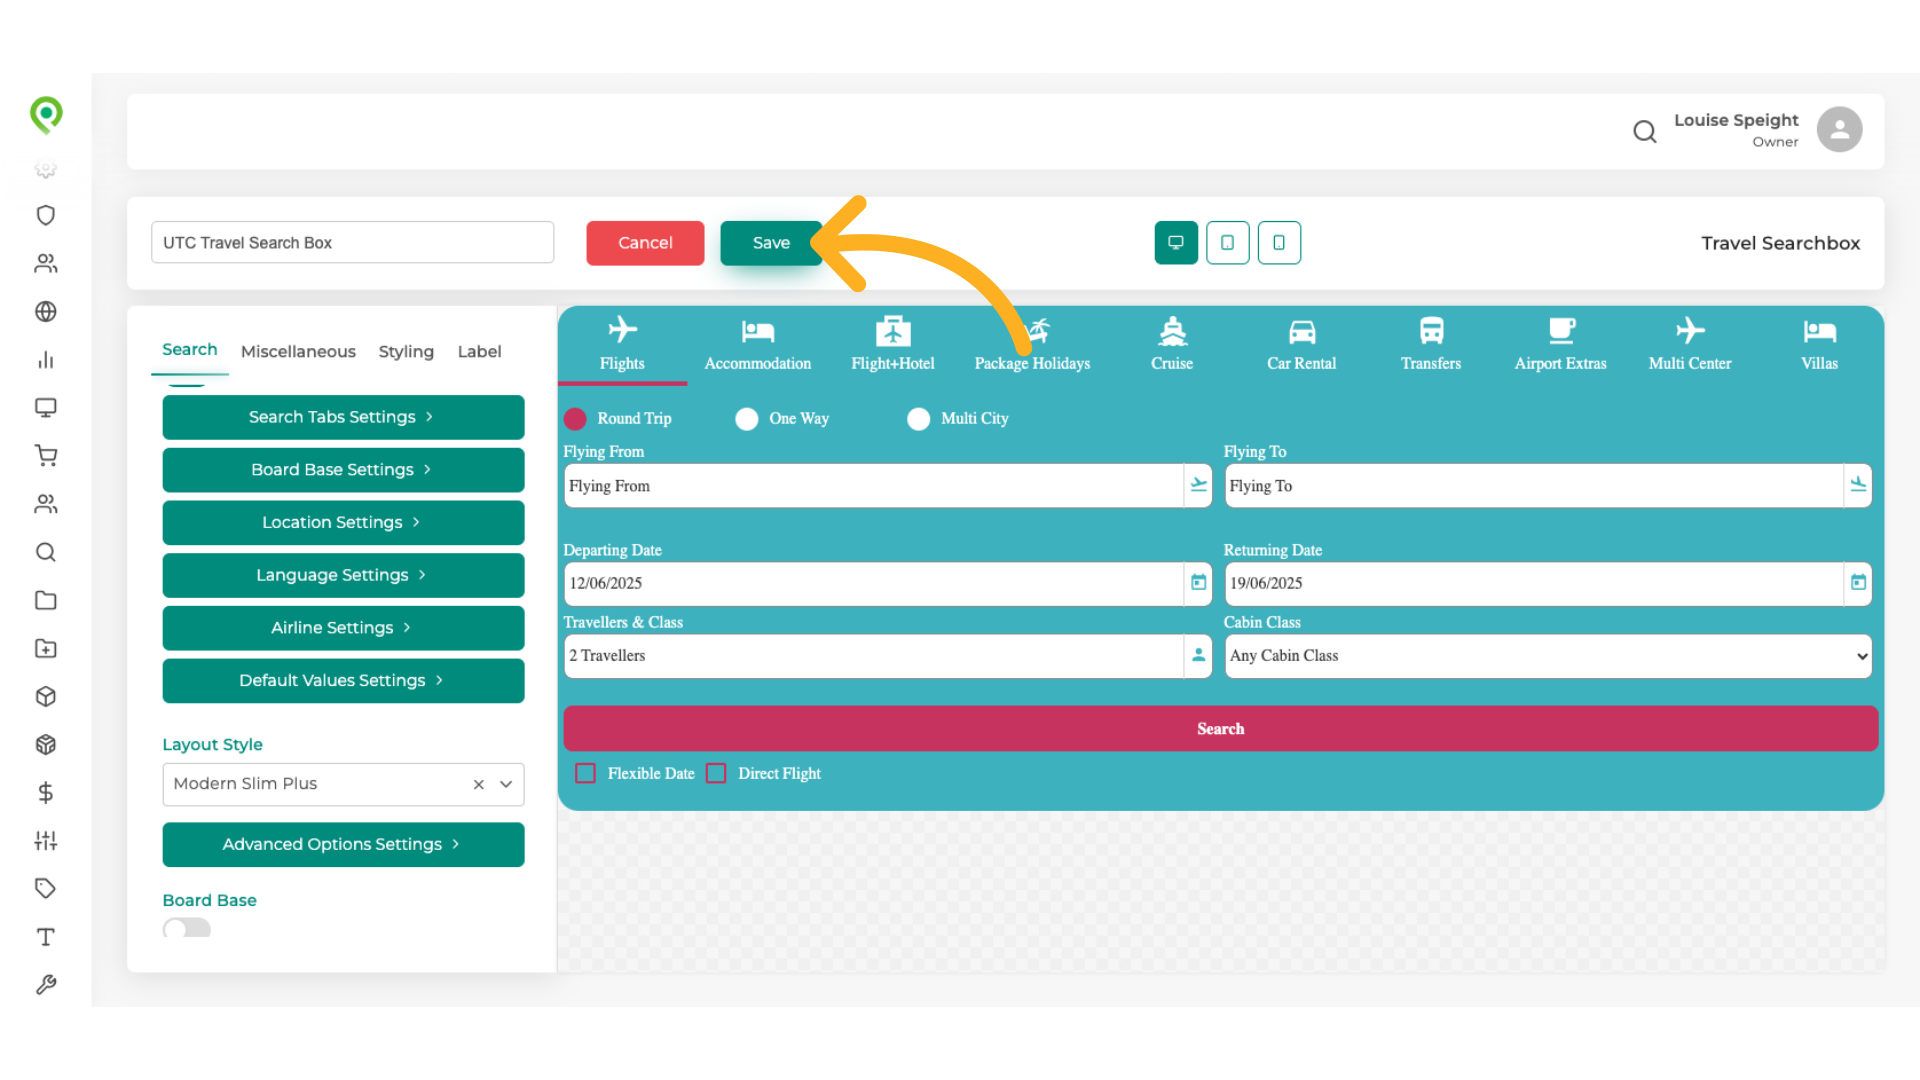
7. Click "Save"
Save the changes made.
8. Locate the name in your list and click the Edit icon
Locate the name in your list and click the Edit icon

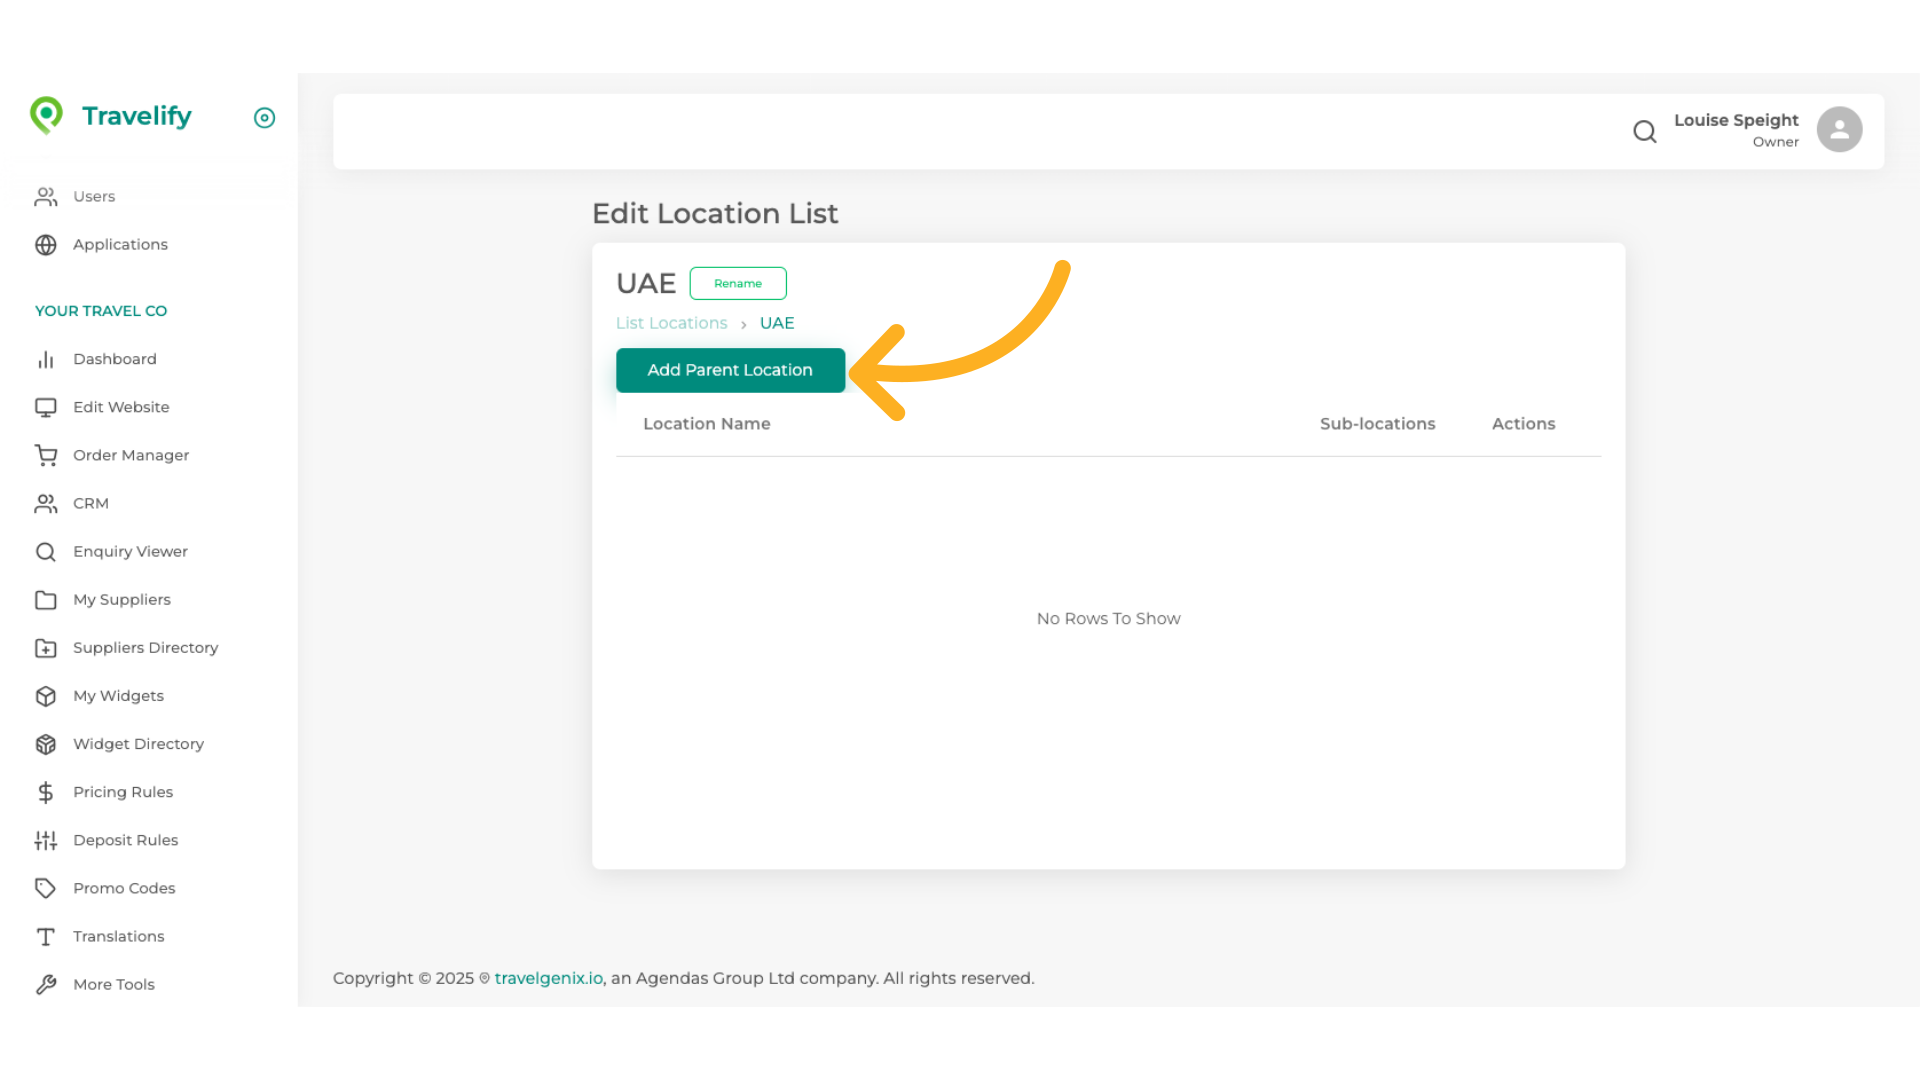
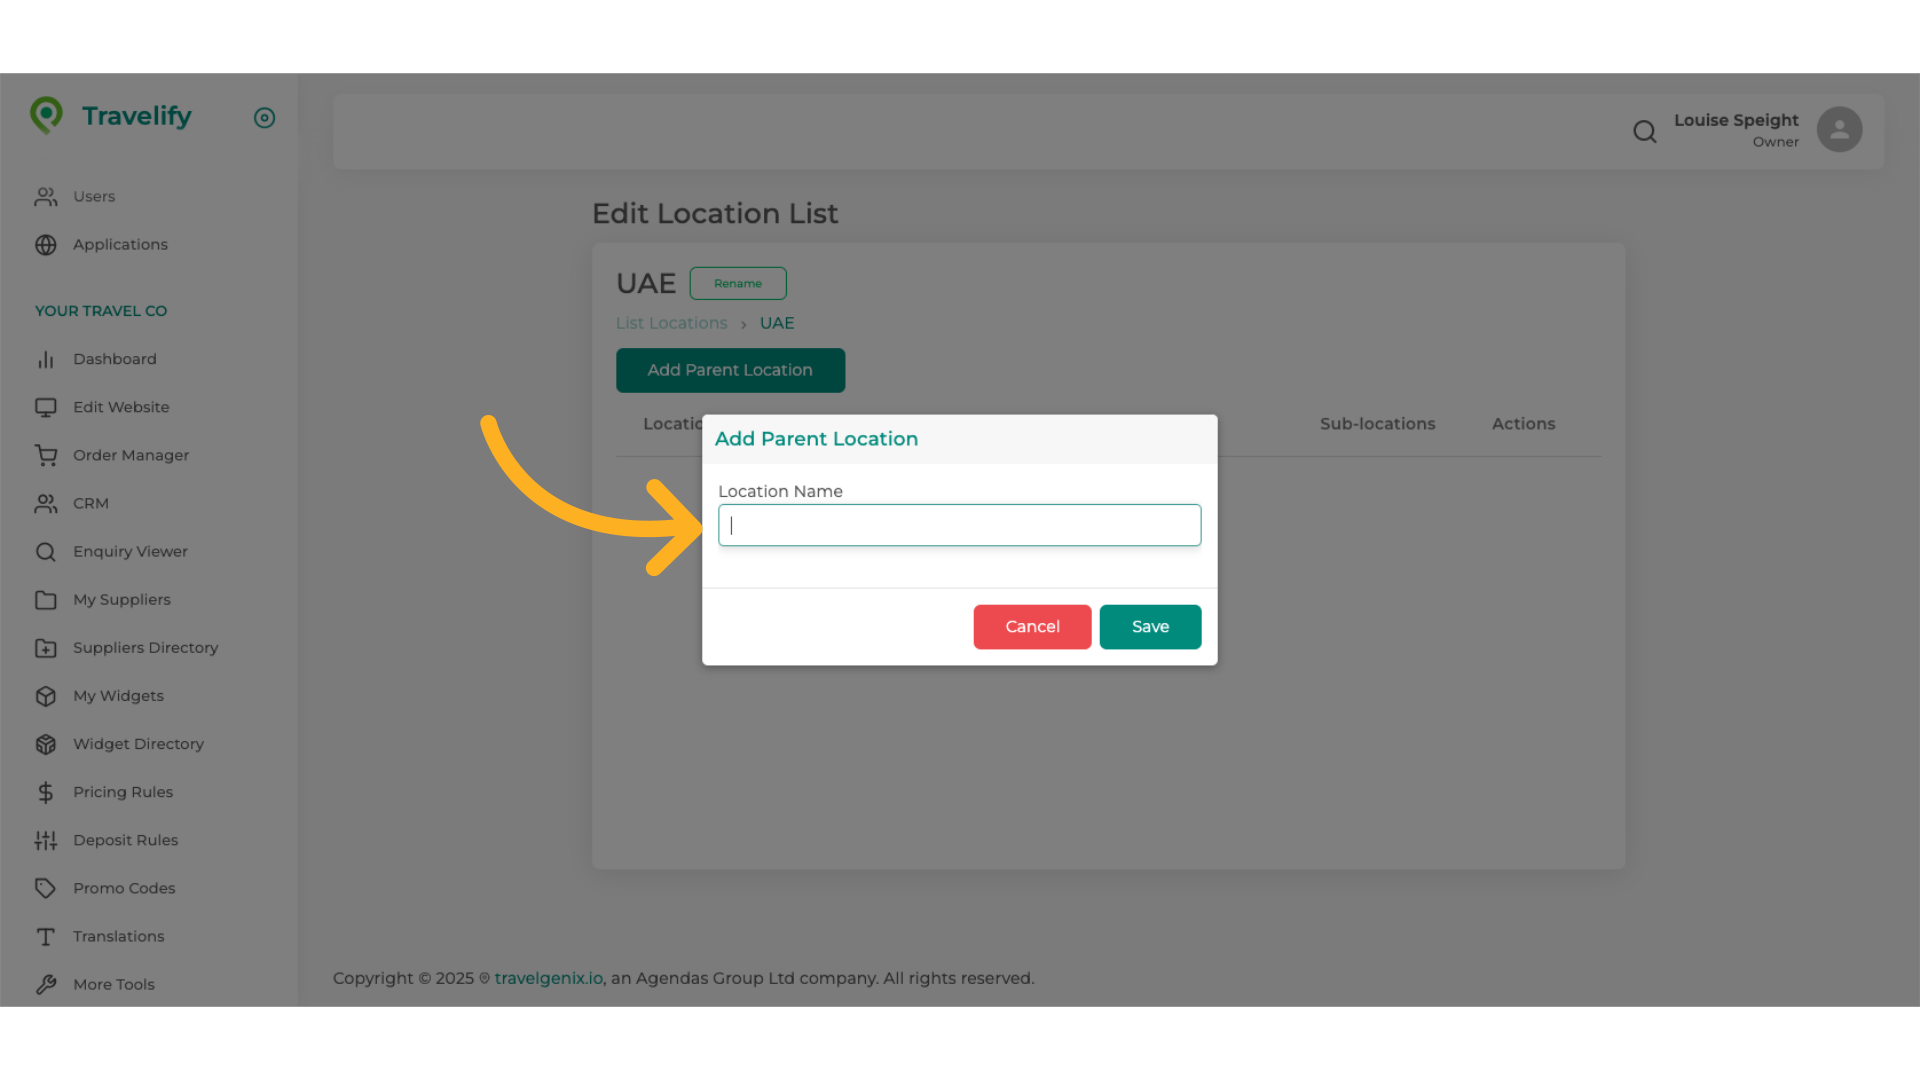
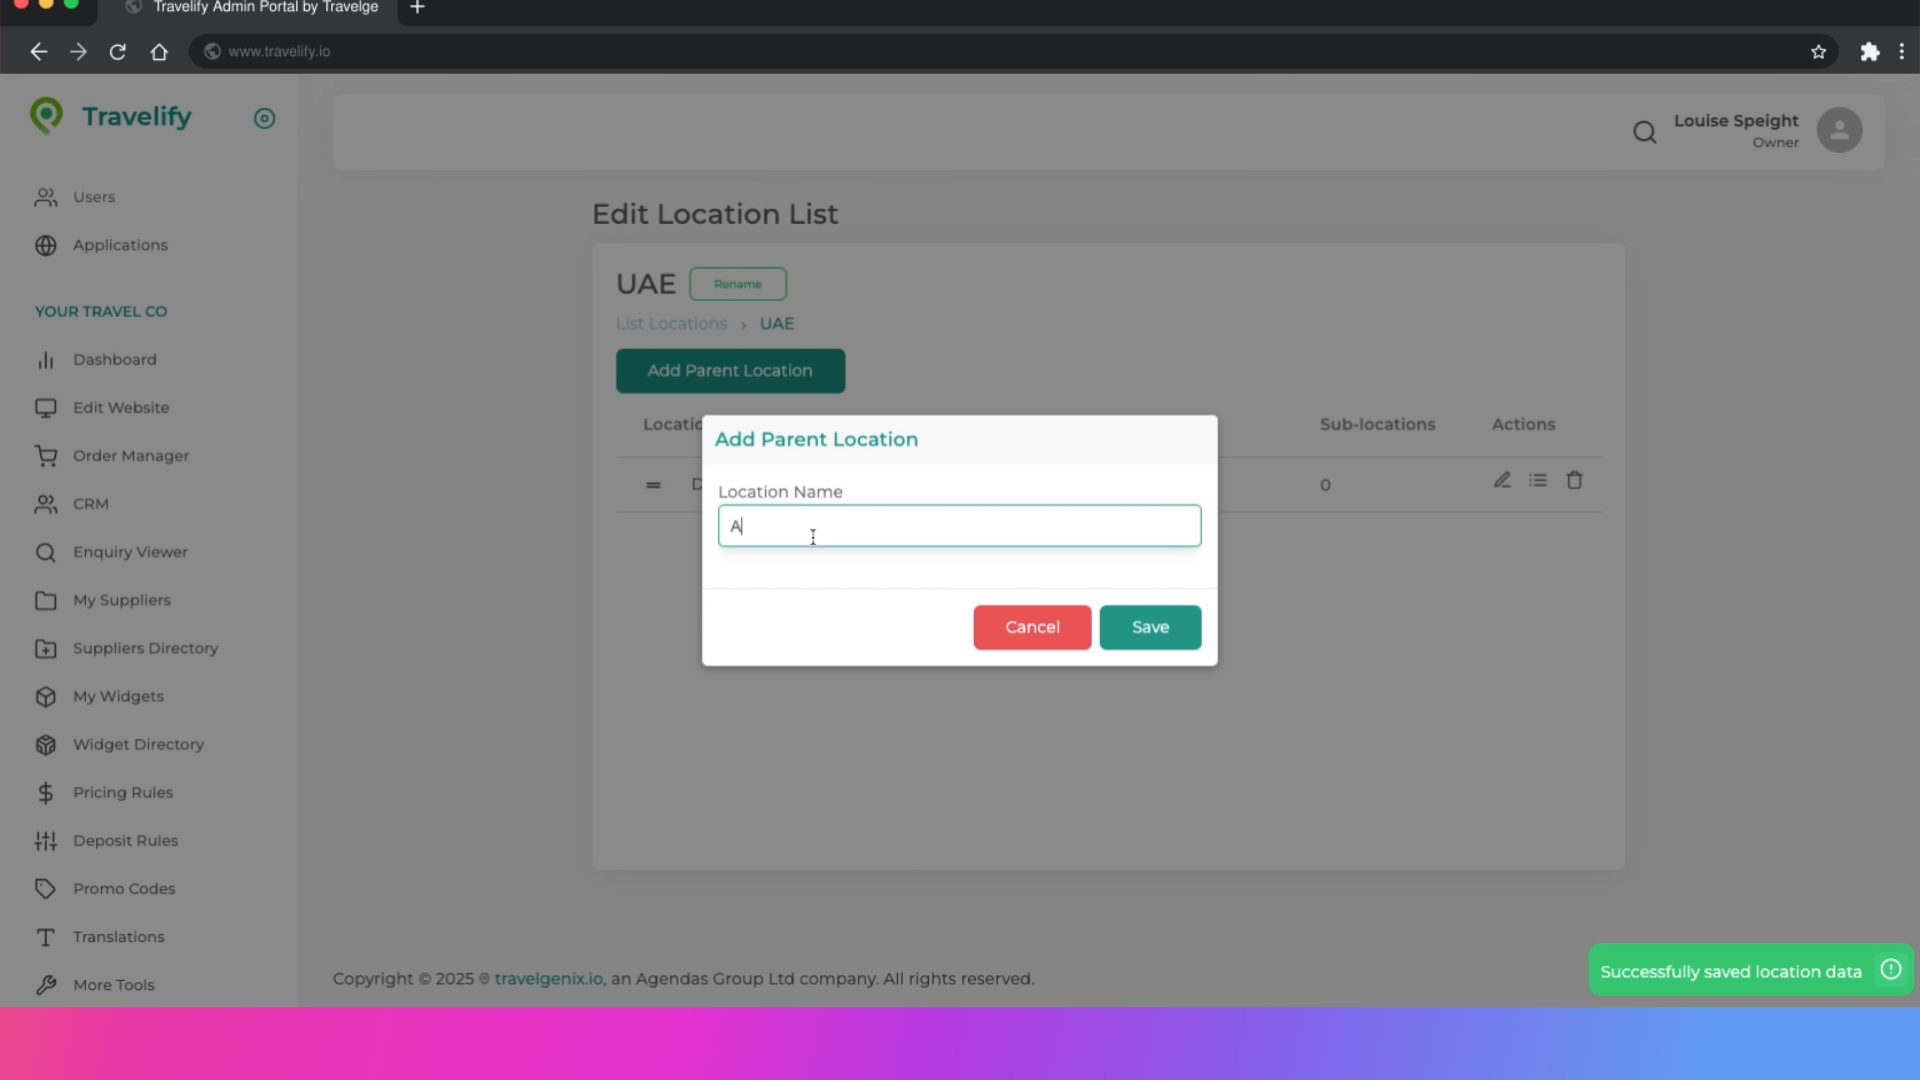
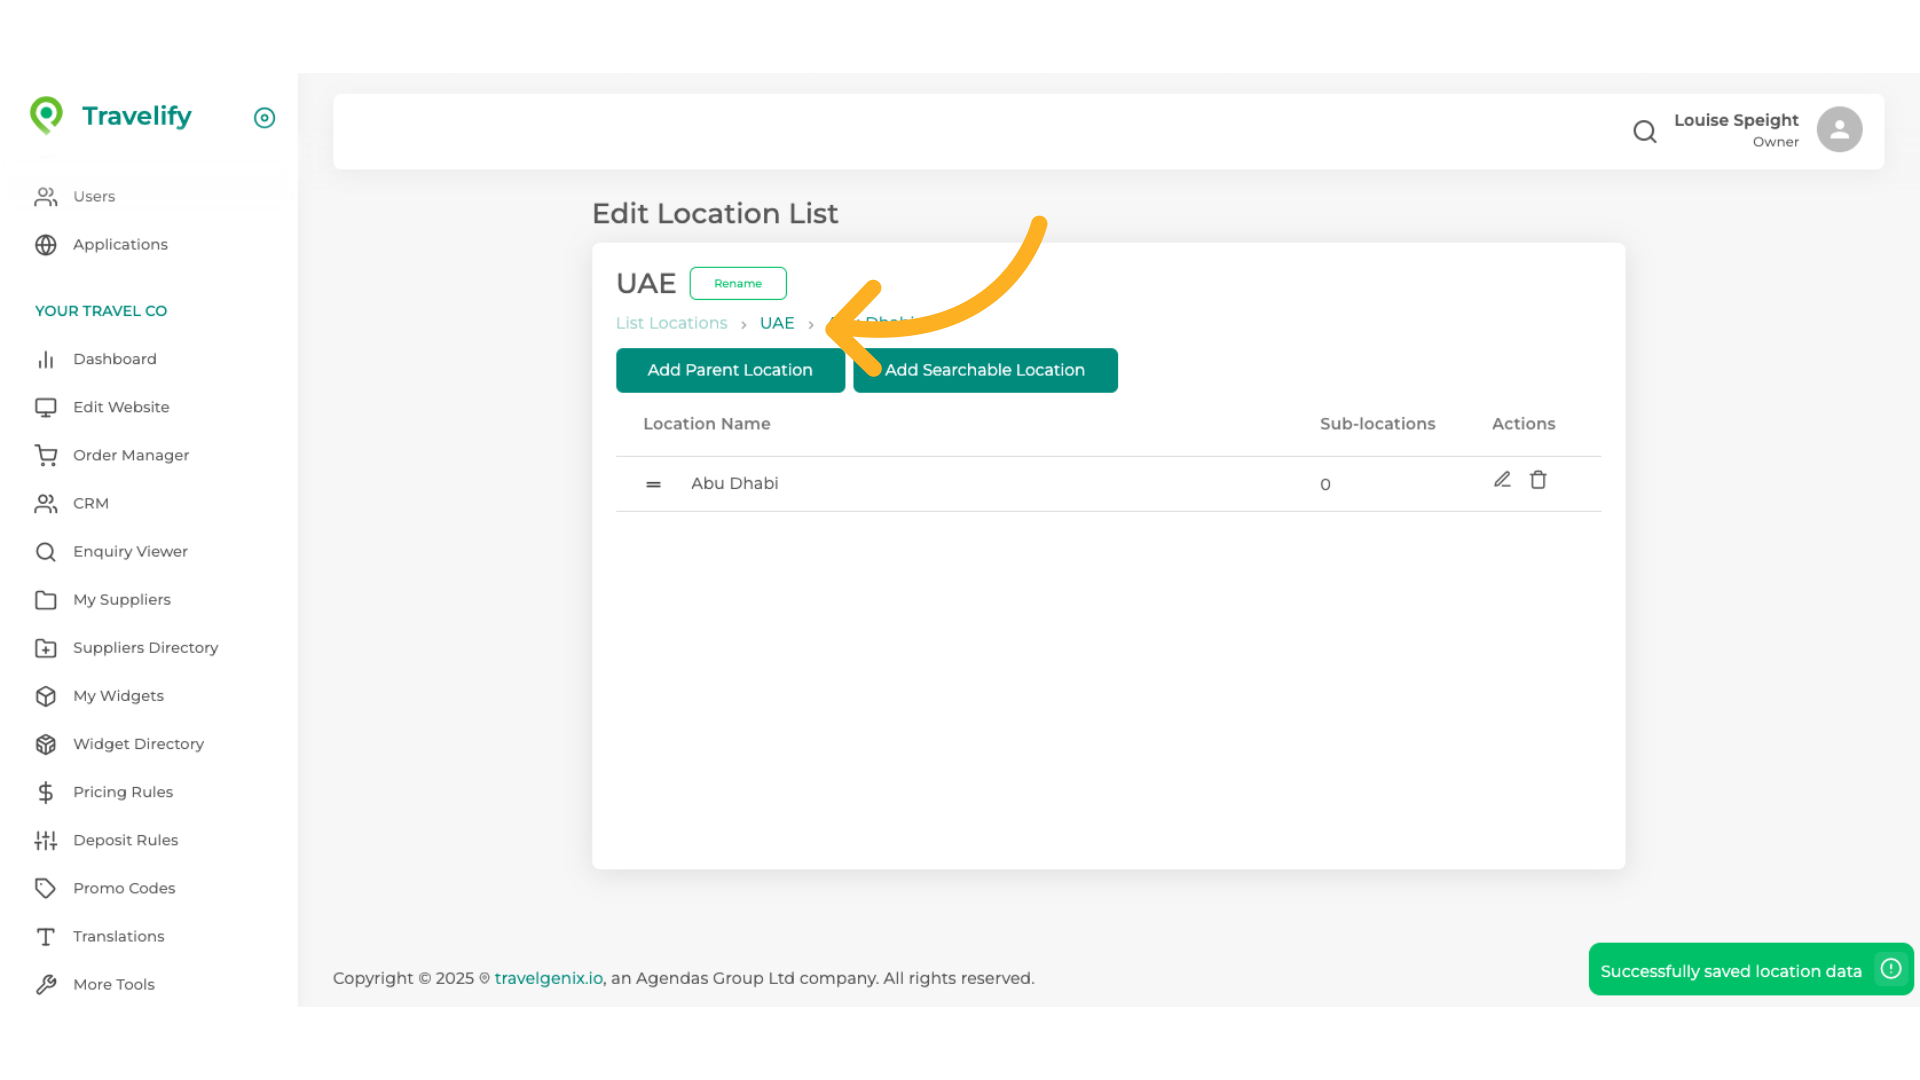
9. Click "Add Parent Location"
Now we need to add the Parent Locations
10. Give your Parent Location the desired name
Give your Parent Location the desired name
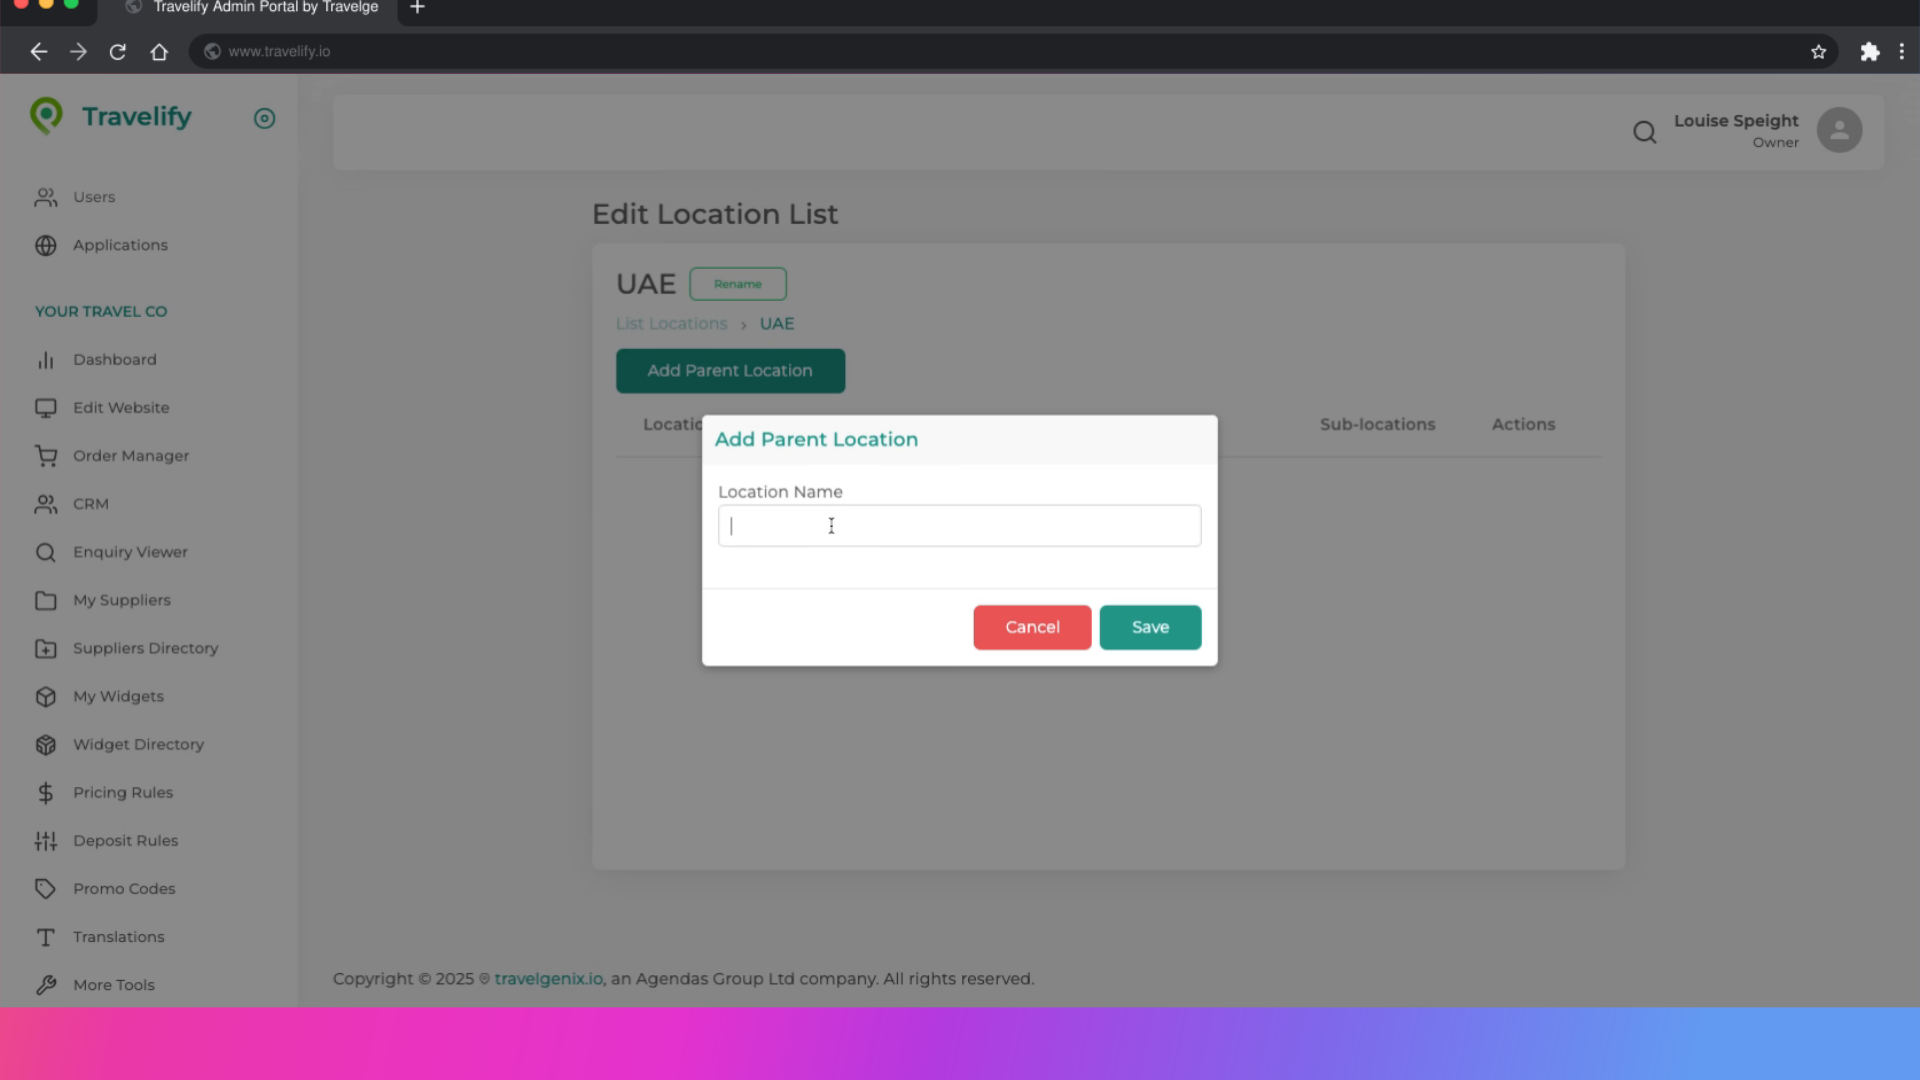
11. Type name
Type in name
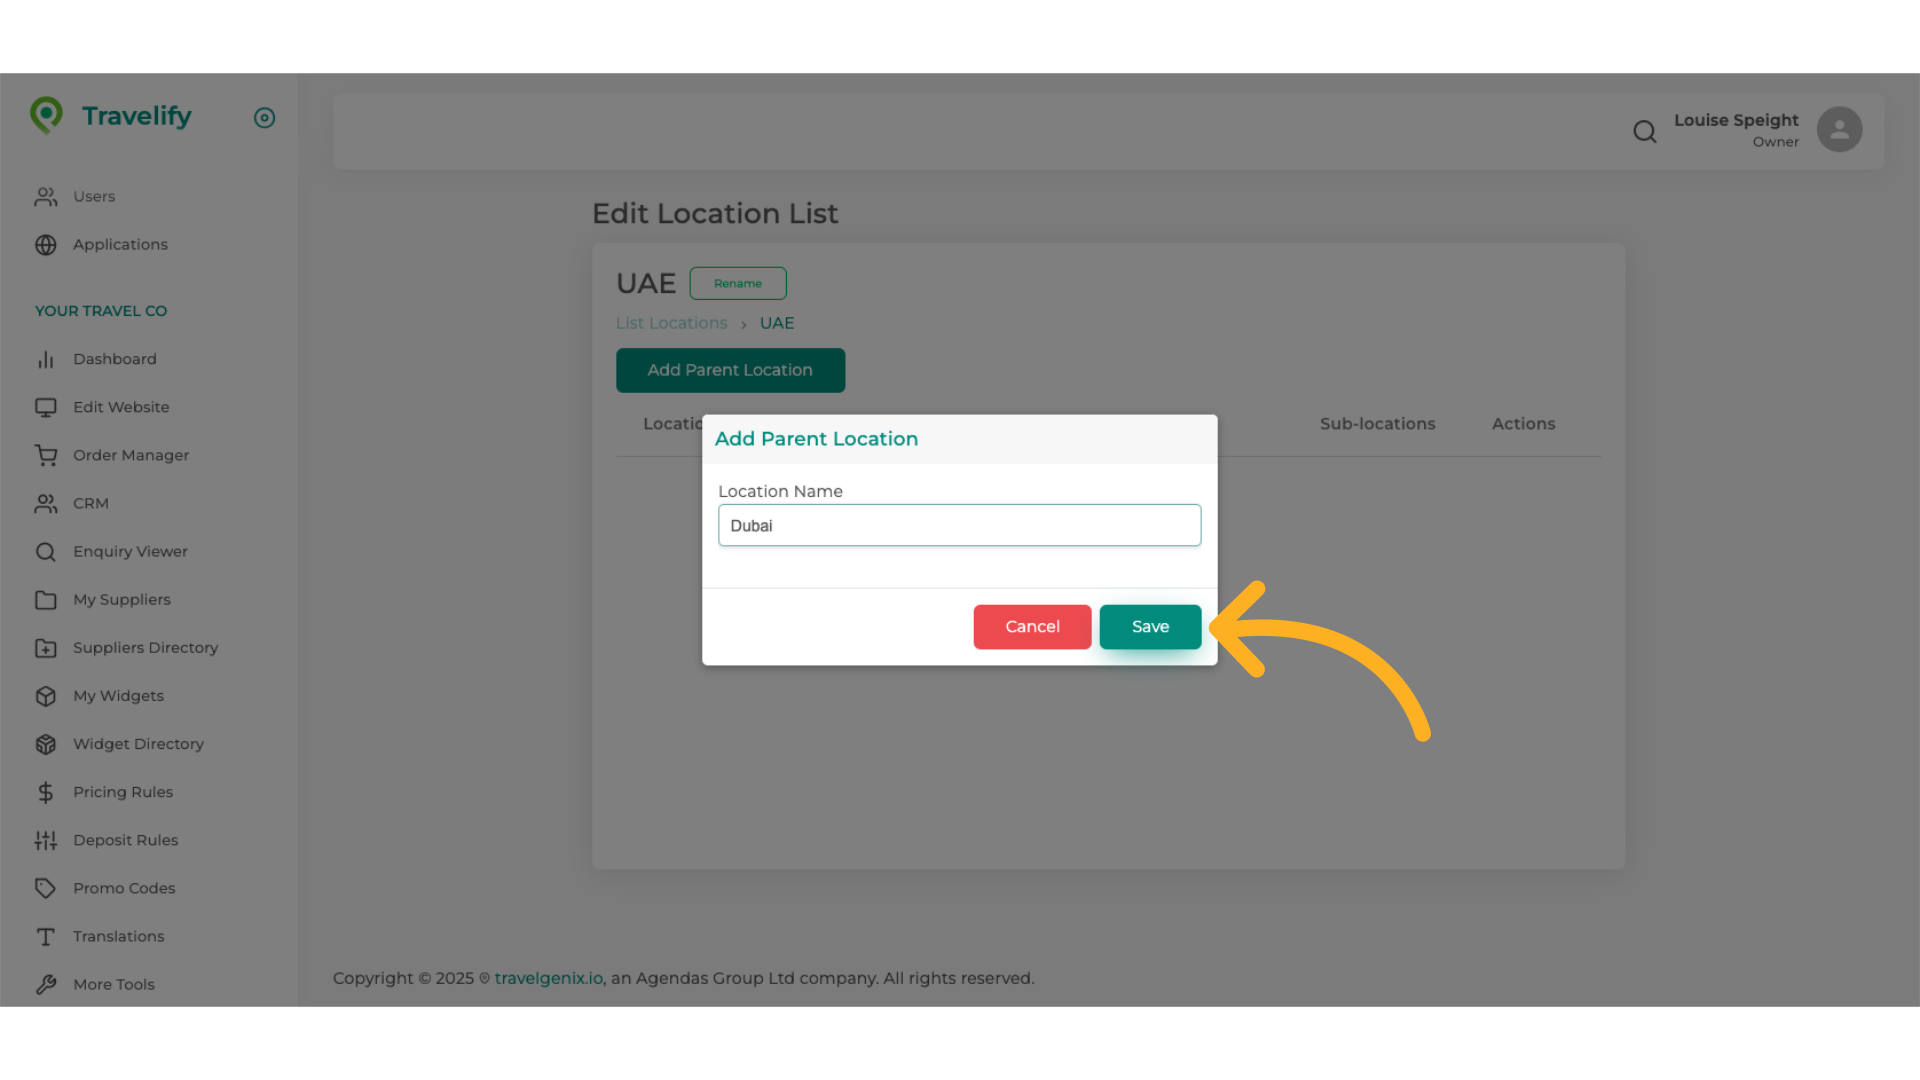
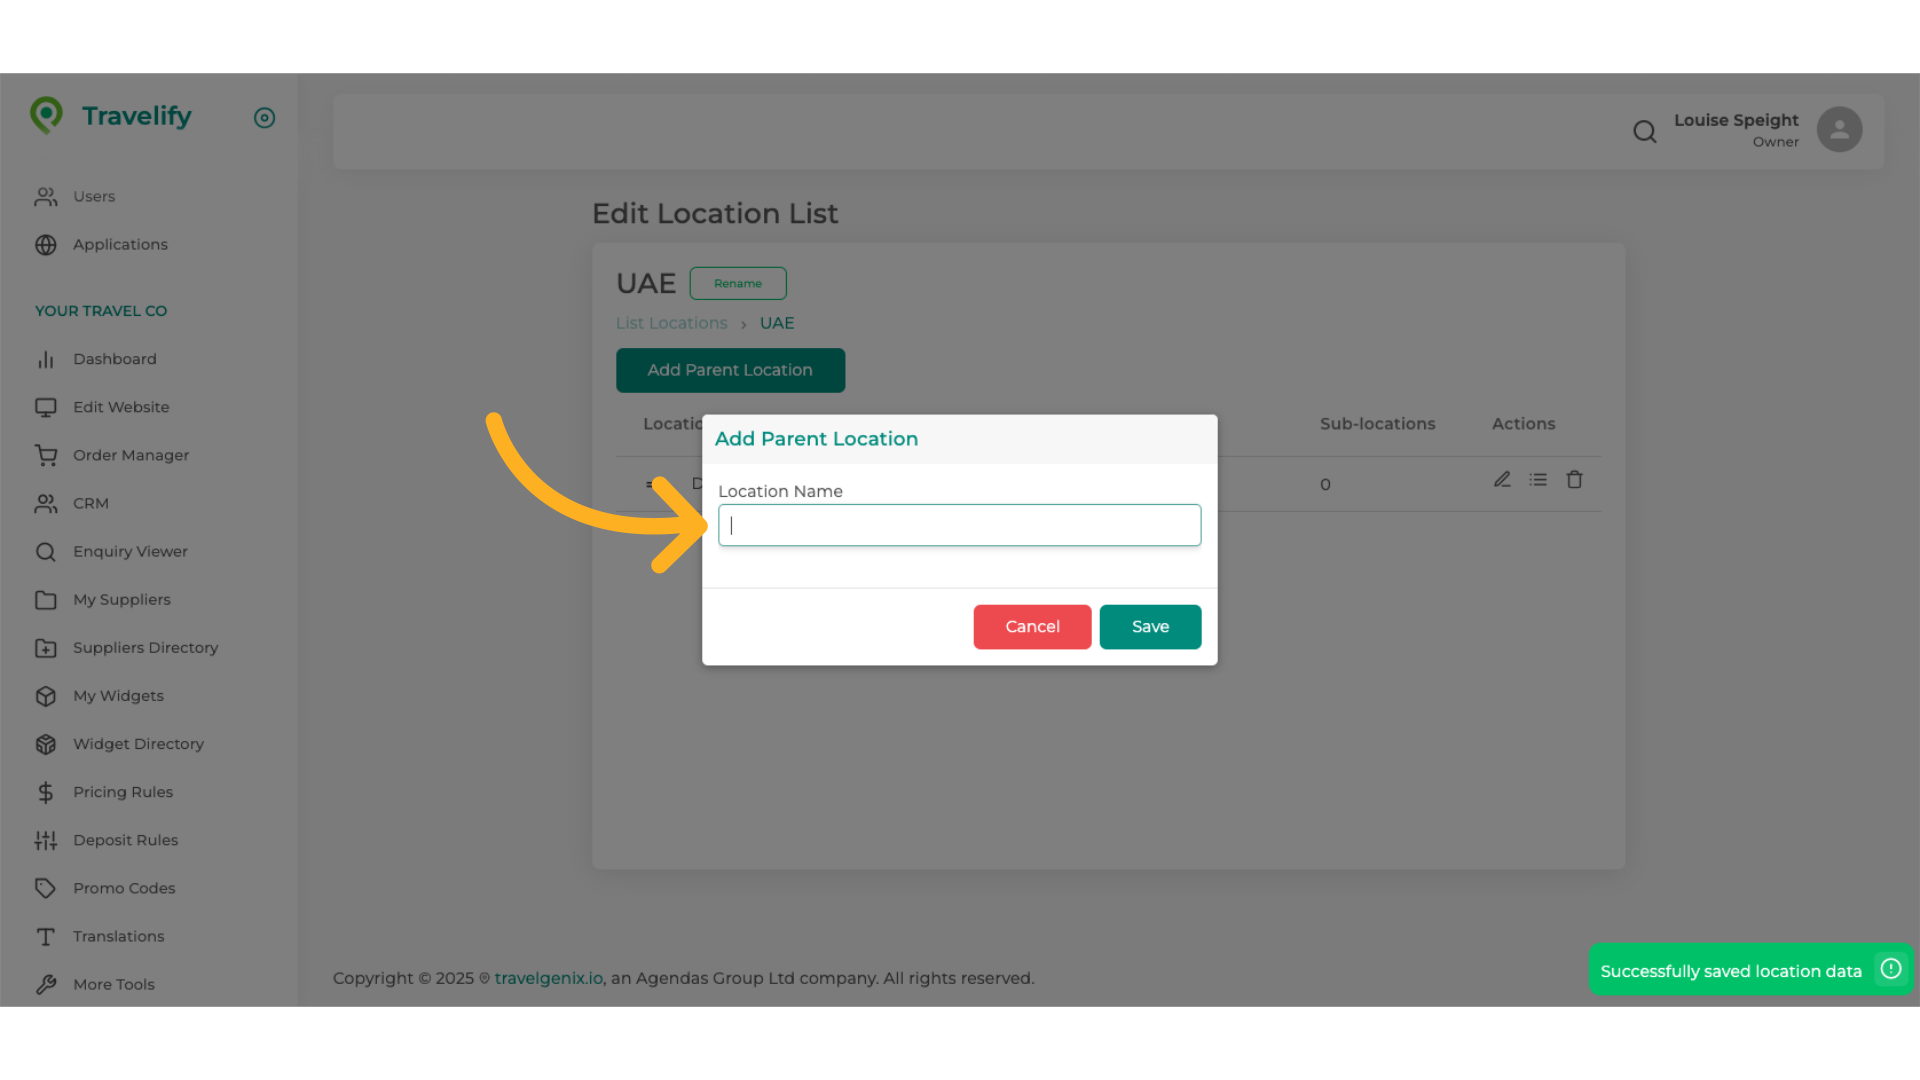
12. Click "Save"
Save the changes made.
13. Click "Add Parent Location
Lets create another Parent Location in the same way

14. Click here
Add desired name as before
15. Fill in name
Fill in the text box with "Abu Dhabi"
16. Click "Save"
Save the changes made.

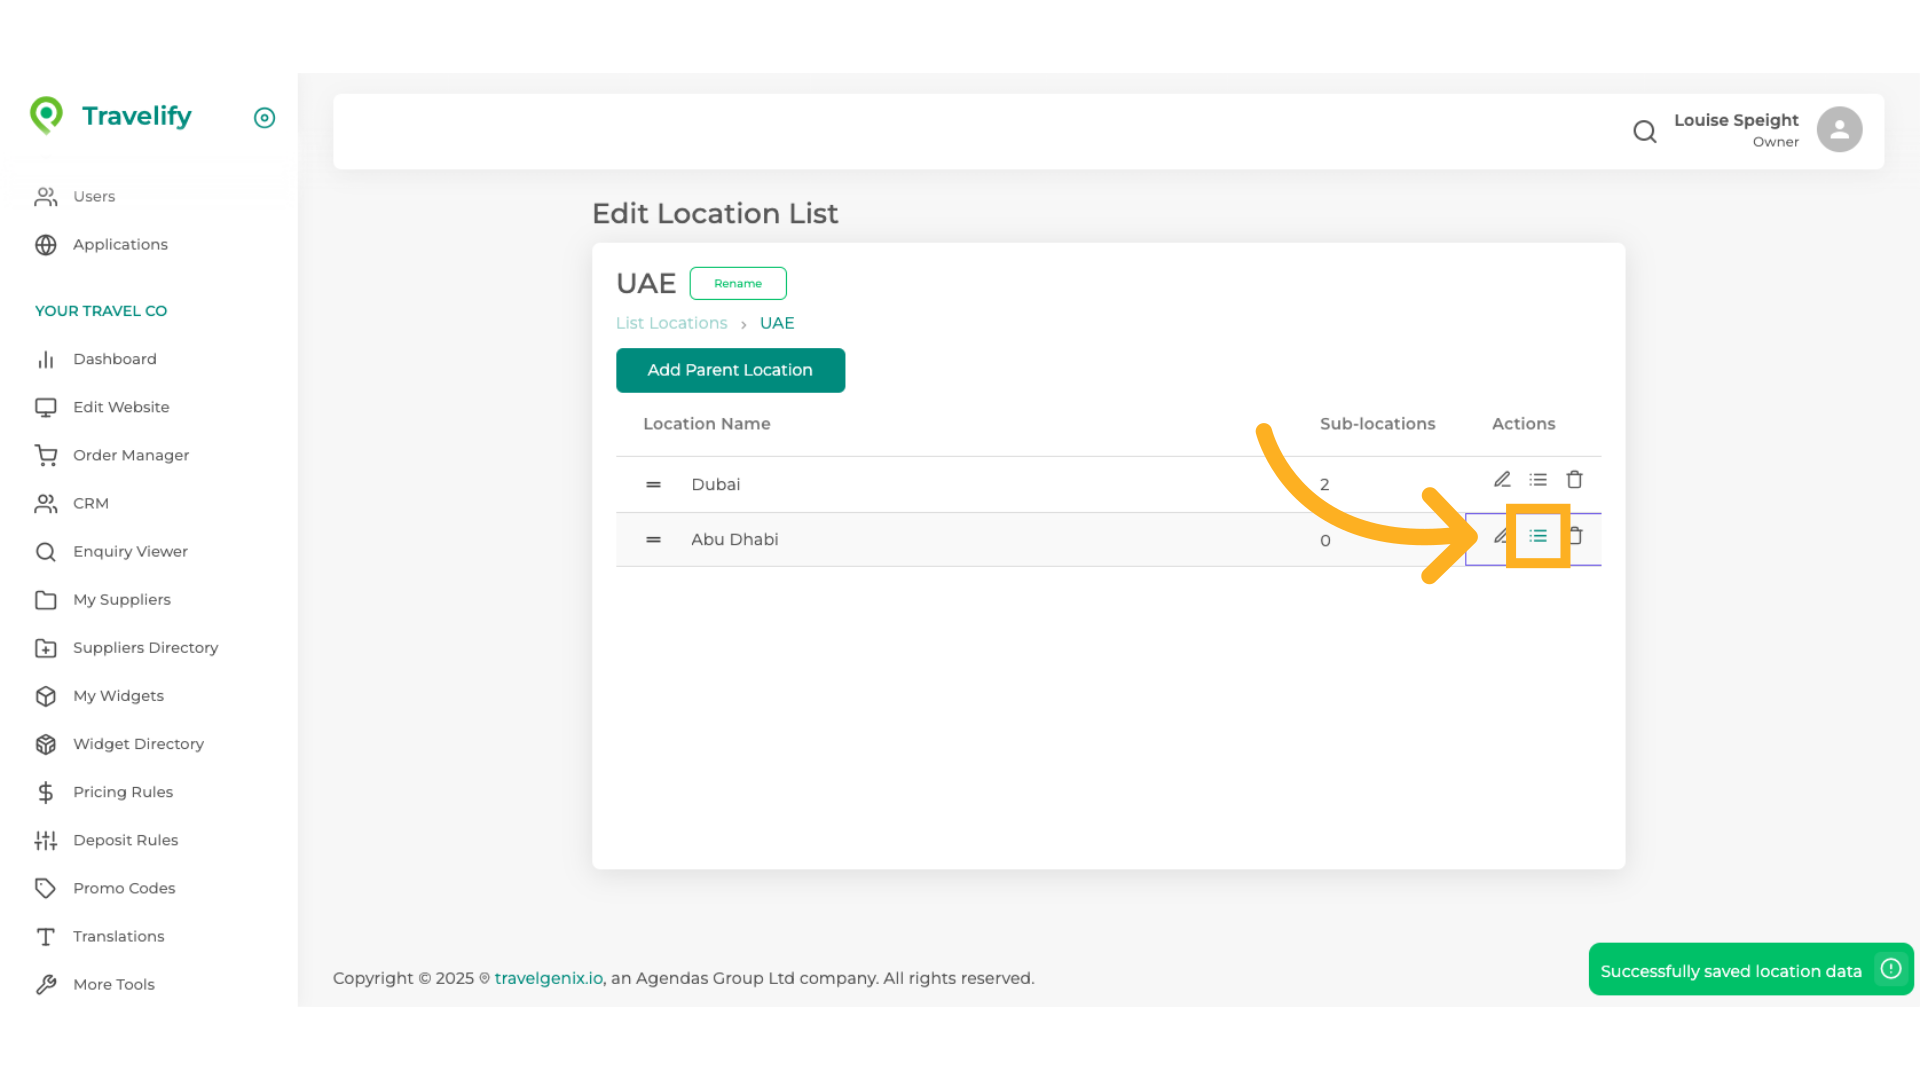
17. Now we can refine this list even further
Now we can refine this list even further, click on the burger to start this
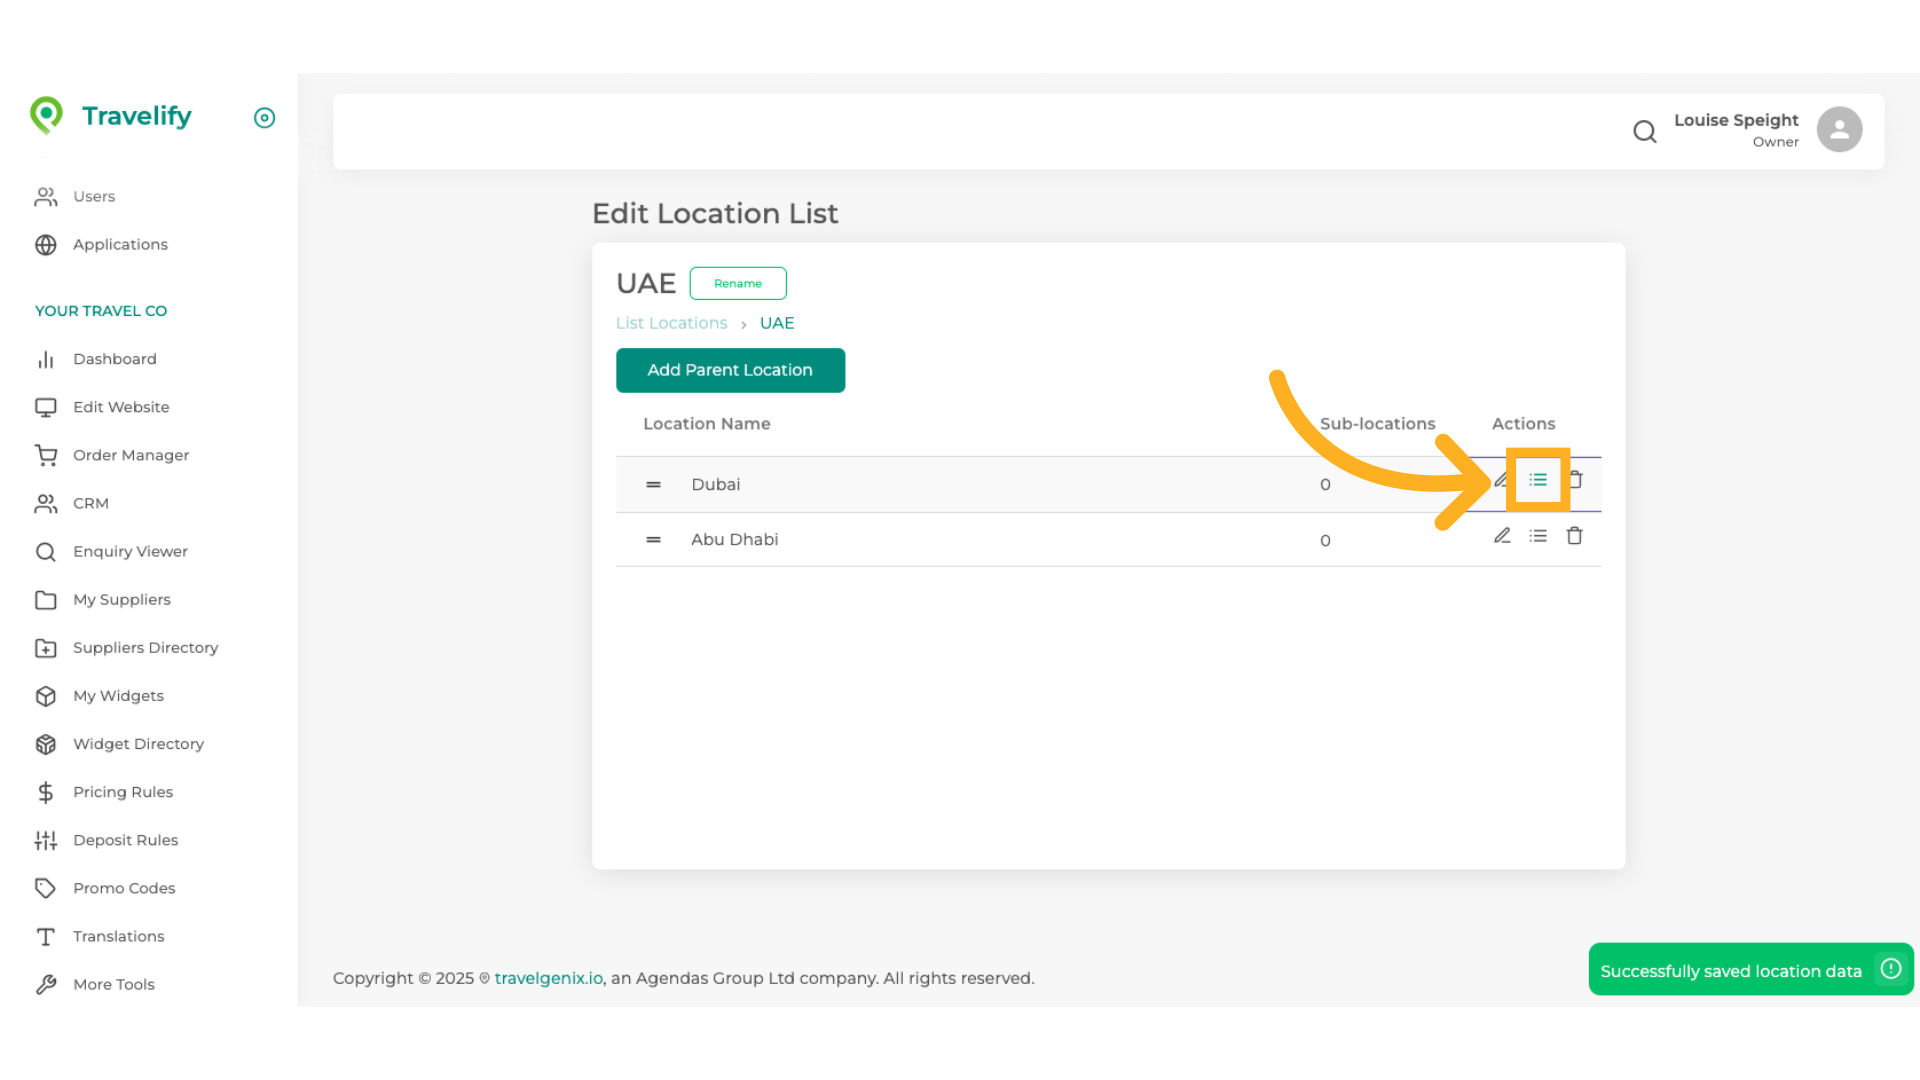
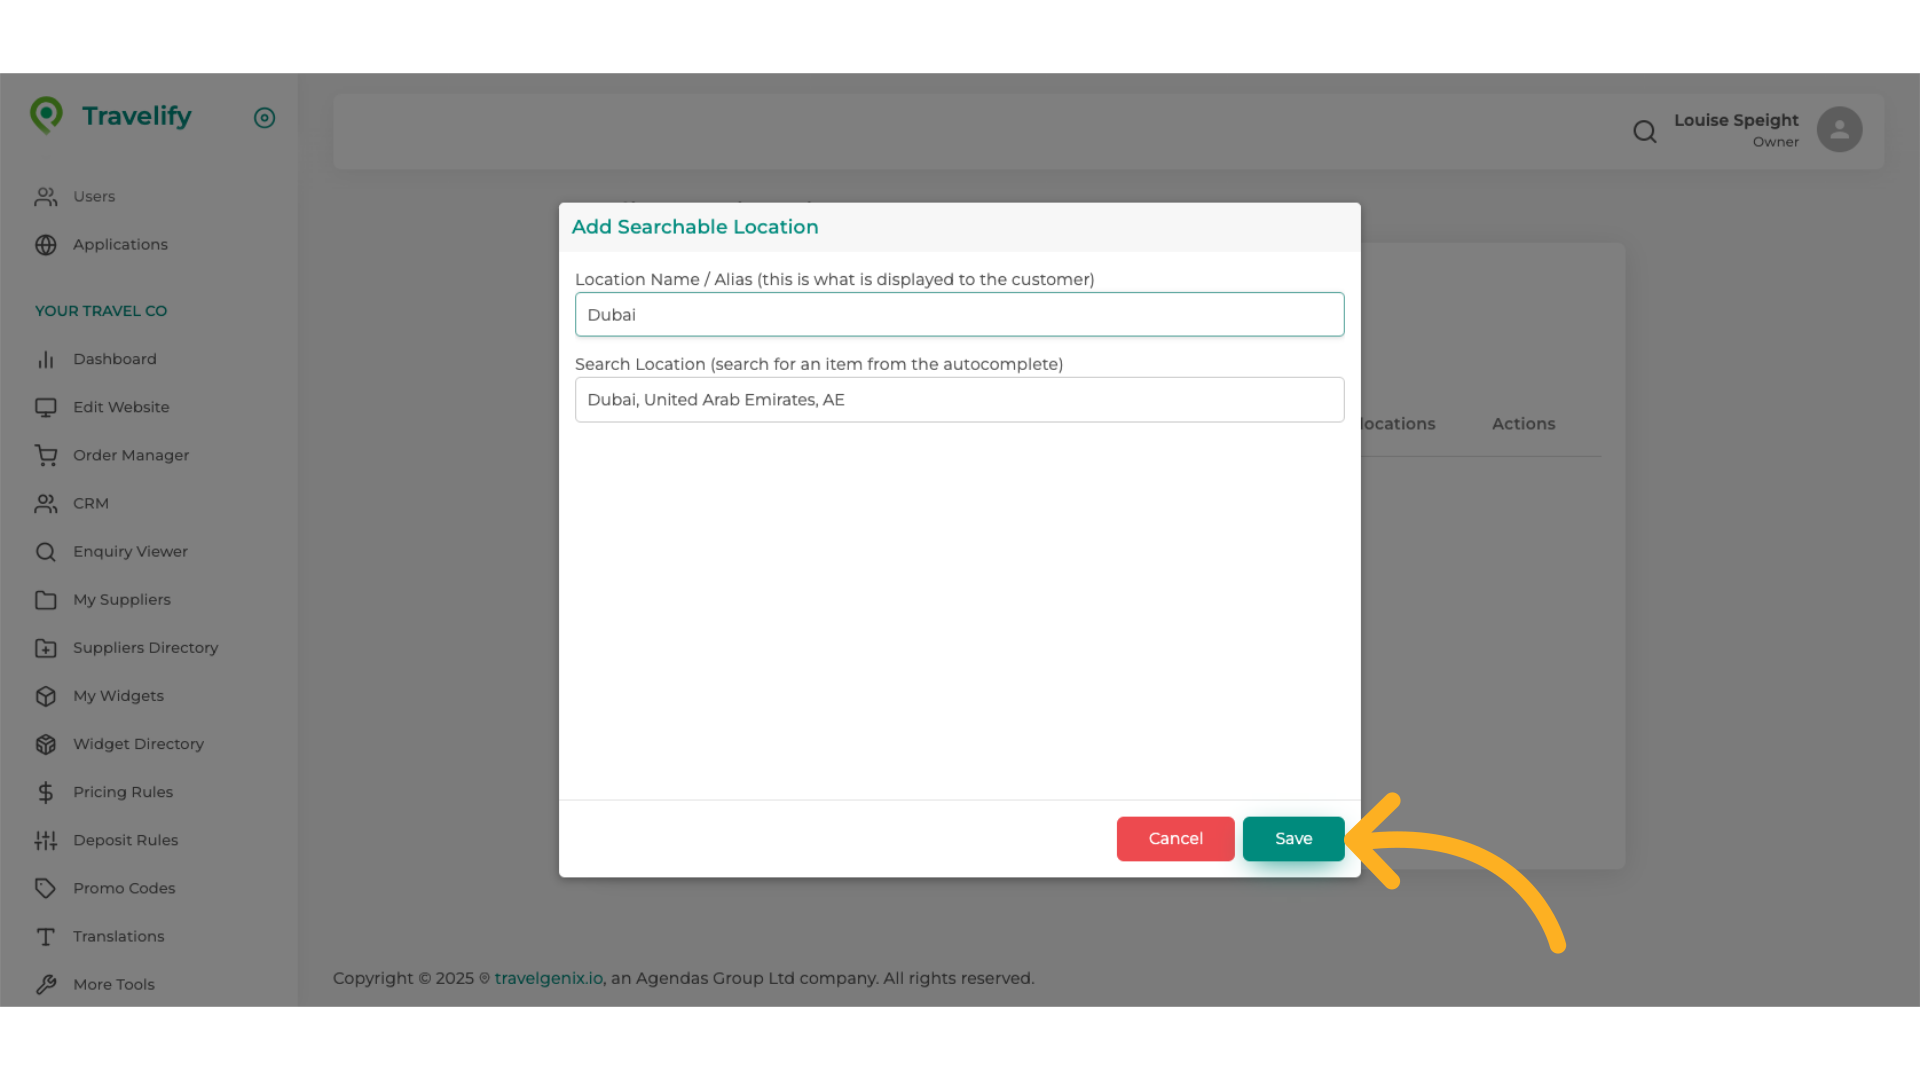
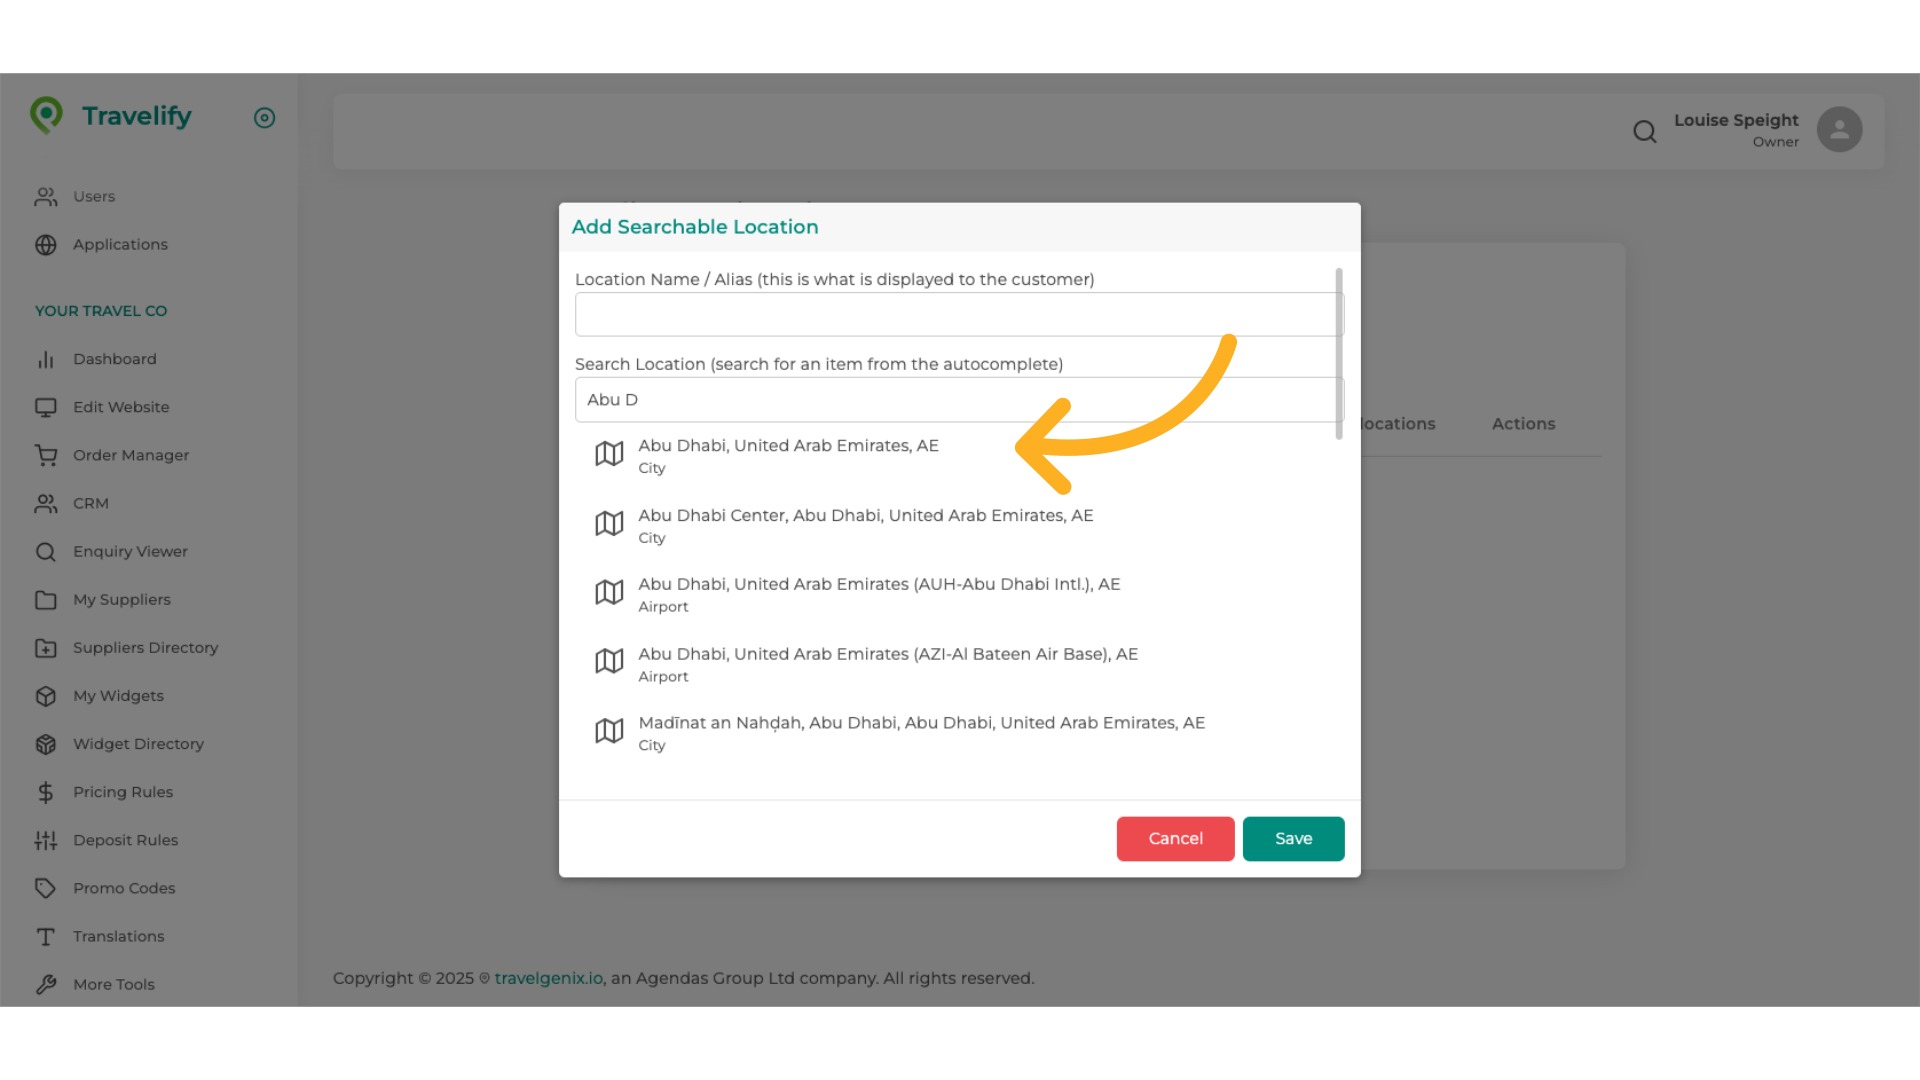
18. Click "Add Searchable Location"
We want to add Searchable Locations here

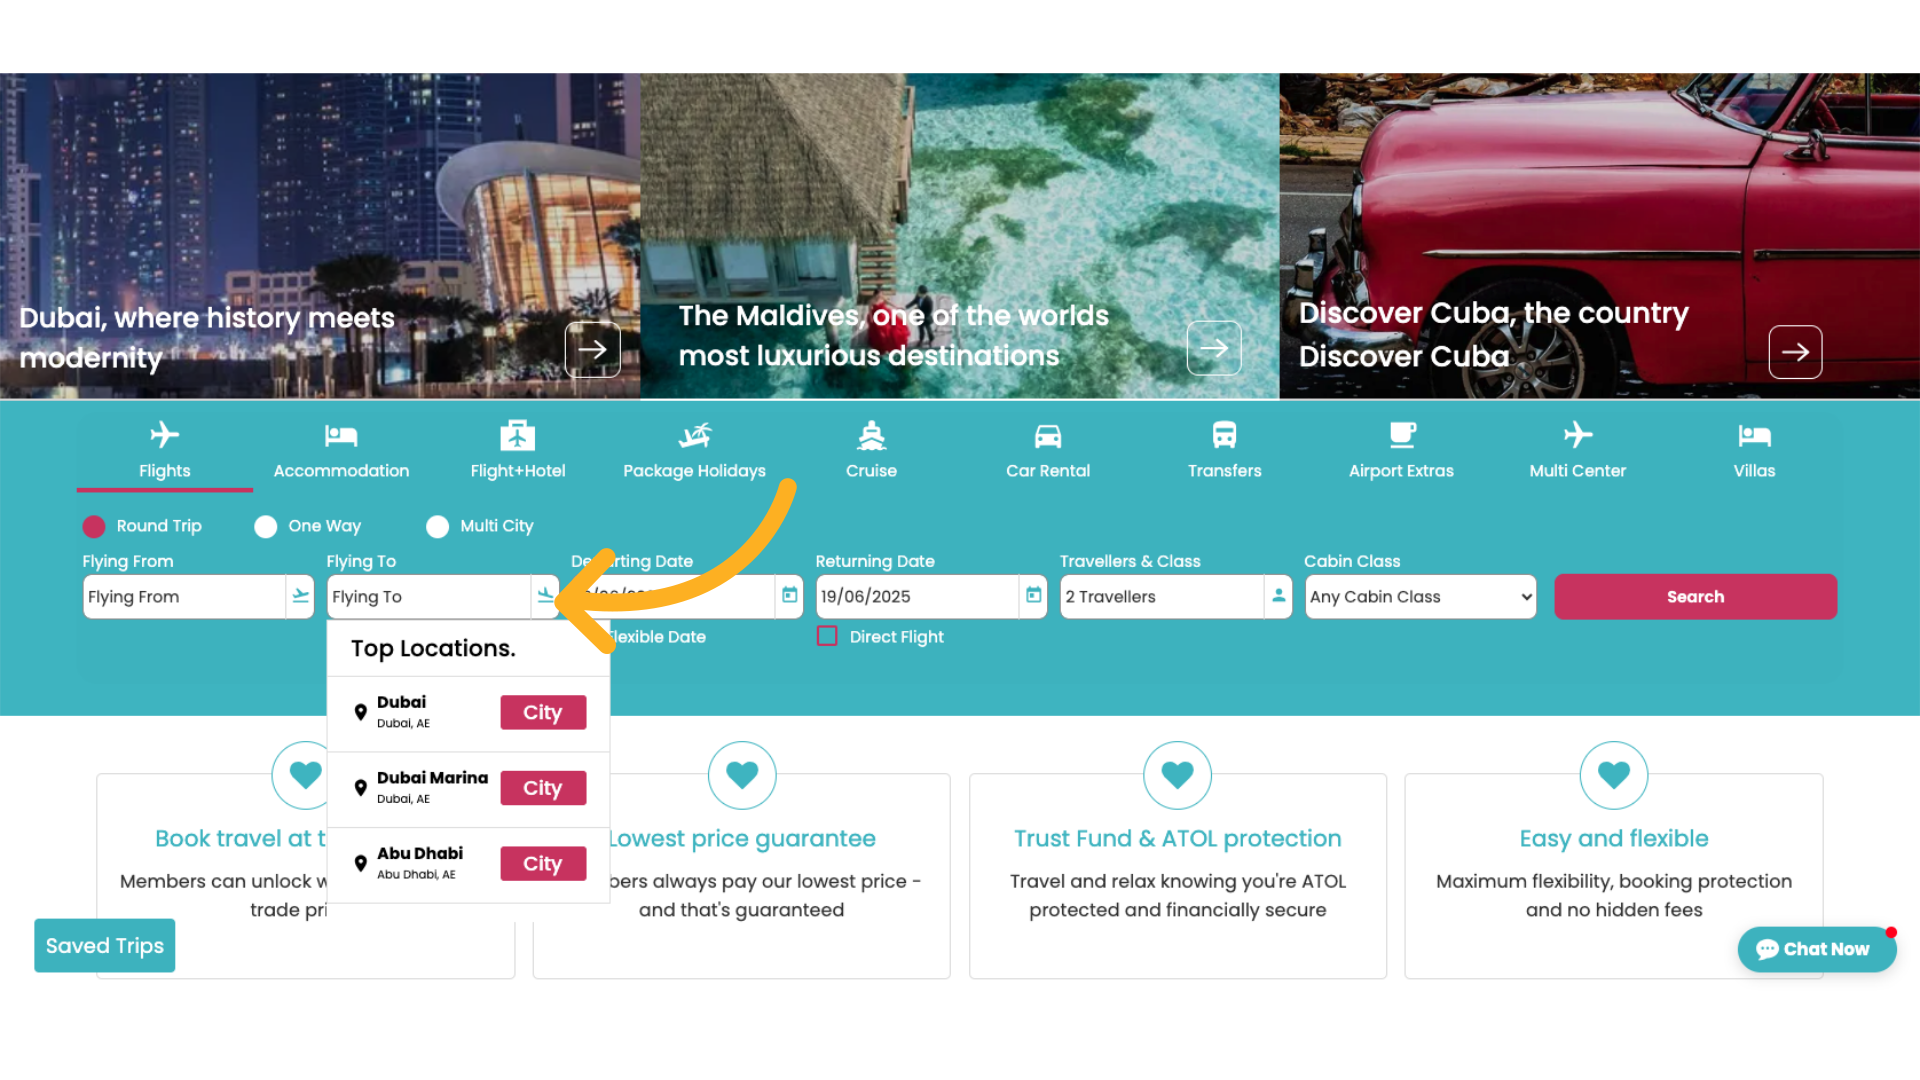
19. Click on the bottom box to select from the database
Click on the bottom box and start typing your desired location This list will populate from our database
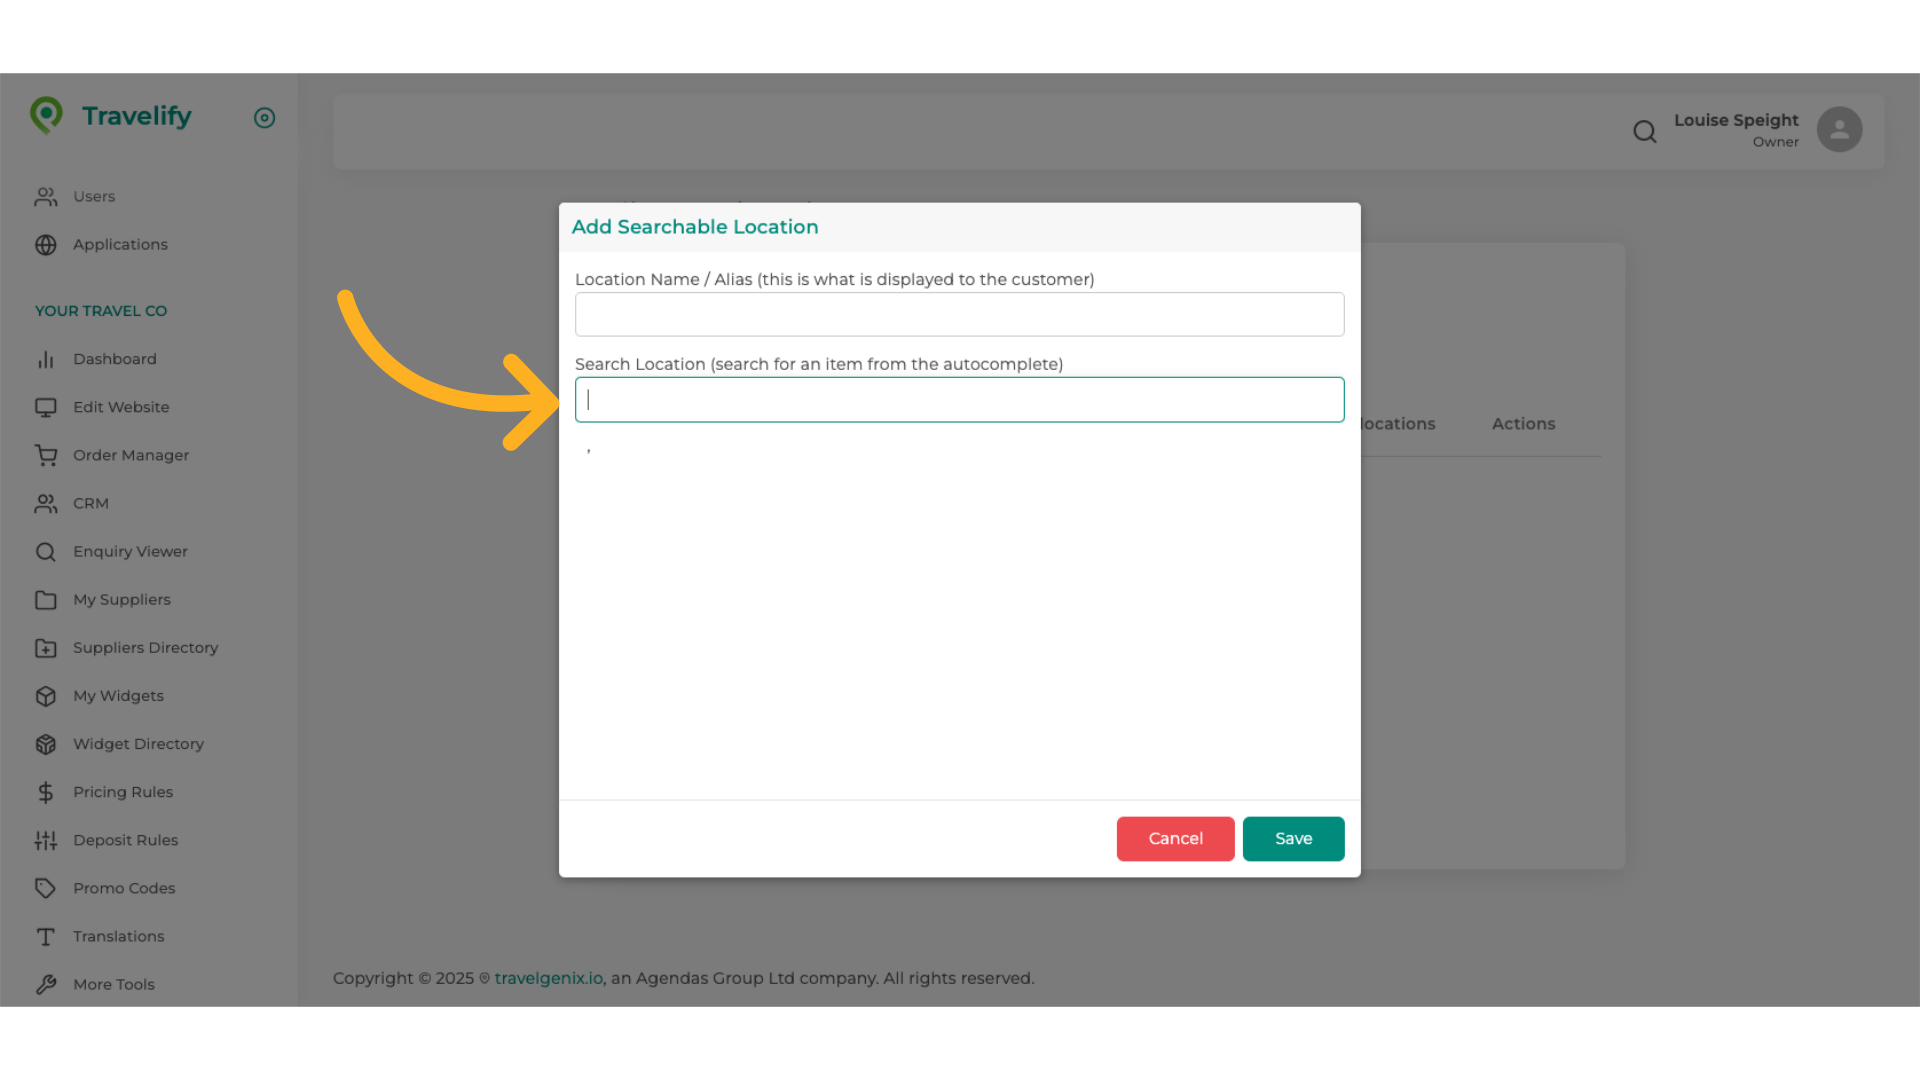
20. Fill in your desired name
Enter the desired location name
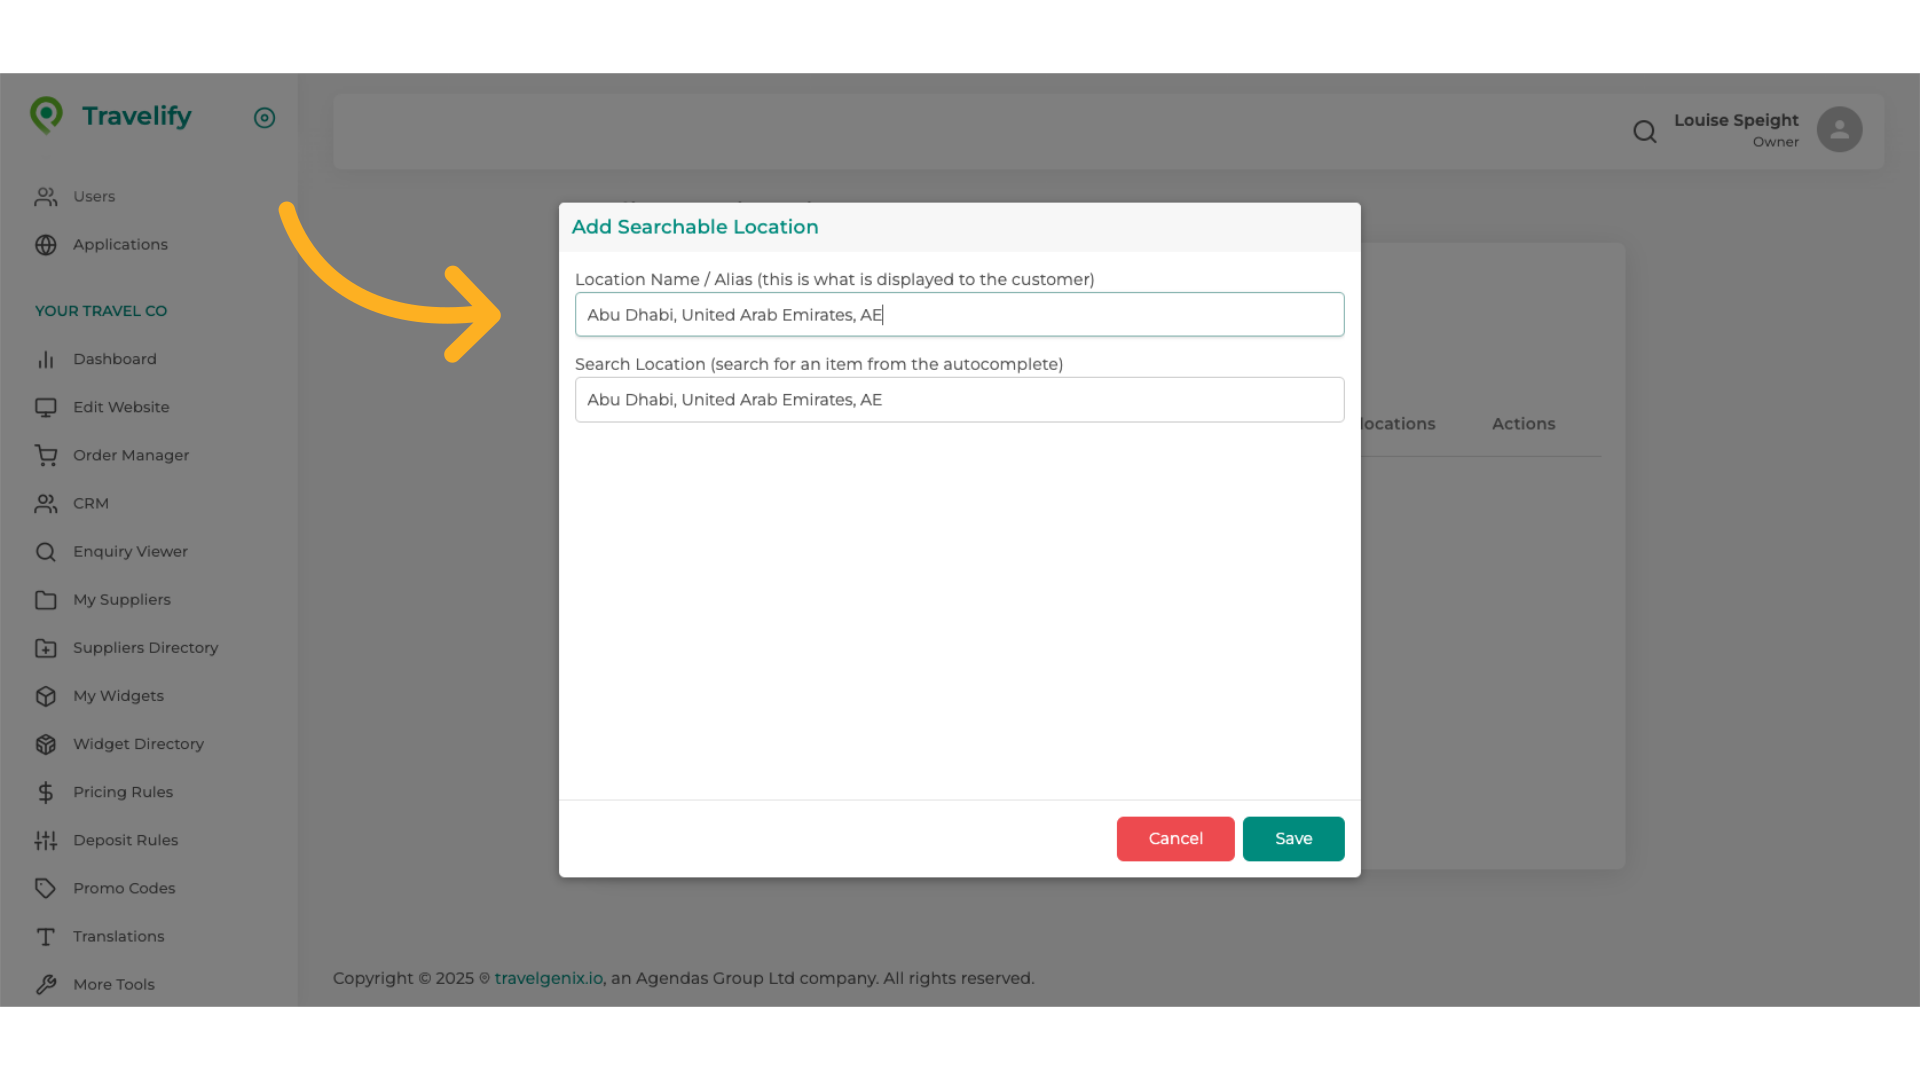
21. Make selection from the dropdown list
Make your selection from the dropdown list

22. Edit the top box as you wish, this is what the customer will see
Edit the top box as you wish, this is what will appear on your website and the text the customer will see

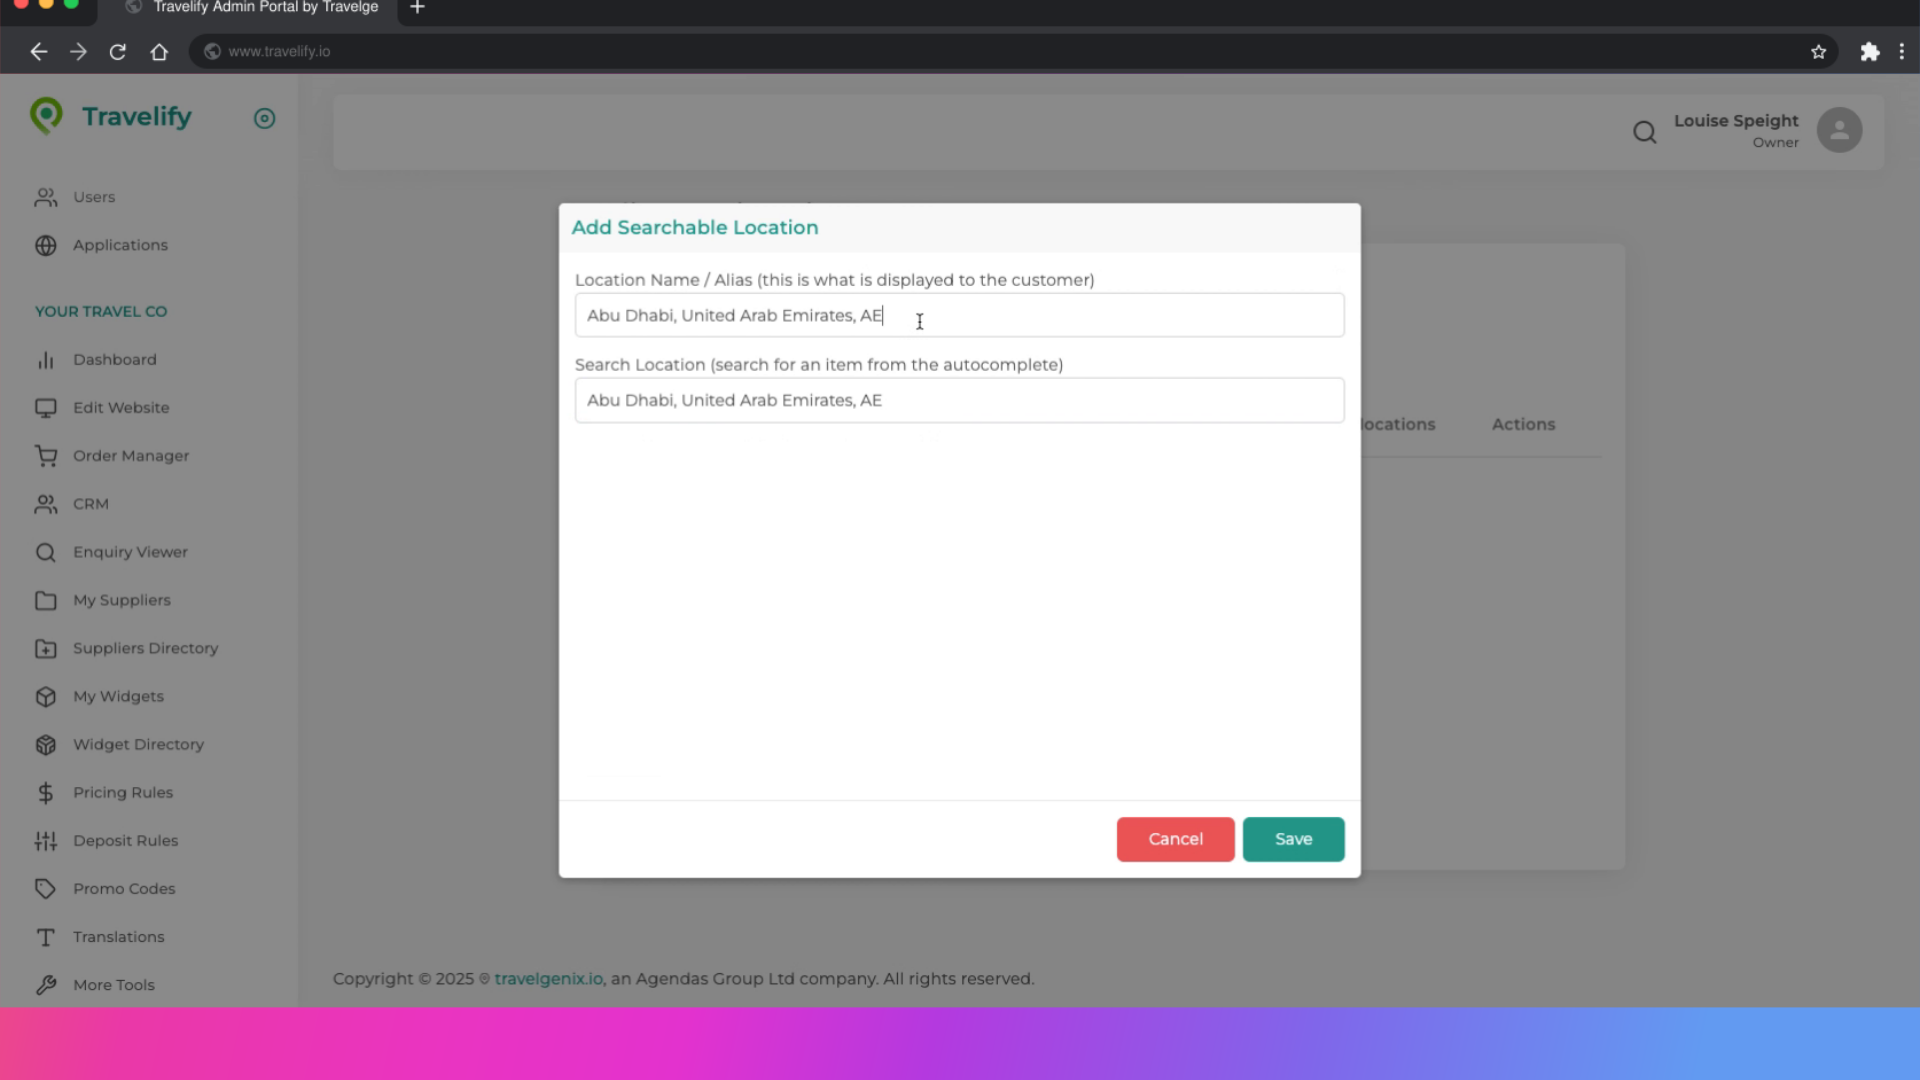
23. Edit text
Type "Dubai" in the given field

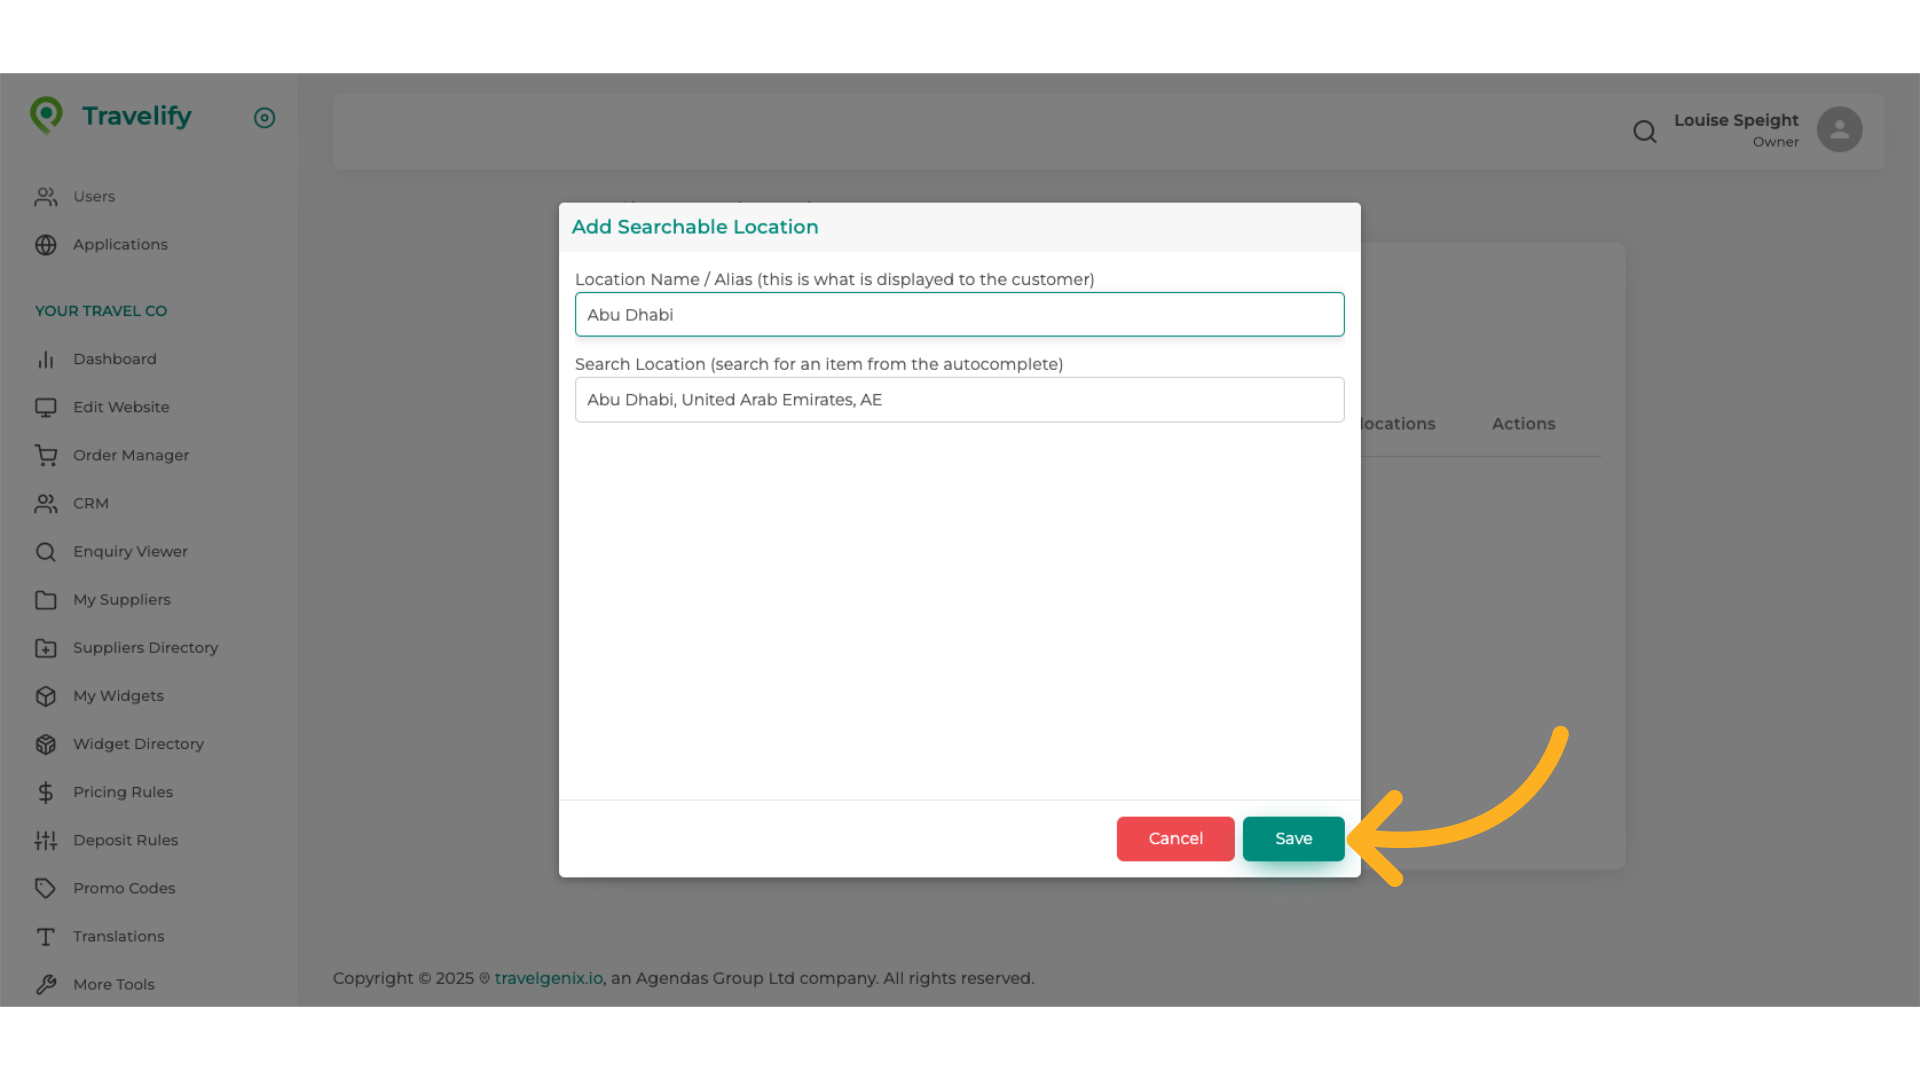
24. Click "Save"
Save the changes made.
25. Lets add another Searchable Location for this Parent
Lets add another Searchable Location for this Parent in the same way
26. Click here
Start typing name of location required
27. Start typing name
Input "Dubai Ma" in the available field
28. Select name from the dropdown list
Make selection from the dropdown list
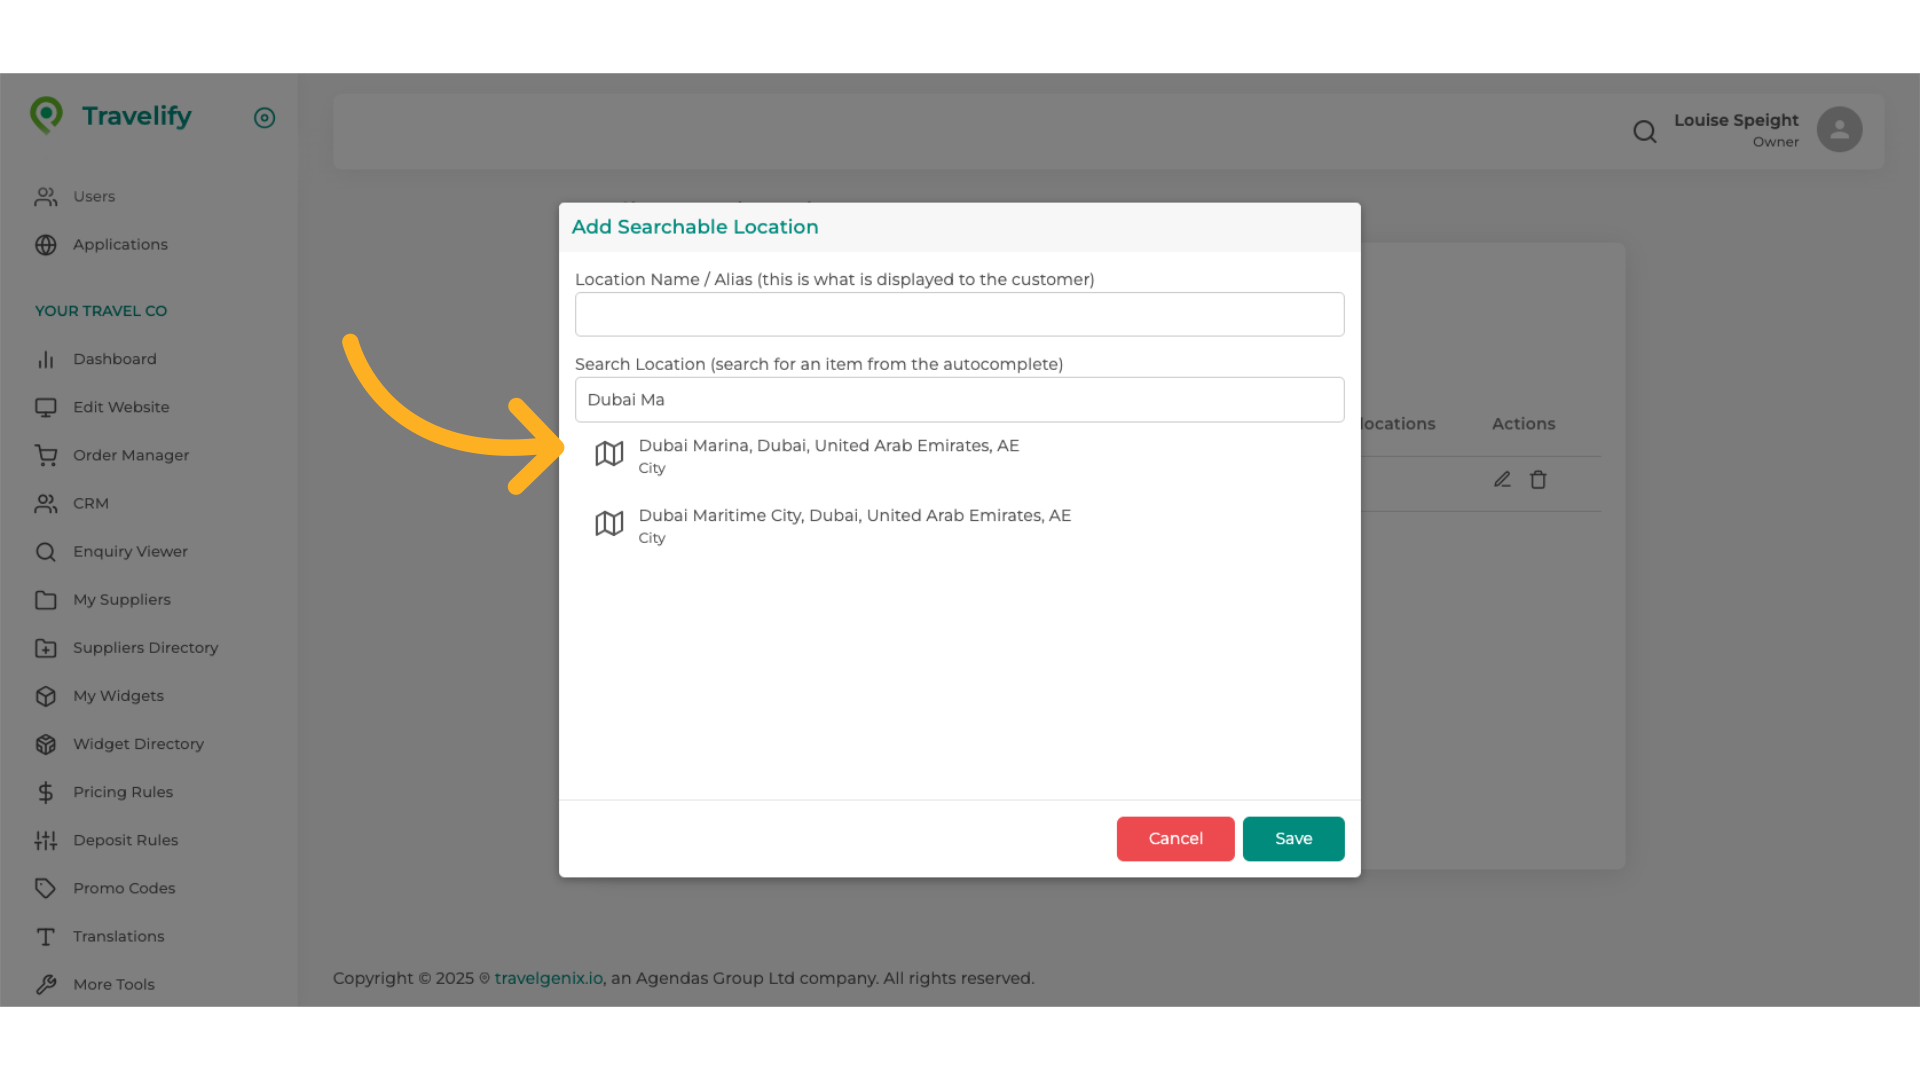
29. Edit name
Choose Dubai Marina, Dubai, United Arab Emirates, AE as the location.

30. Change name that will appear on site
Edit name as desired

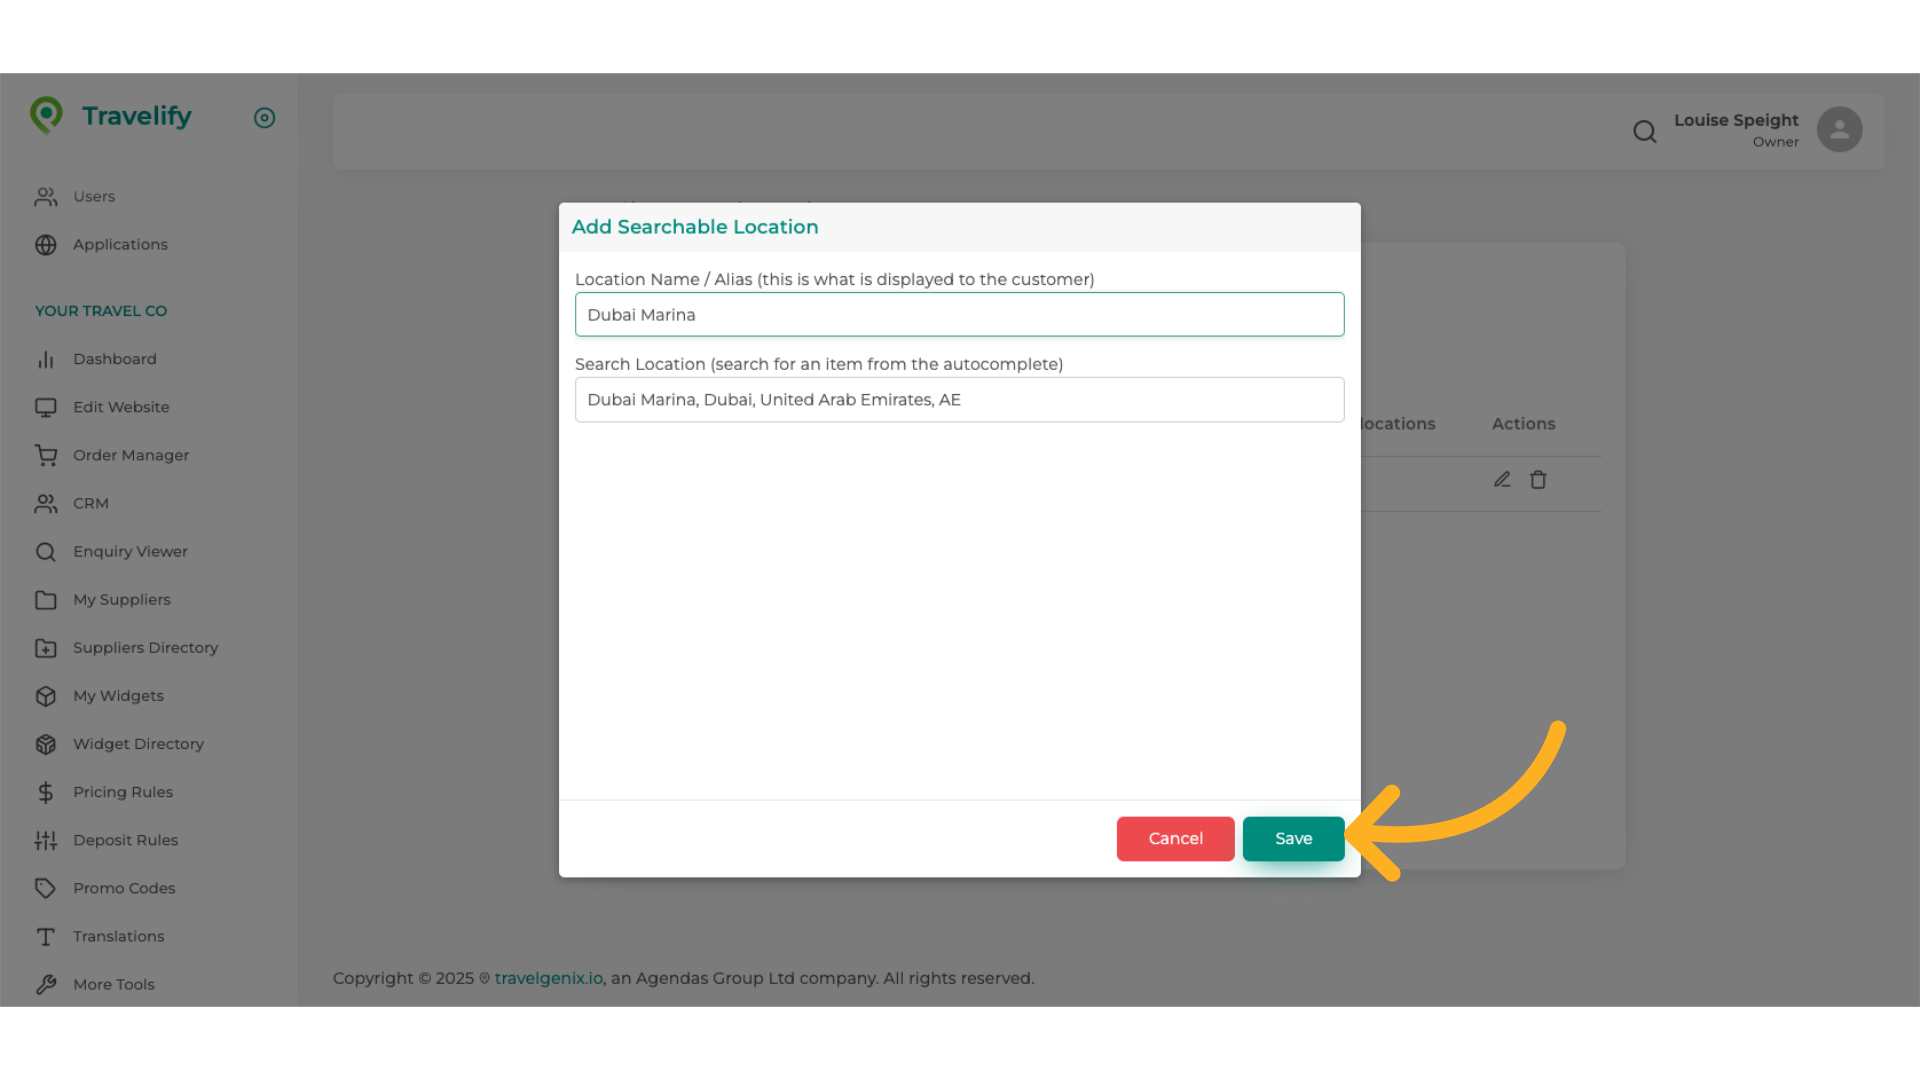
31. Click "Save"
Save the changes made.
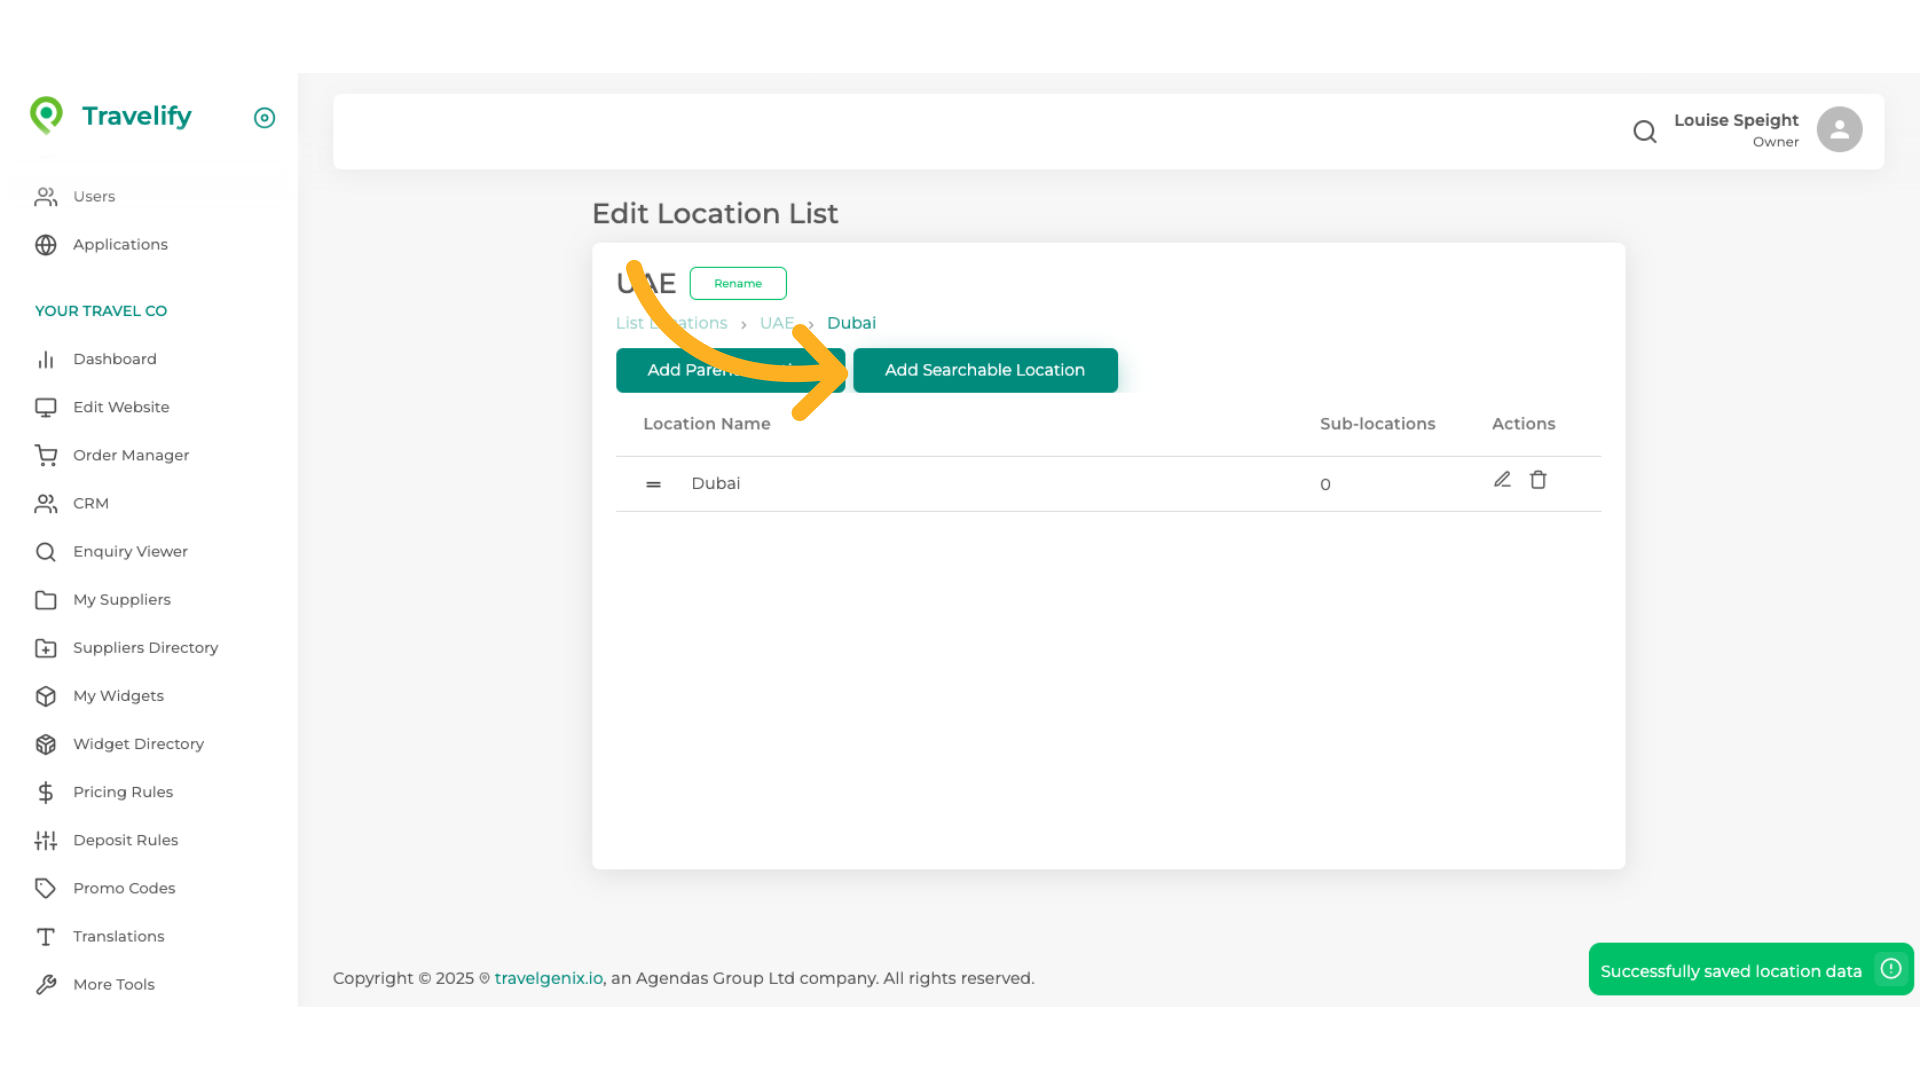
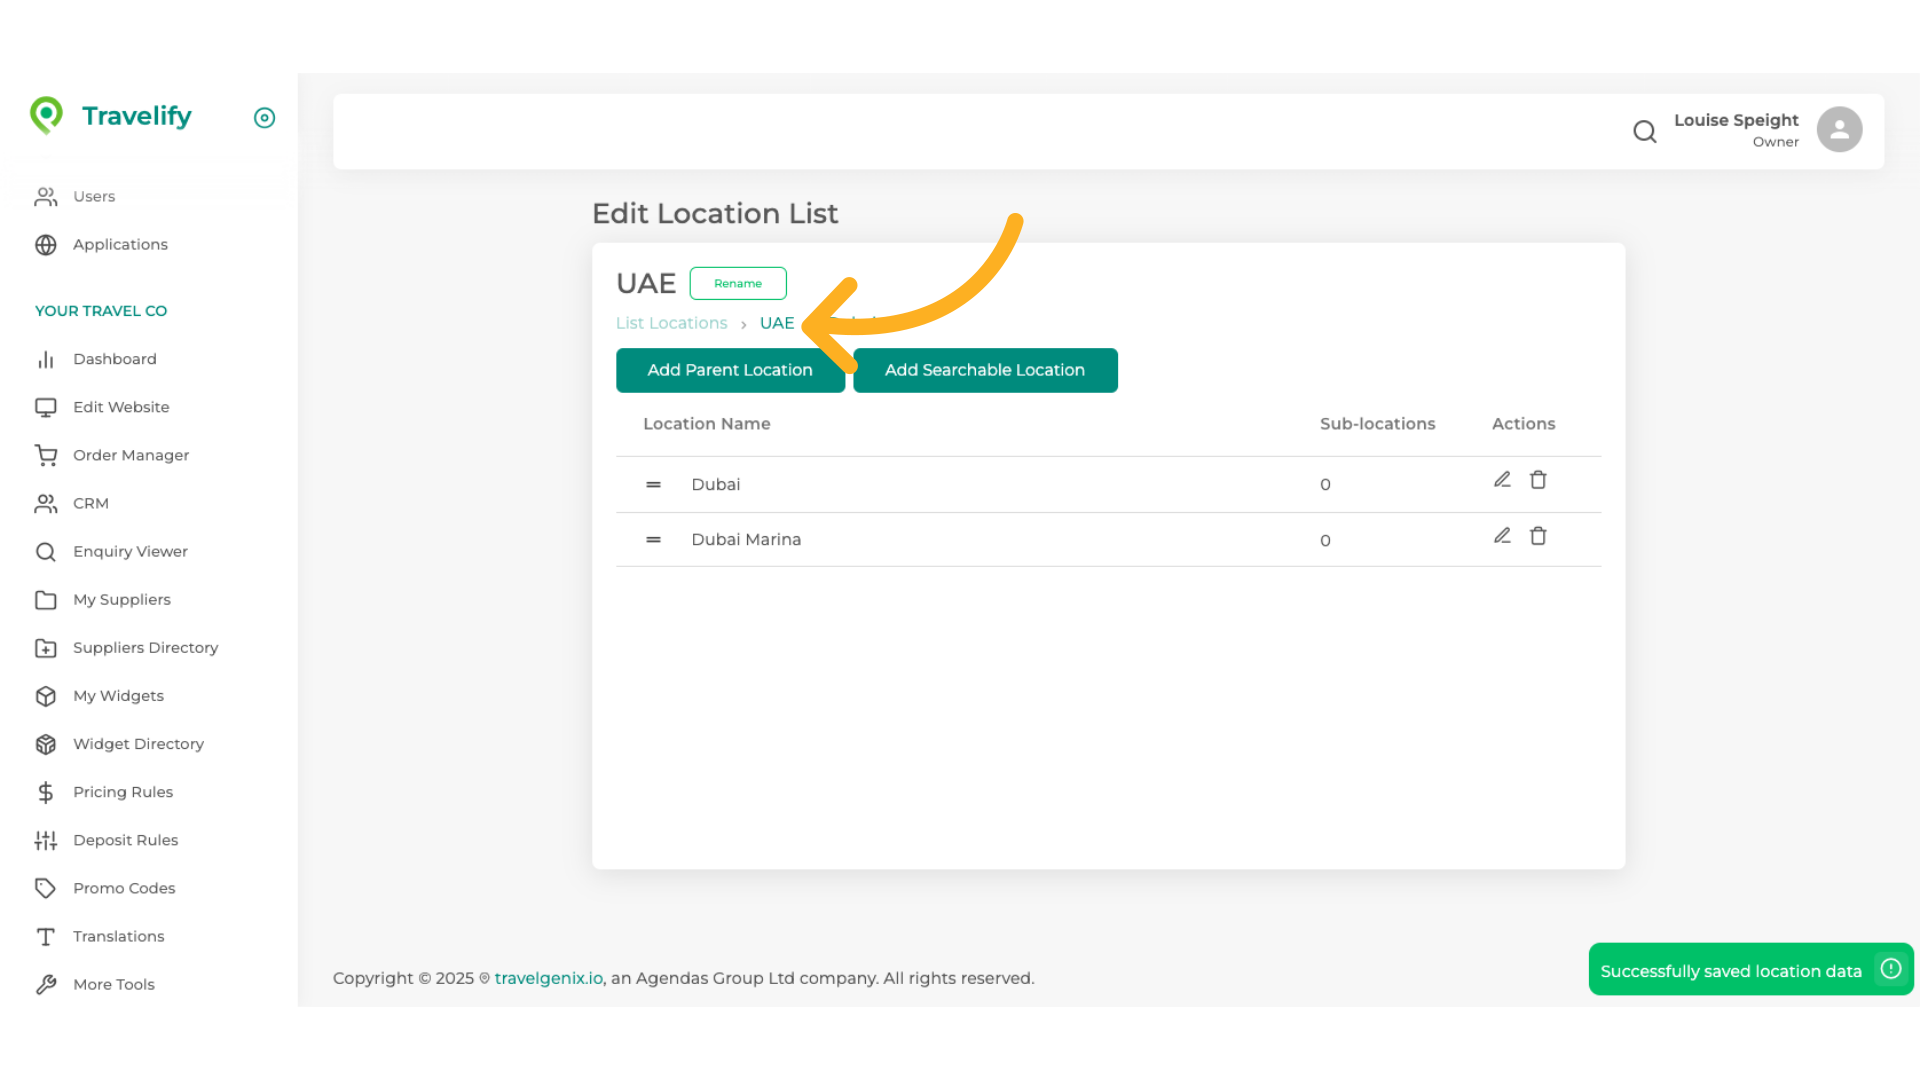
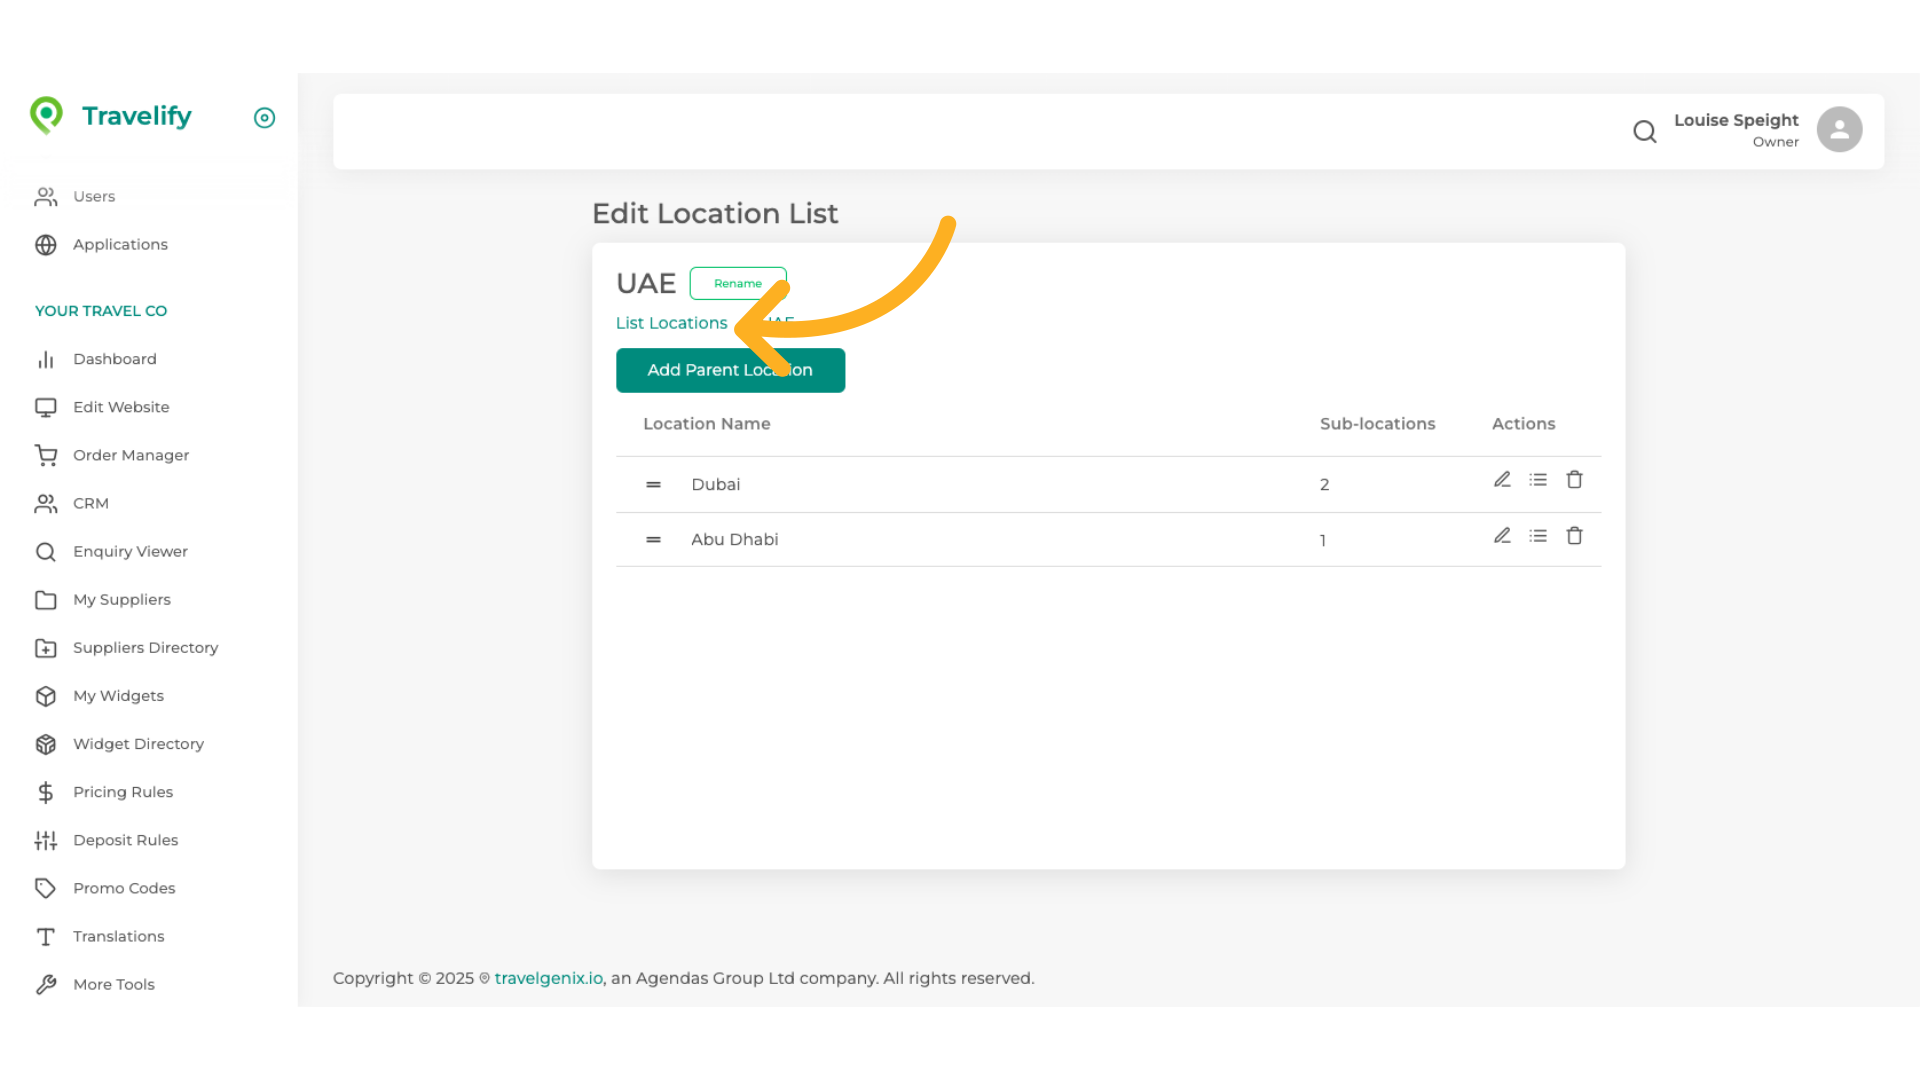
32. Click onto the Main Parent Location
Click onto the Main Parent Location to navigate back to your lis
33. Now lets create a Searchable Location for another Parent Location
Now lets create a Searchable Location for another Parent Location Again click on the burger icon
34. Click "Add Searchable Location"
Click on Add Searchable Location.

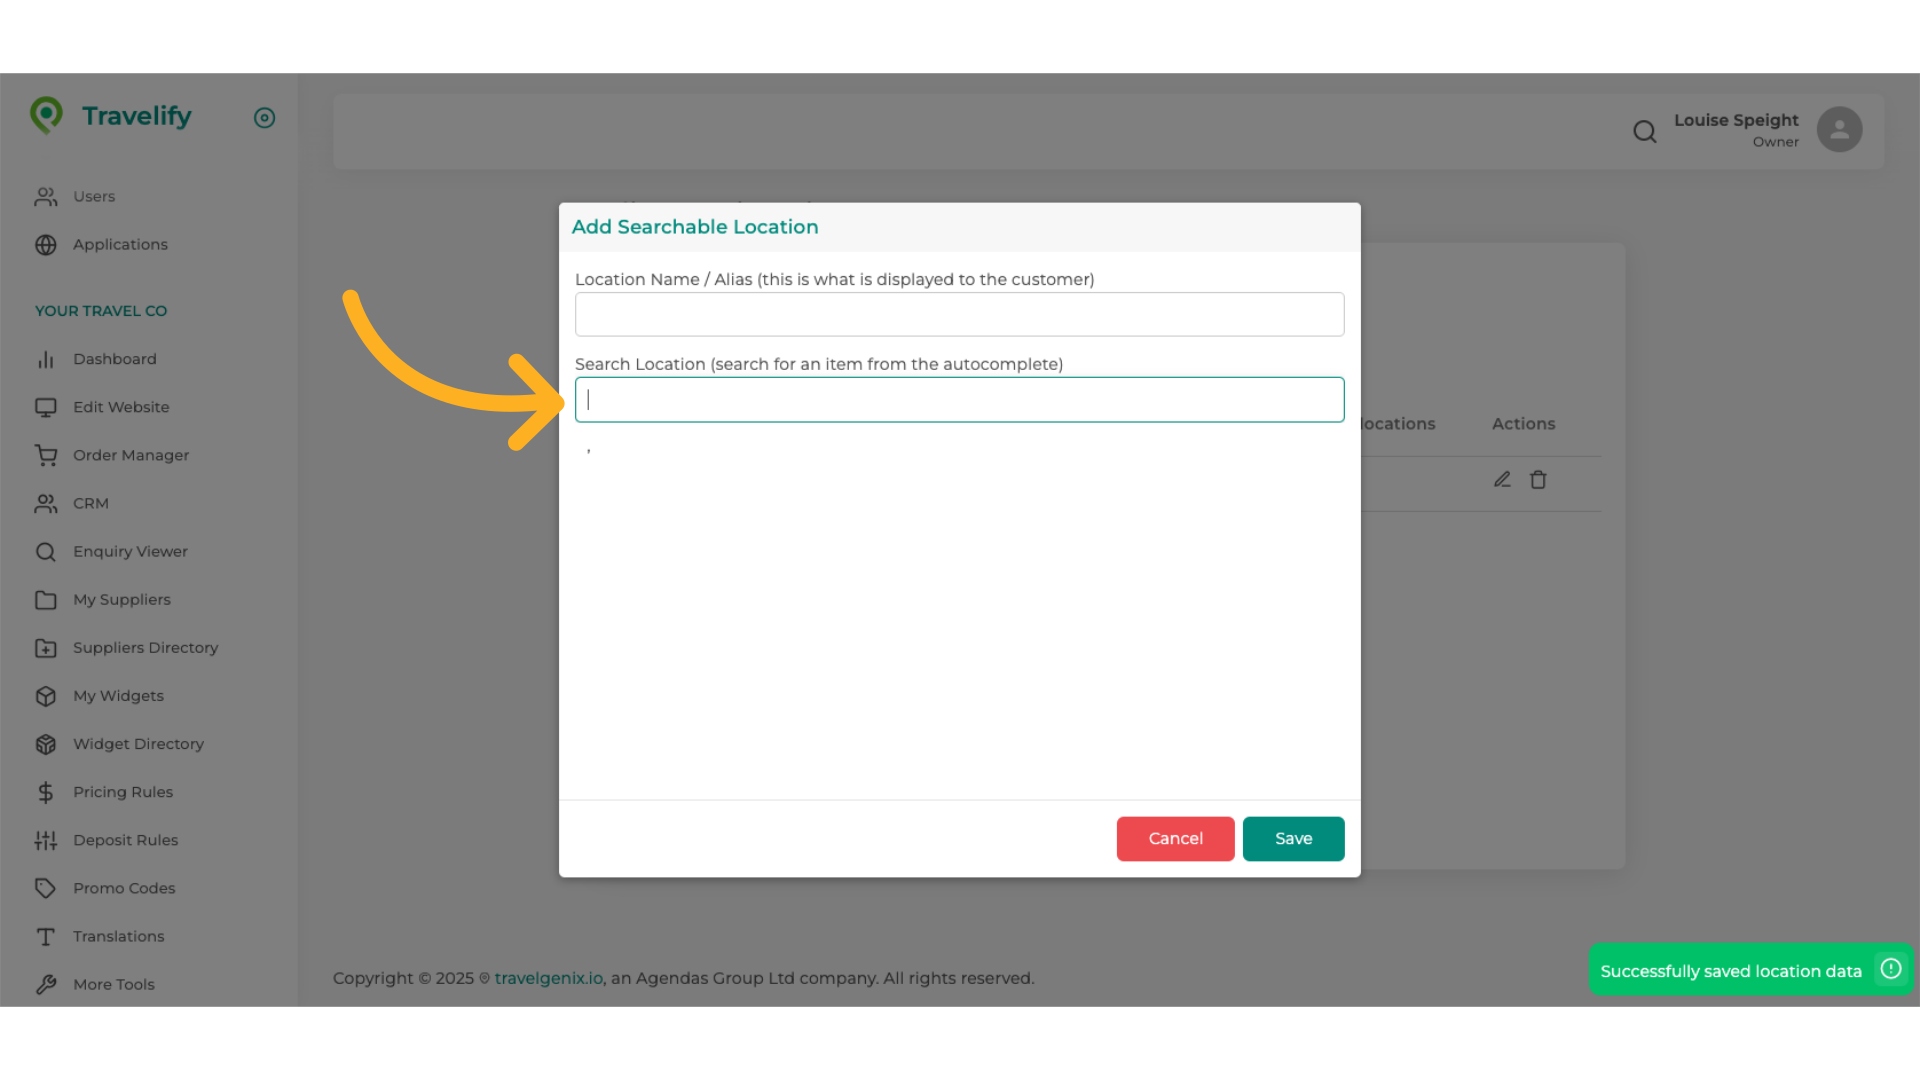
35. Click here to make your selection from the database
Click here to make your selection from the database

36. Start typing desired location name
Start typing desired location name, a list will start to appear which is populated from our database

37. Make selection from the dropdown list
Make yourselection from the dropdown list
38. Edit the top box to the name you wish to appear on your website
Edit the top box to the name you wish to appear on your website, remembering this is what the customer will see
39. Edit name
Input the desired text
40. Click "Save"
Save the changes made.
41. Click here to navigate back to your list
Click here to navigate back to your list
42. Click here to go back to your Main Parent Location Listing
Click here to access your Main Parent Location Listing
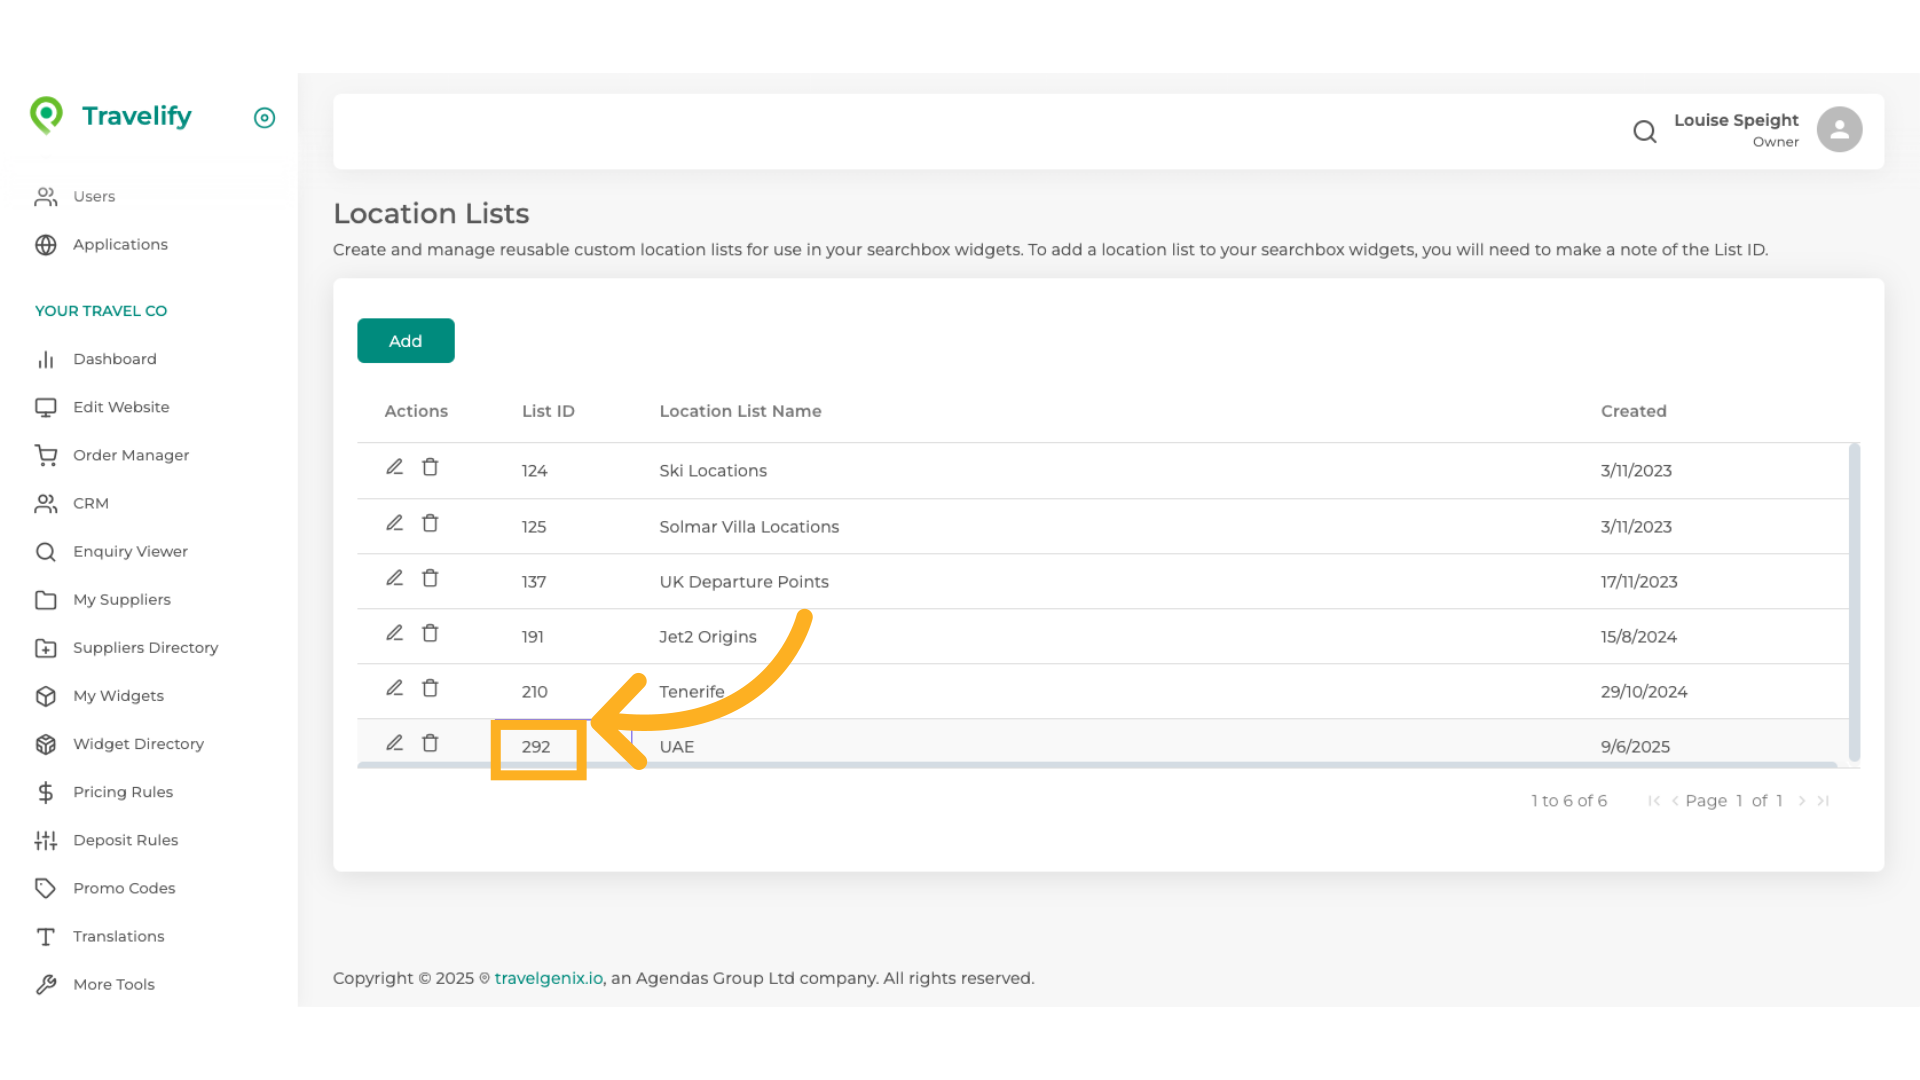
43. Make note of this List ID number as you will need it for the next step
Make note of this List ID number as you will need it for the next step
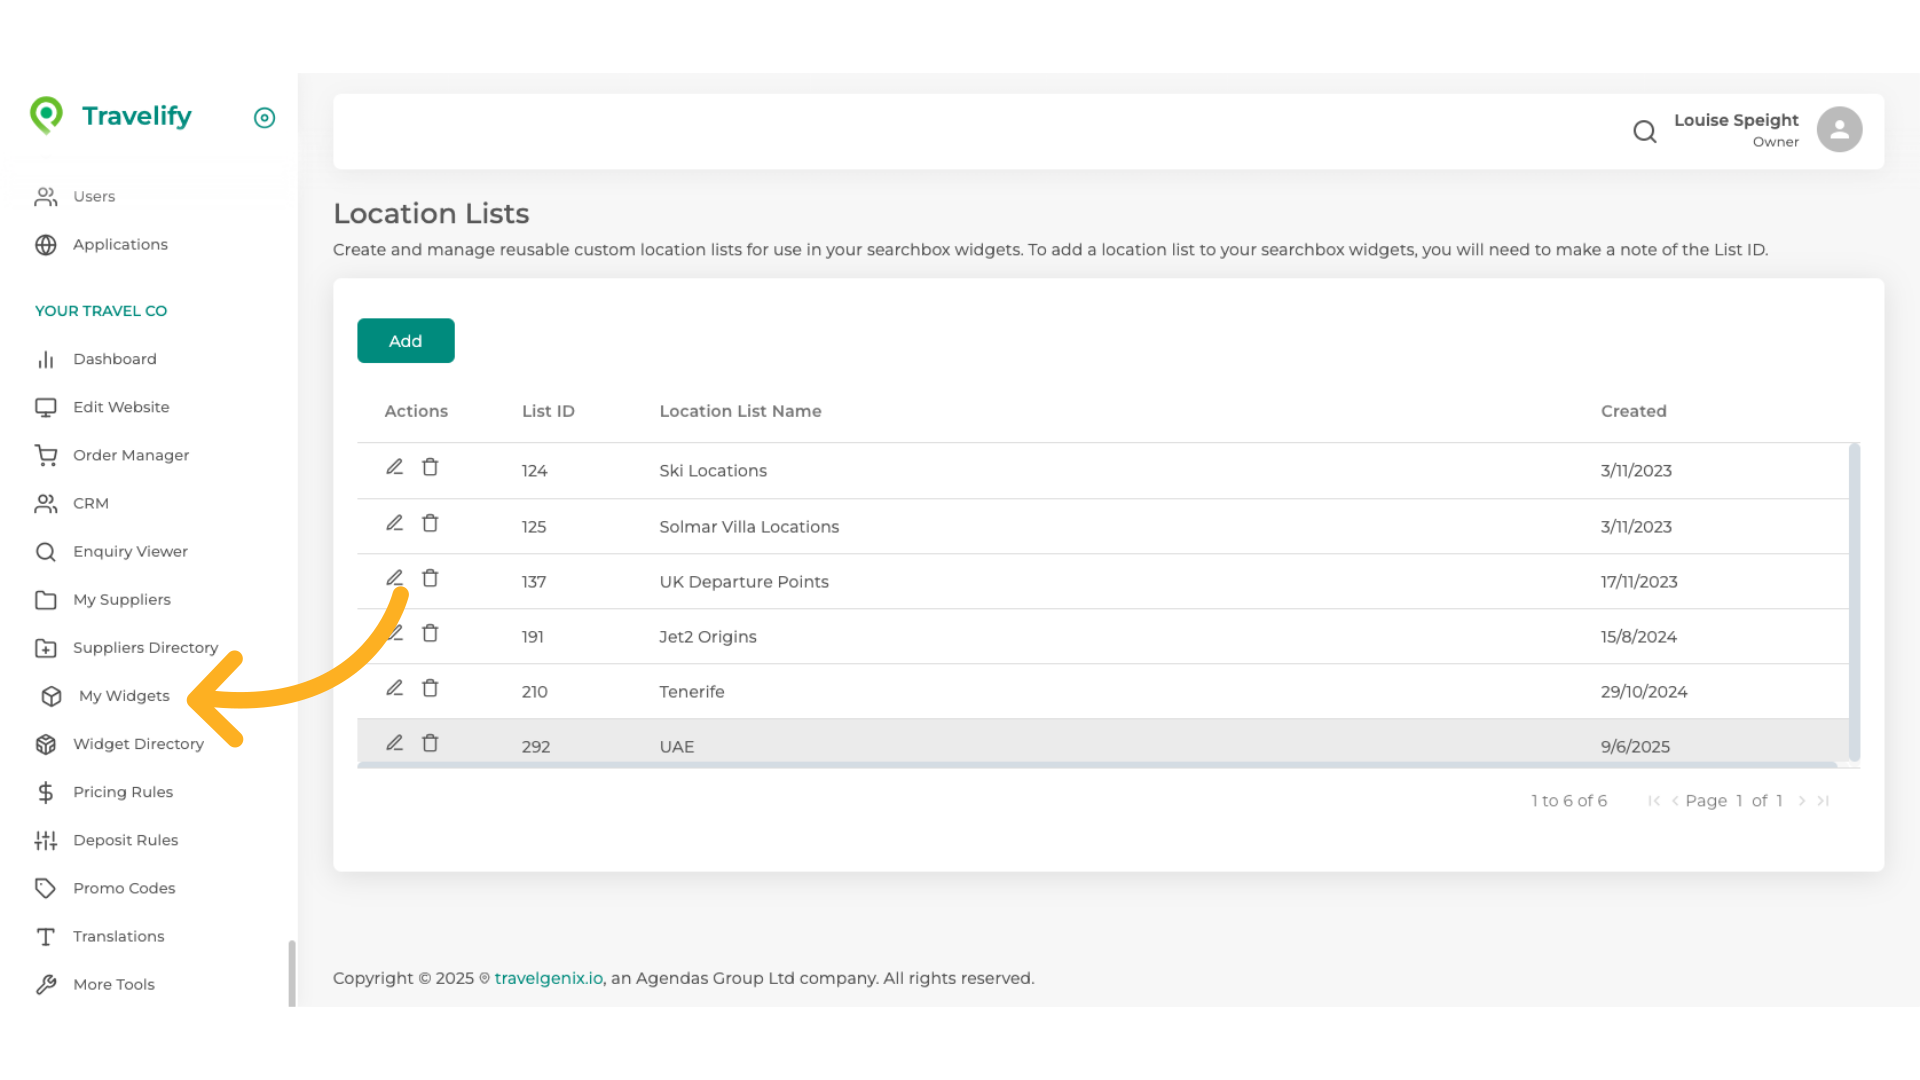
44. Click "My Widgets"
Access the My Widgets section.
45. Select Travel Searchbox
Select Travel Searchbox
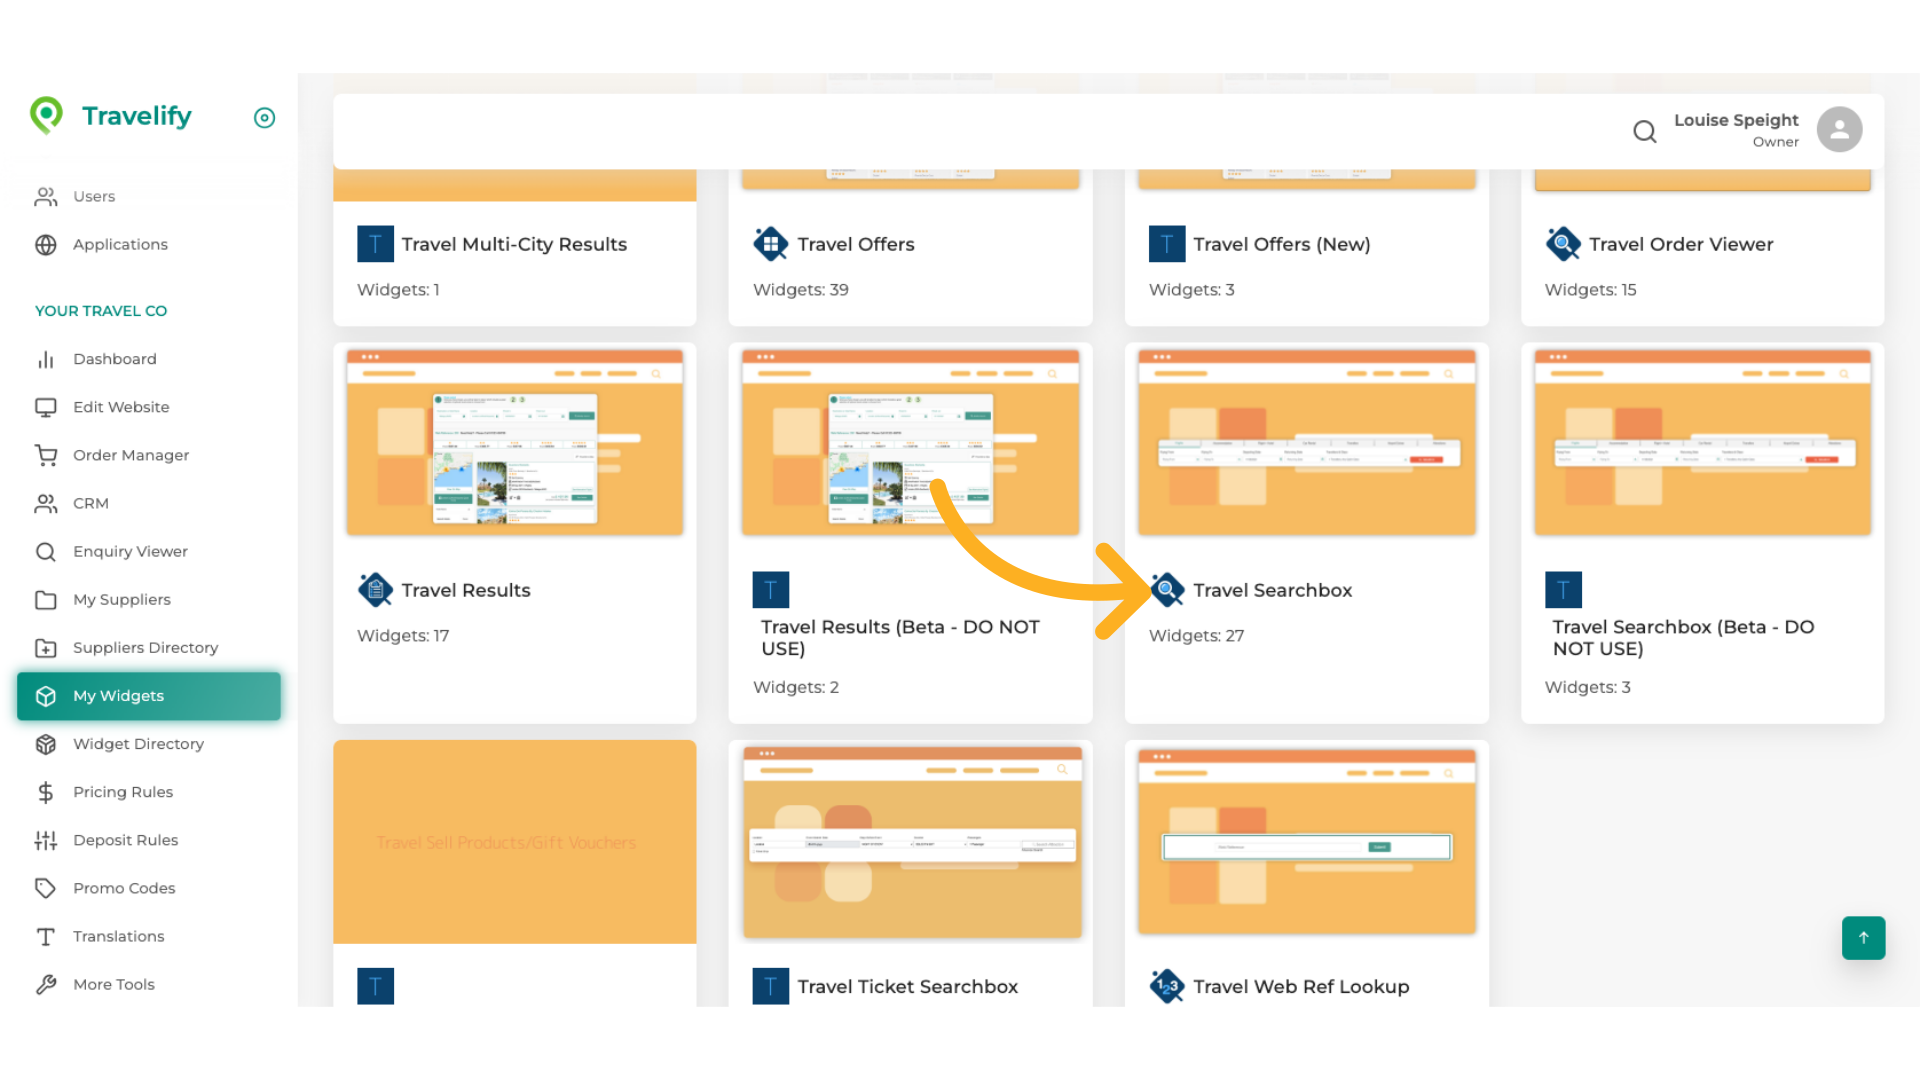
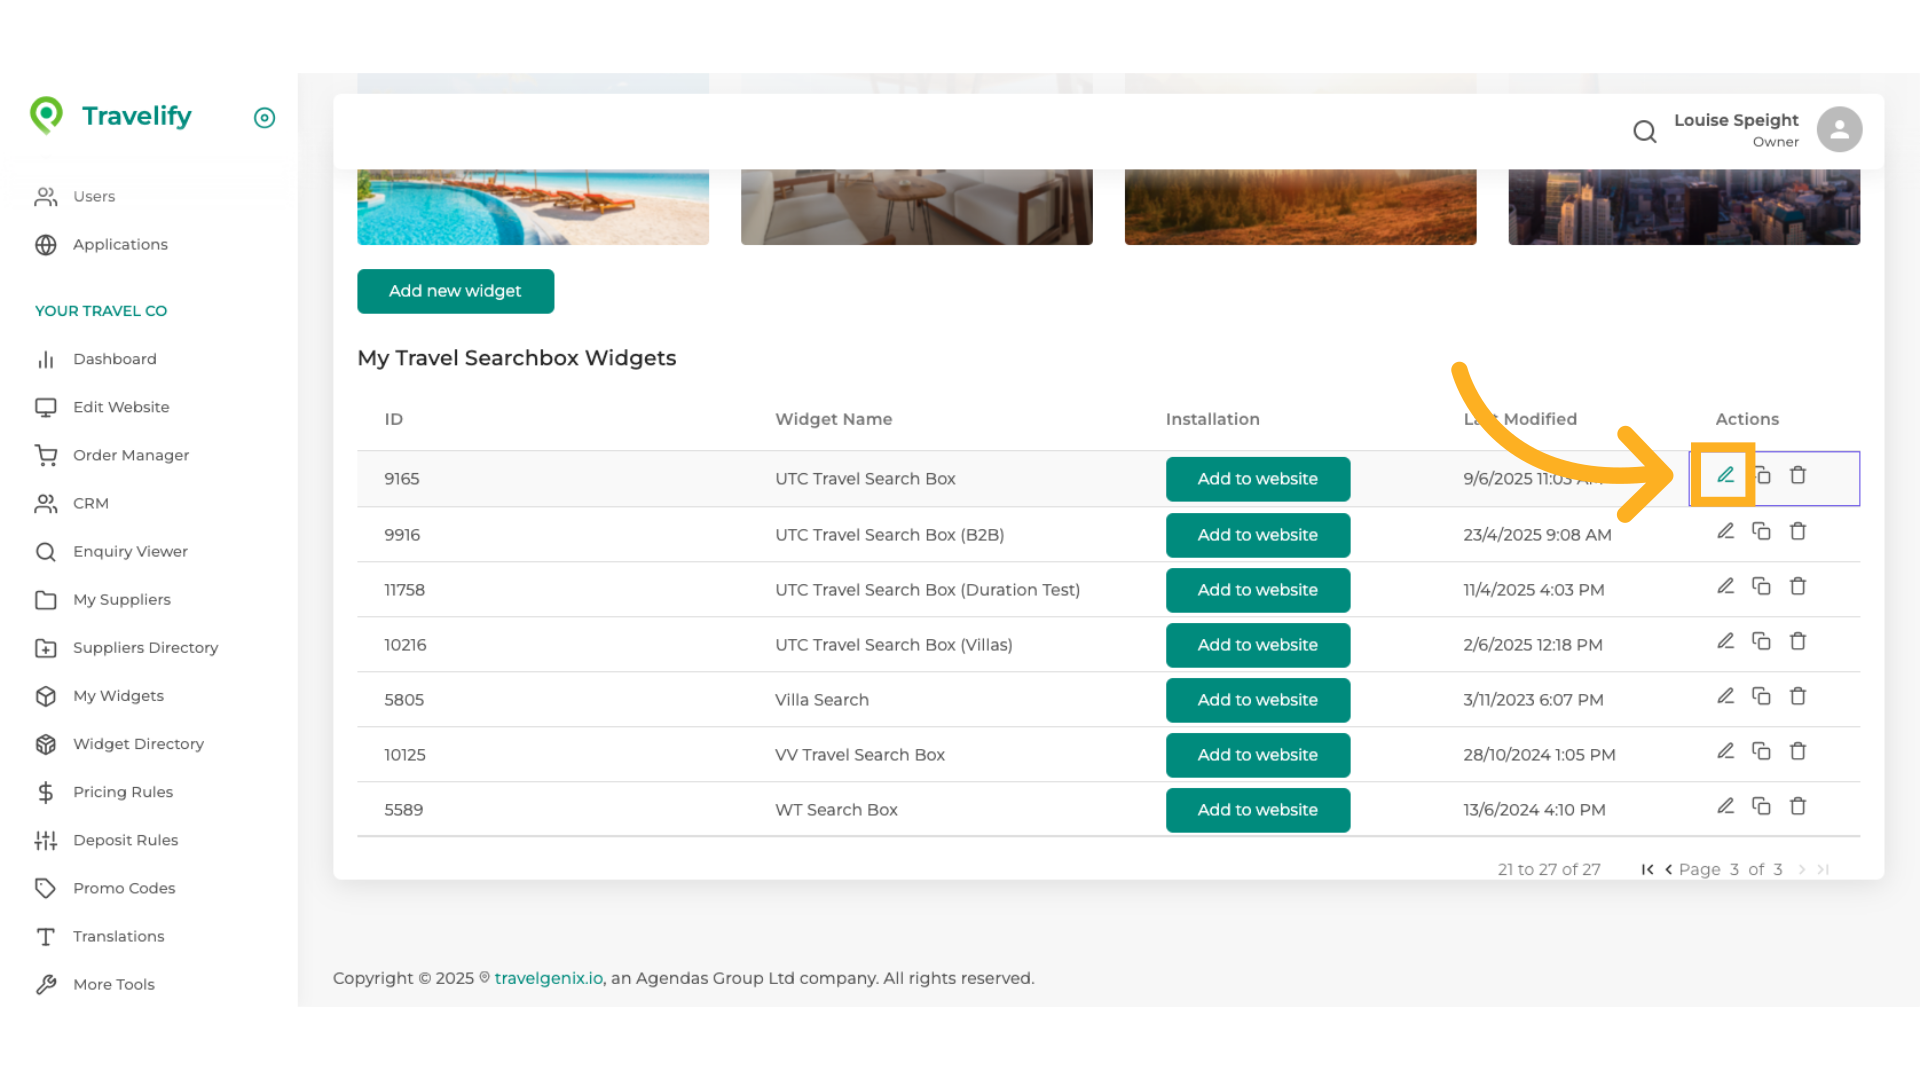
46. Find the Travel Searchbox Widget you wish to add the custom list to
Find the Travel Searchbox Widget you wish to add the custom list to and click on the Edit Icon
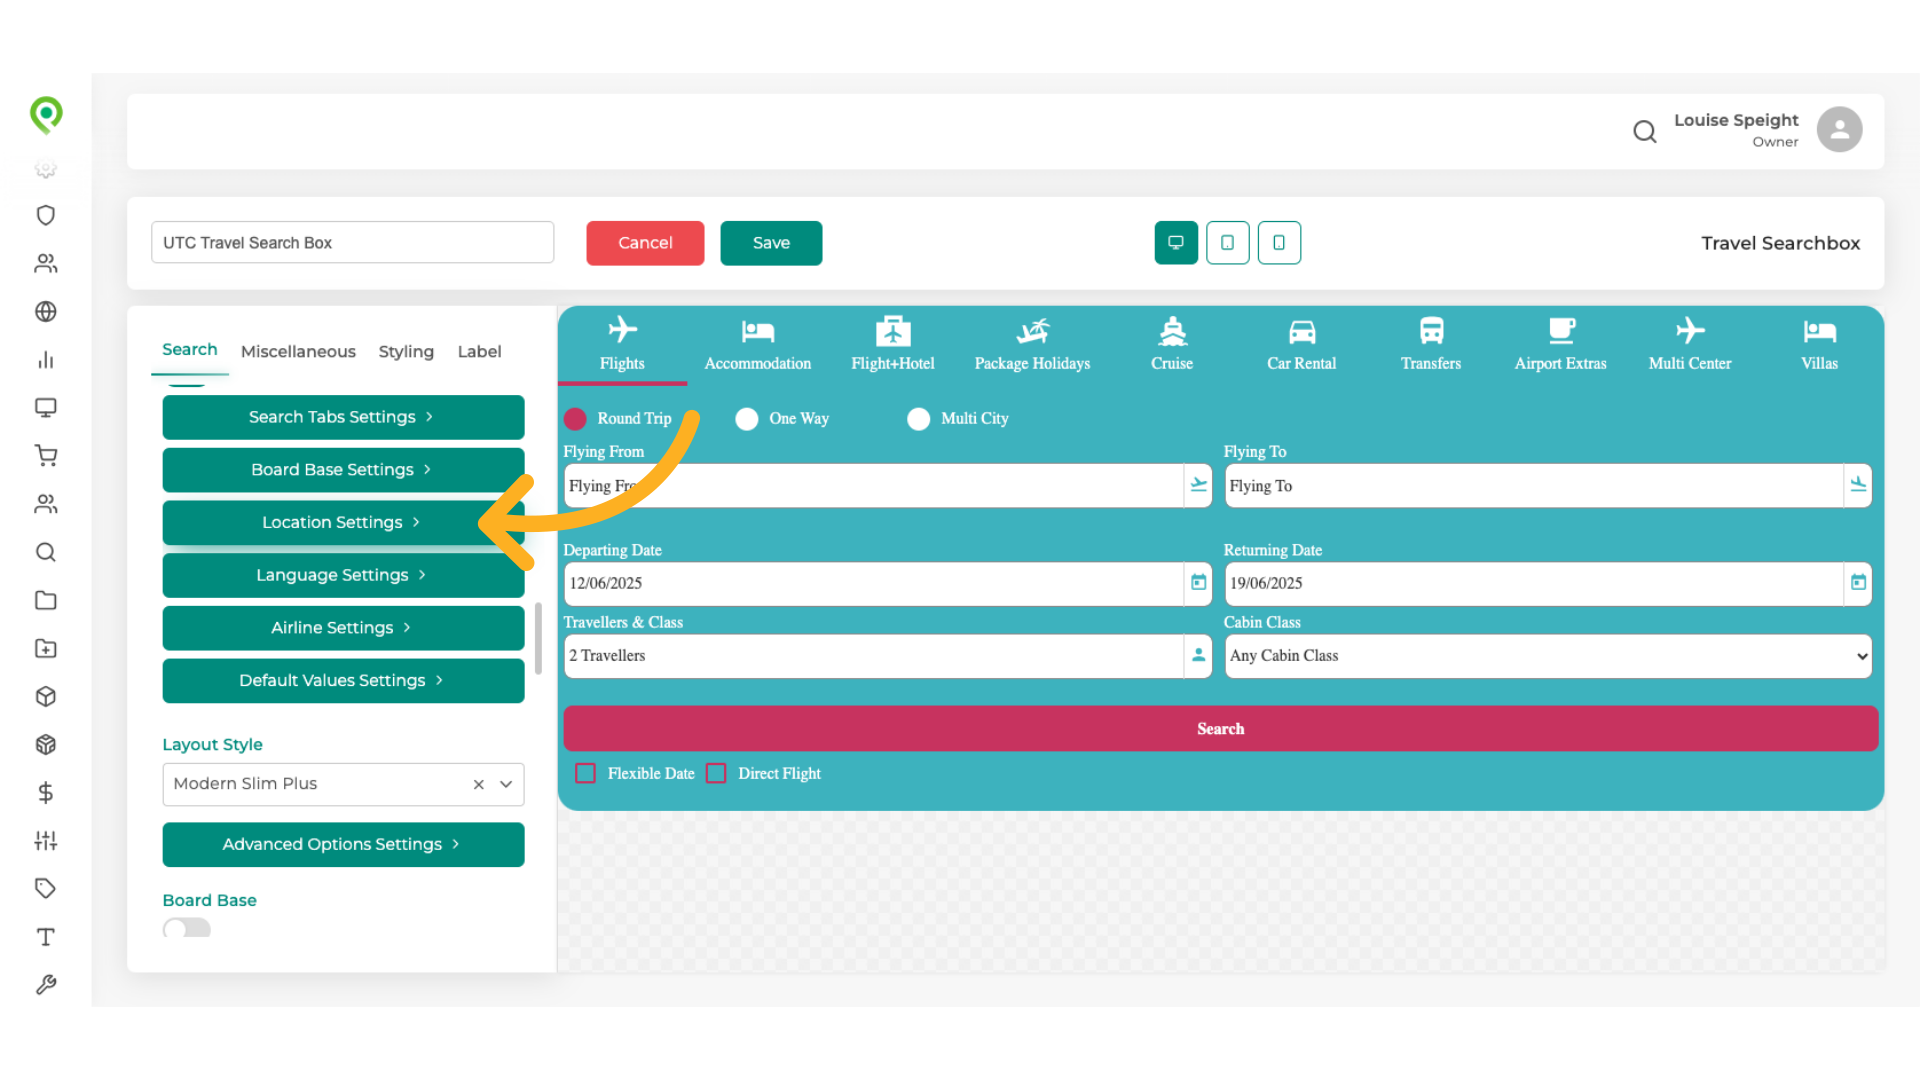
47. Scoll down to "Location Settings"
Scroll down to "Location Settings"
48. Select "Custom (list Id)" from the dropdown list
In Destinations Type select "Custom list I D" option from the dropdown list
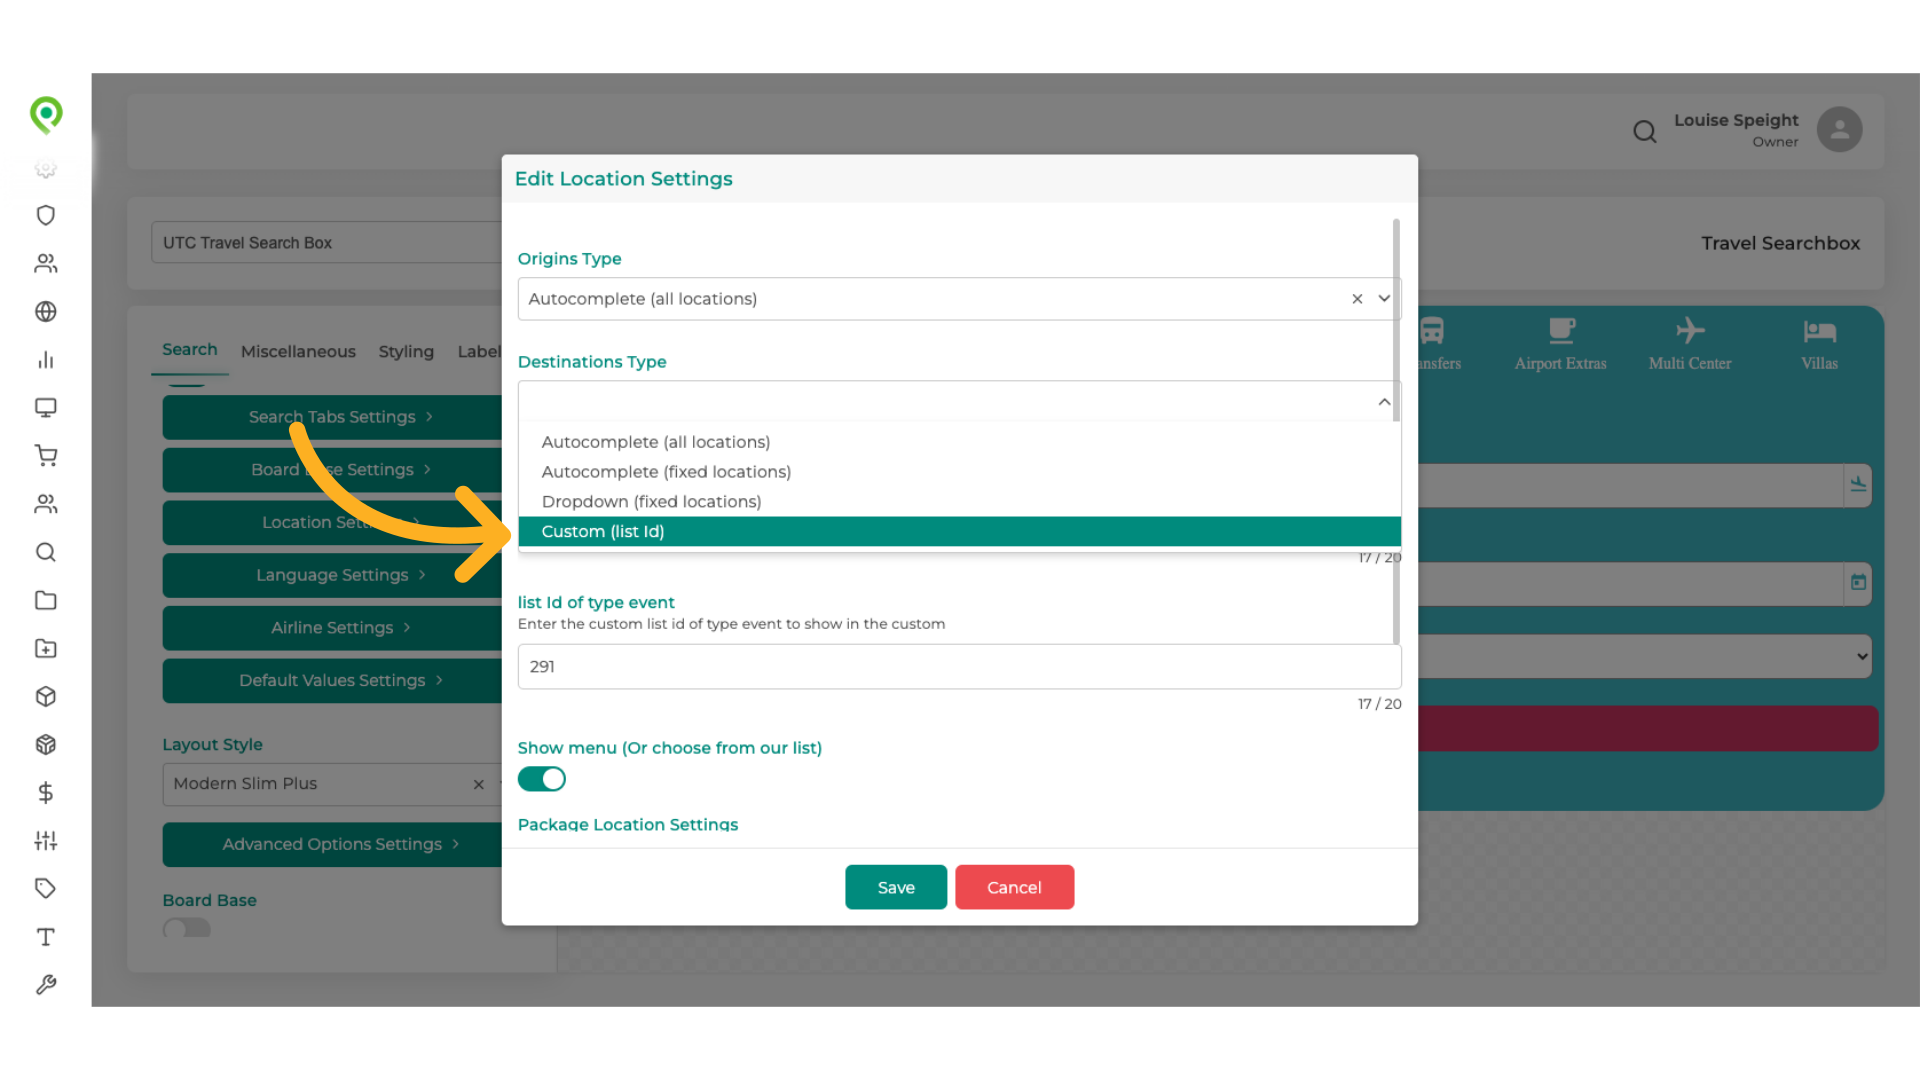
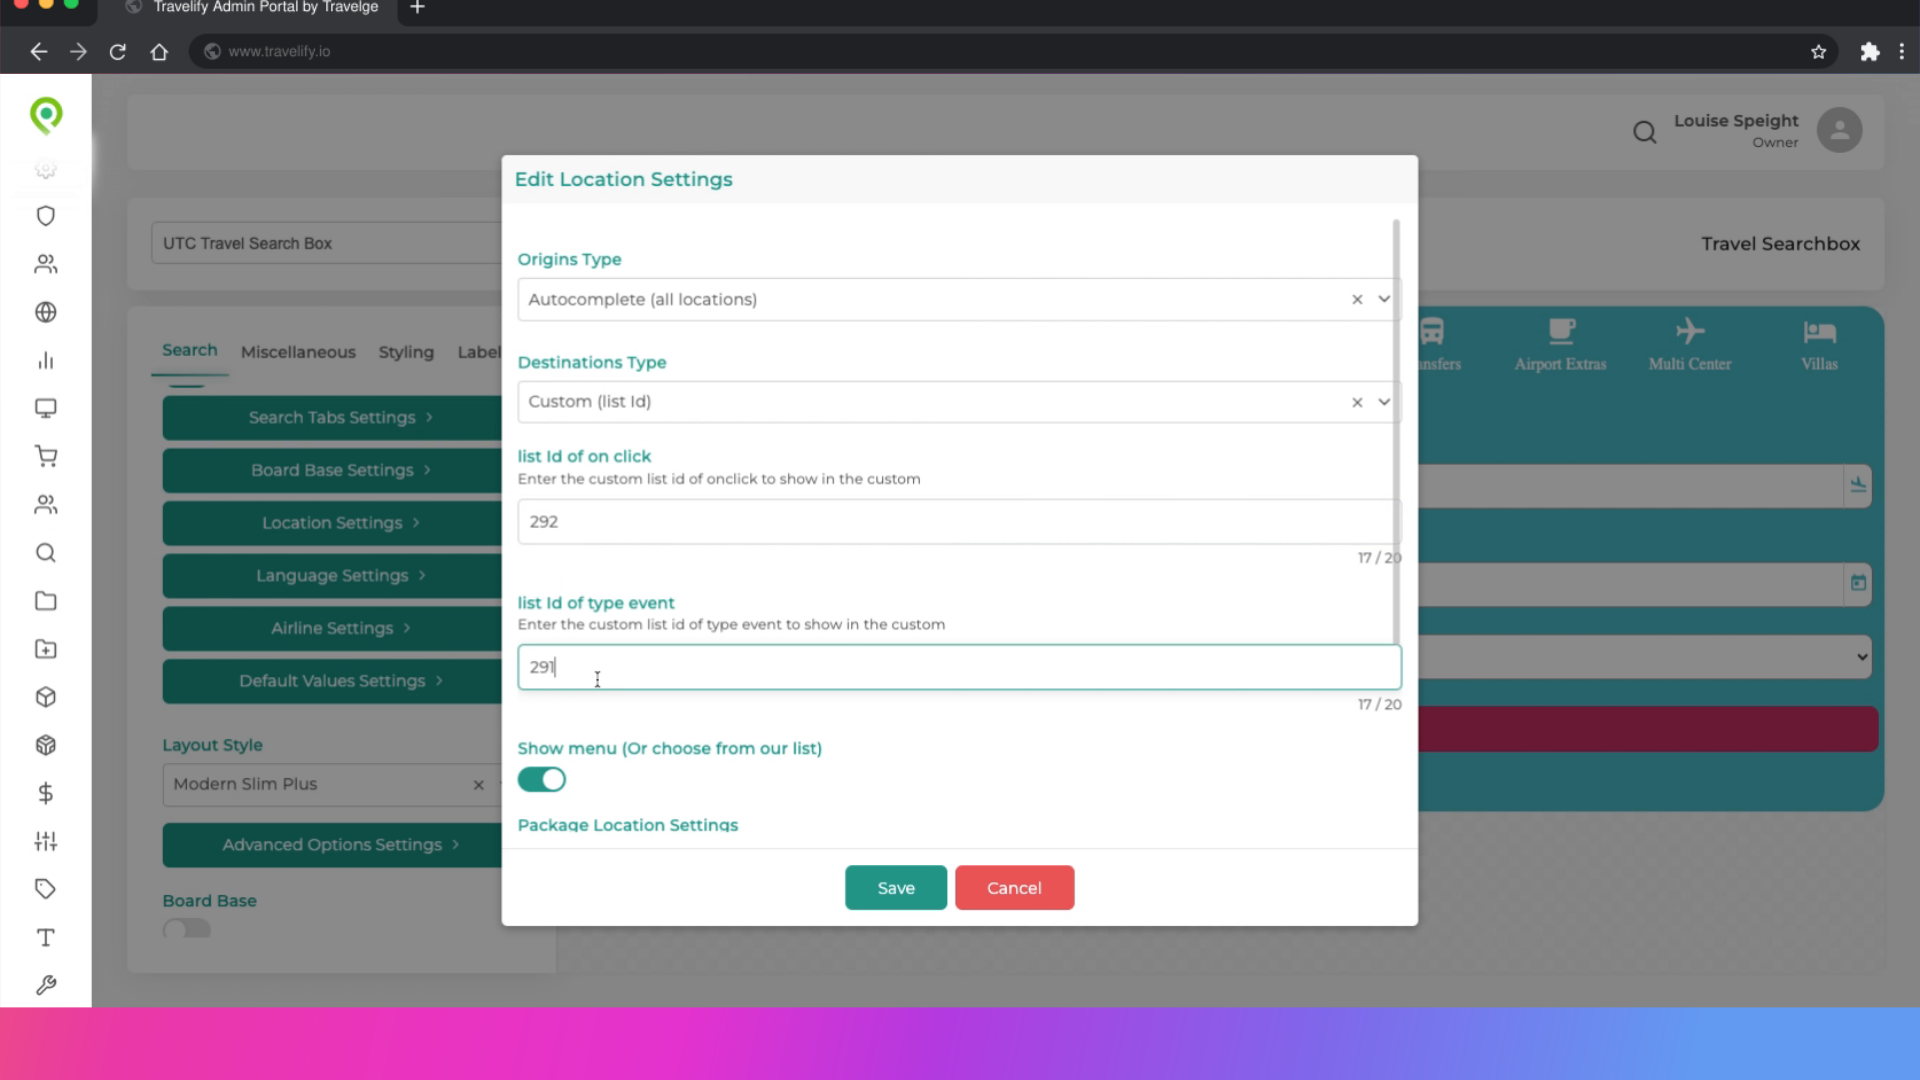
49. Enter the List ID number that you should have noted
Enter the List I D number you should have made a note of
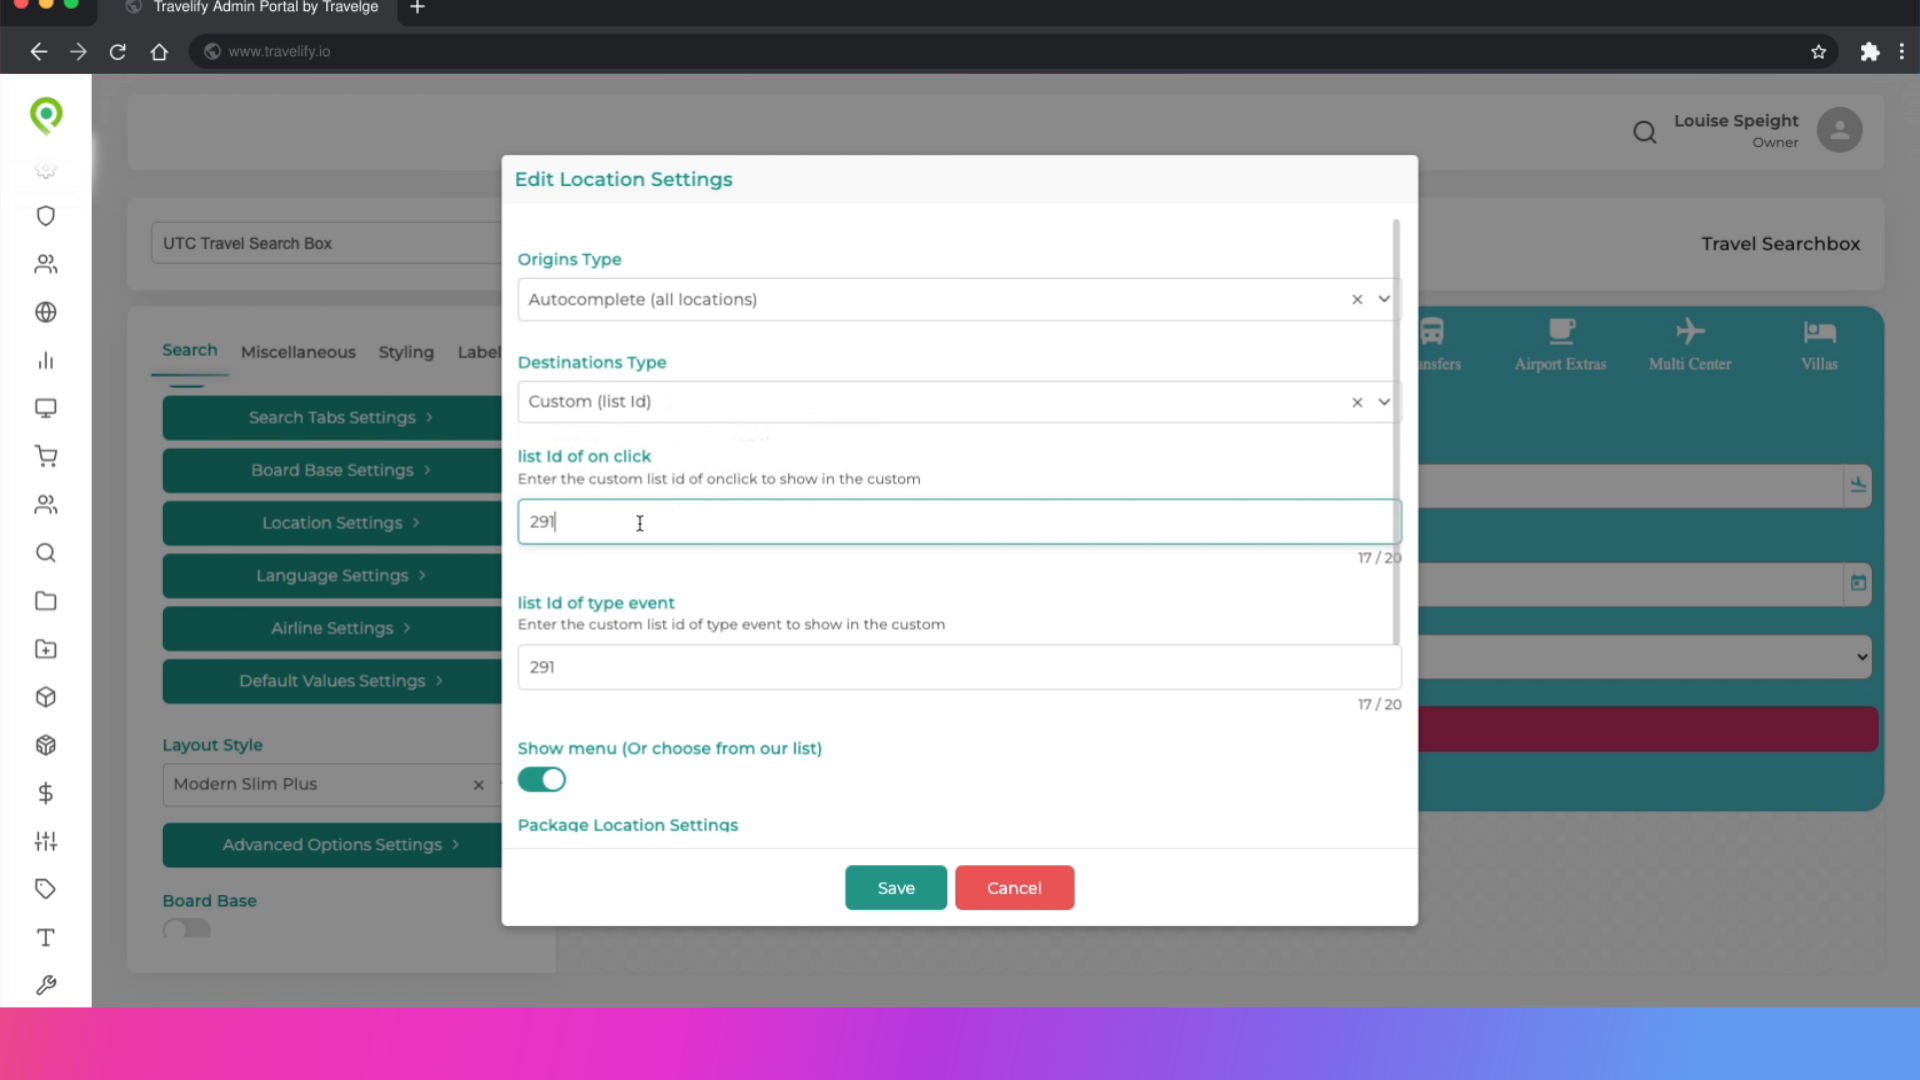
50. Enter List ID number here too
Enter List ID number here too
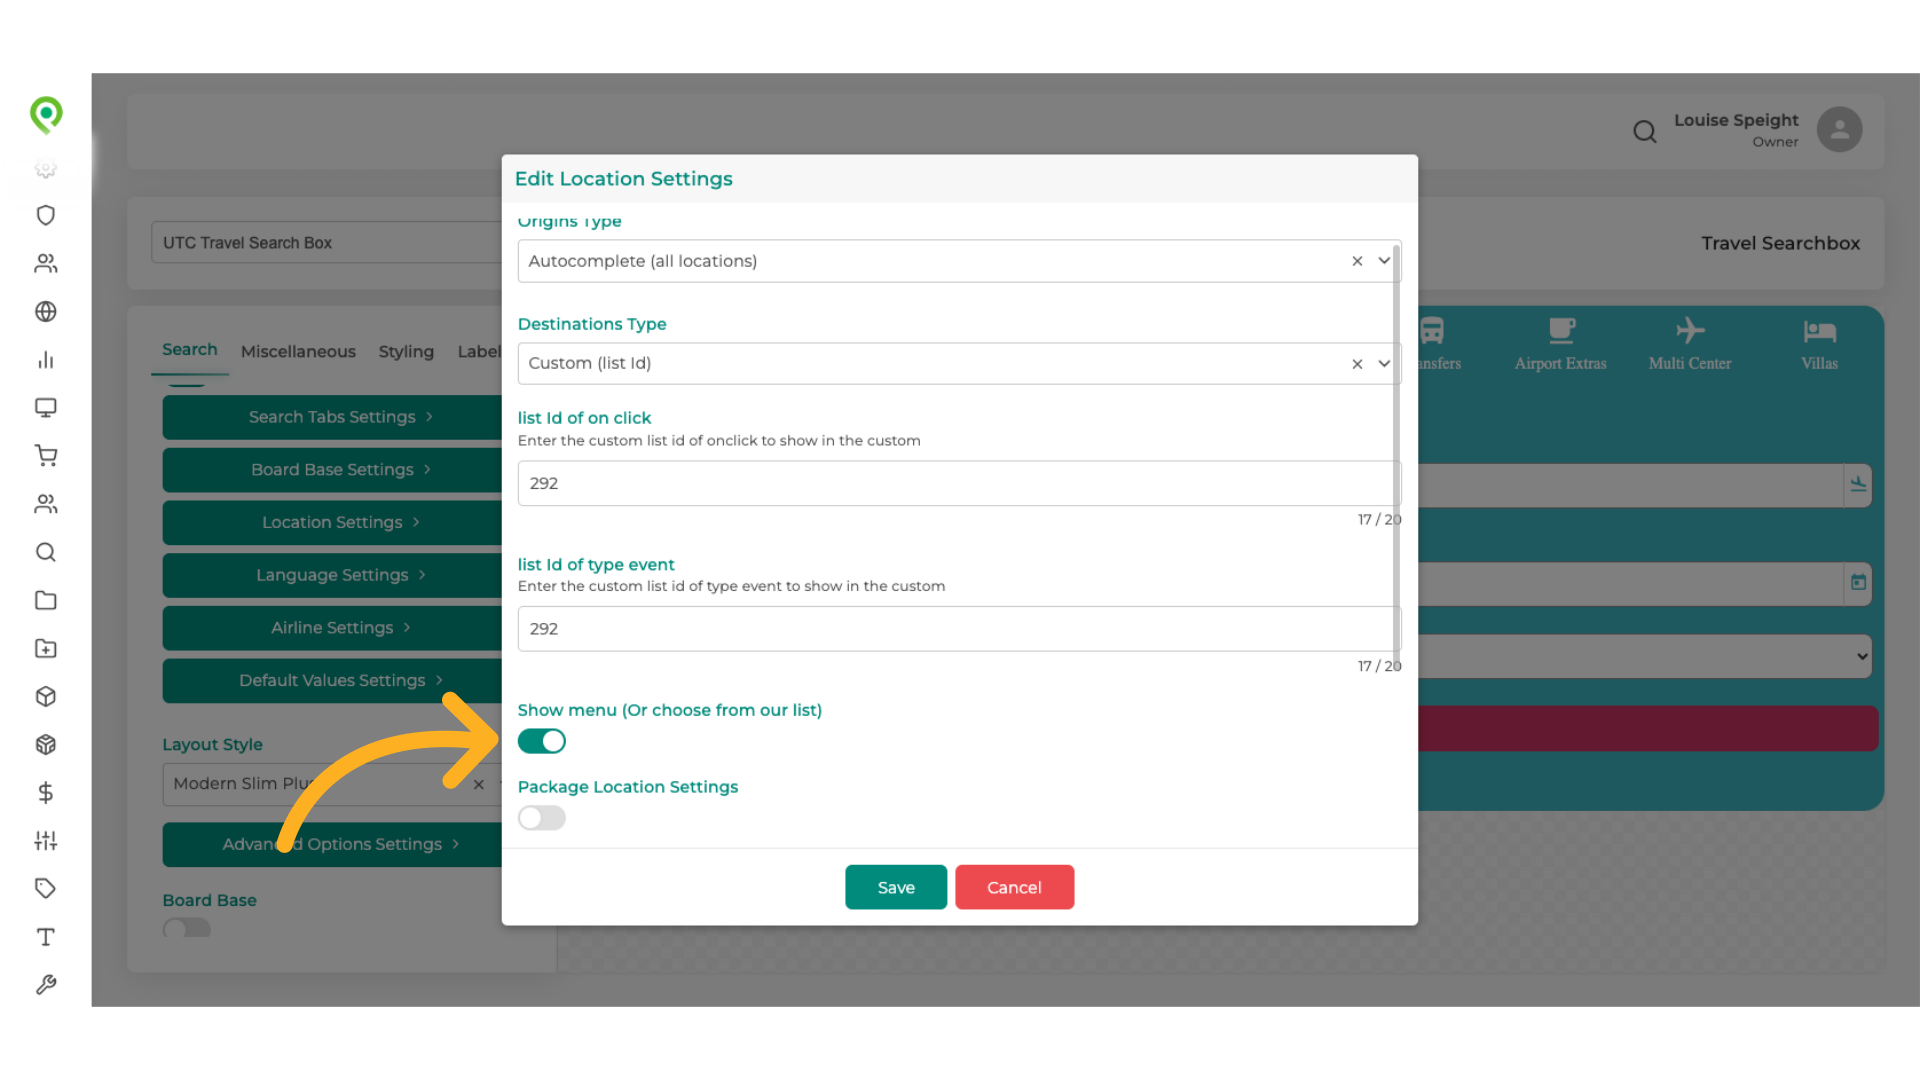
51. Check this box
Check this box to Enable the Custom List to appear
52. Click "Save"
Save the changes made.
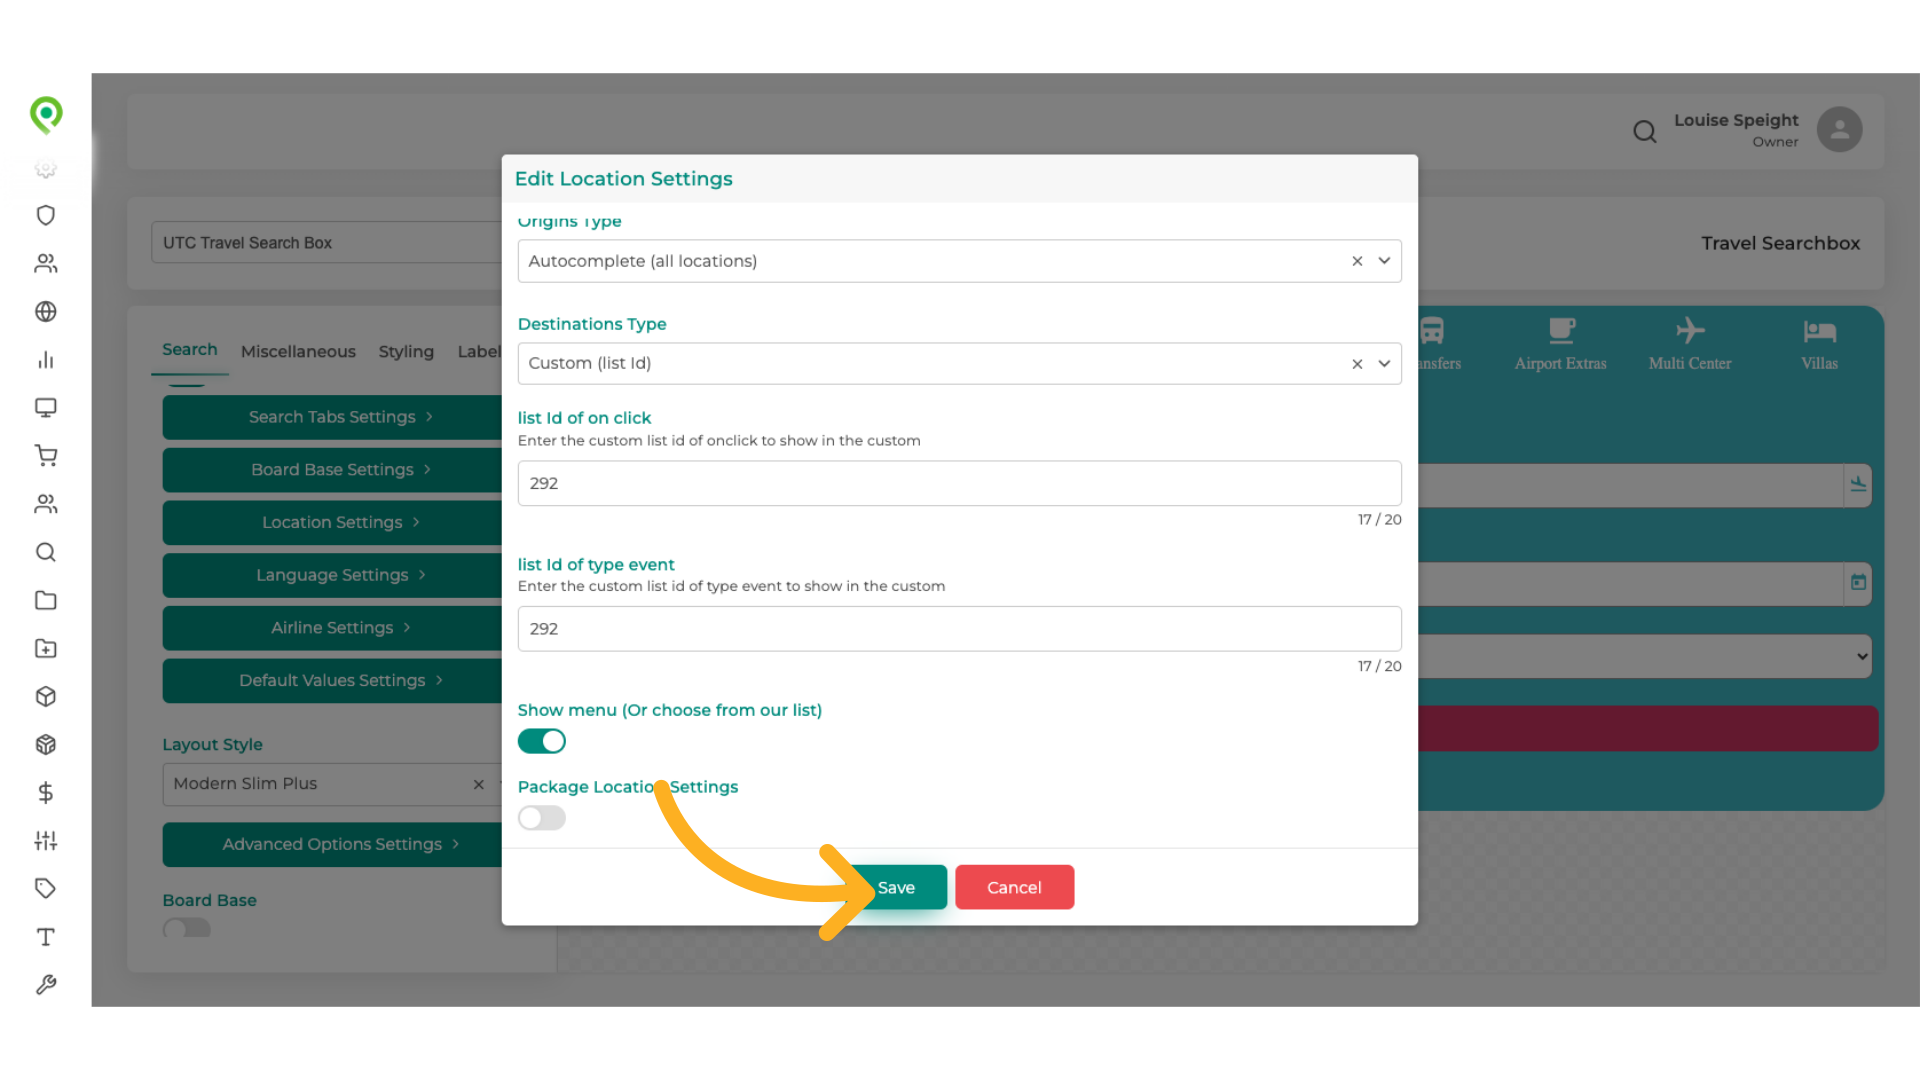
53. Click "Save"
Click Save to complete the process
54. You can see here how the Custom List will appear
You can see here how the Custom Location List will appear on the website
This guide covered creating a custom location list in Travelify, including adding parent locations, searchable locations, and configuring location settings. Additionally, it includes steps to select specific locations and save changes

VIDEO TRAINING - This widget will enable you to create a booking form that can be added to an offer page ...
Recent CMA regulations within the UK require travel companies to clearly display all charges that a customer could be liable for included in their holidays costs.

VIDEO TRAINING: At a glance, search history for your customers
VIDEO TRAINING: This tutorial guides you through configuring the Travel Balance Payment widget.
VIDEO TRAINING: Recent CMA regulations within the UK require travel companies to clearly display all charges that a customer could be liable for included in their holidays costs.
VIDEO TRAINING - The Travelgenix RSS link builder lets you display live product feeds to your audience on website pages and within marketing emails.

VIDEO TRAINING - This video will help you to create offer boxes for your website

This 30-day plan is designed to fit into a busy schedule. We aren't rebuilding the internet here; we are just making sure your travel business is seen and heard in all the right places. Think of this as a "Couch to 5K" for your website. By the end of the month, you’ll have a site that Google recognises and customers trust. Your 30-Day "Get Seen" Calendar Week 1: Setting the Foundations (The "Check-In") Focus: Telling the search engines you are open for business. Day 1: Set up Google Search Console. Submit your sitemap so Google can start "reading" your pages. Day 2: Set up Google Analytics 4. Check that it’s tracking your own visits so you know it's working. Day 3: Claim your Google Business Profile. Fill in every detail—don’t skip the phone number or the bio! Day 4: Upload 5 high-quality travel photos to your Google Business Profile. These are your "shop window" images. Day 5: Review: Look at Search Console. Has Google found any errors? If not, great—you’re officially on the map. Week 2: Solving Problems (The "Scratch the Itch") Focus: Finding out what travellers want and giving it to them. Day 8: Go to AnswerThePublic. Search for your top destination (e.g., "Skiing in France"). Pick the 3 most common questions people ask. Day 9: Write a short, helpful 300-word "Quick Guide" on your site answering one of those questions. Day 10: Use Canva to create a stunning graphic for that guide. Post it on your social media with a link back to your site. Day 11: Answer the second question from your list as a new blog post or "Expert Tip" page. Day 12: Review your Google Business Profile. Has anyone left a review? If so, reply with a friendly "Thank you!" Week 3: Building Buzz (The "Digital Recommendations") Focus: Getting the word out and looking like the expert you are. Day 15: Use Canva to create a "Top 5 Tips" checklist for a specific holiday type you sell. Day 16: Share that checklist on LinkedIn or Facebook. Ask people to tag a friend who needs a holiday. Day 17: Reach out to a local partner (maybe a luggage shop or a local cafe) and ask if they’d share your "Top 5 Tips" link on their page. Day 18: Write your third "Answer" post from your Week 2 research. Day 19: Check Google Analytics. Which of your three posts got the most clicks? This is your "winner"—write more like this! Week 4: Refining & Repeating (The "Consistency Loop") Focus: Checking the data and planning for next month. Day 22: Go back to Google Search Console. See if any new "search terms" have appeared. Are people finding you for things you didn't expect? Day 23: Update your Google Business Profile with a "Weekly Update" post about a current travel trend or a new solution you offer. Day 24: Use Canva to refresh your website’s main banner or "Hero" image. Keep it seasonal! Day 25: Look at Google Analytics. Identify the page where people "drop off" (leave the site). Read through it—is it too technical? Make it simpler and more engaging. Day 26: Plan your next 3 "Answer" topics for next month using AnswerThePublic. The "Golden Rule" for Success Don't try to do this all in one day. 20 minutes a day is far better for your business than a 10-hour sprint once a month. Google loves consistency; it shows them you are a reliable, active solution provider.

Building a successful travel website isn’t a "set and forget" project—it’s more like tending a garden. If you water it regularly, it blooms; if you leave it, the weeds take over. Here is your step-by-step guide to using those five essential tools to keep your business growing. 1. Google Search Console: Your Direct Line to Google Purpose: To make sure Google can see your pages and tell you if anything is broken. Step-by-Step: Verify Your Site: Go to Search Console and add your website URL. You’ll need to prove you own it by adding a small bit of code to your site (most website builders have a simple box for this). Submit a Sitemap: This is essentially a "map" of your site that helps Google find every page. Most sites create one automatically at yourwebsite.com/sitemap.xml. Paste that link into the "Sitemaps" section. Check for "Crawl Errors": Once a month, look at the "Indexing" report. If Google says a page can’t be found, it’s like having a broken link in your shop window. Fix it! The Result: You'll see which search terms people are using to find you. Timeline: It takes 1–4 weeks for Google to start showing your data. Ongoing Effort: Check this once a month. As you add new tours or blog posts, check here to ensure Google has "seen" them. 2. Google Analytics 4 (GA4): Your Business X-Ray Purpose: To see where your visitors come from and what they do before they book. Step-by-Step: Set Up a Property: Sign up at Google Analytics. Follow the prompts to create a "Data Stream" for your website. Install the Tag: Copy the "Measurement ID" (it starts with G-) and paste it into your website builder's analytics settings. Watch the "Acquisition" Report: Go to Reports > Acquisition > Traffic acquisition. This tells you if people are coming from Google, Facebook, or clicking links in your emails. The Result: You’ll stop guessing what works. If your Instagram posts aren't bringing visitors, you’ll know. Timeline: Data starts appearing within 24 hours. Ongoing Effort: Review this weekly. Look for which pages people stay on the longest—that’s the content they find most helpful! 3. Google Business Profile: Your Local Megaphone Purpose: To show up on Google Maps and in local search results. Step-by-Step: Claim Your Business: Go to Google Business and search for your company name. If it’s not there, create it. Fill Every Box: Add your phone number, website, and opening hours. Crucial: Add high-quality photos of your tours or your happy team. Verify: Google will usually send a postcard or ask for a quick video to prove you’re real. The Result: You’ll appear when someone nearby searches for "Travel Agent" or "Tour Operator." Timeline: You can show up within days of verification. Ongoing Effort: Post an "Update" (like a mini-blog post) once a week and reply to every single review. Active profiles rank higher! 4. Canva: Your Visual Hook Purpose: To create professional-looking images that stop people from scrolling past your brand. Step-by-Step: Pick a Template: Search Canva for "Travel Instagram" or "Travel Brochure." Customise with Your Photos : Drag and drop your own holiday photos into the template. Use your brand colours so people recognise you. Download and Share: Use the "Share" button to download high-res versions for your site or social media. The Result: Your business looks like a global powerhouse, even if you’re a team of one. Timeline: Instant. You’ll have a professional design in 10 minutes. Ongoing Effort: Use this daily or weekly. Visuals go out of date fast; keep your "shop window" fresh with new, seasonal imagery. 5. AnswerThePublic: Your Content Crystal Ball Purpose: To find out exactly what questions travellers are asking so you can provide the answers. Step-by-Step: Search Your Niche: Go to AnswerThePublic and type in a destination or service, like "Luxury Maldives" or "Walking tours London." Download the Data: It will show you a "wheel" of questions people ask (e.g., "Is the Maldives expensive in May?"). Write the Solution : Pick one of those questions and write a short, helpful article on your website answering it. The Result: You become the "expert" that Google loves to recommend. Timeline: Writing an article takes a few hours; seeing it rank on Google takes 3–6 months. Ongoing Effort: Do this once a month. Search trends change with the seasons (winter sun vs. summer city breaks), so always check what people are curious about now. The Reality Check Digital growth is a marathon, not a sprint. You won't see a flood of bookings overnight, but by using these tools consistently, you are building an "asset" that works for you 24/7.
So, you’ve launched your new travel site. It looks fantastic, the imagery is dream-worthy, and you’re ready to send people on the trip of a lifetime. The only problem? It’s a bit quiet. If your website feels like a luxury resort with no guests, don't worry. It’s a common itch for new sites, and we’re going to scratch it. Here is how we get you off the back streets and onto the high street of the internet. Why Is Nobody Seeing My Beautiful Site? (The Itch) The biggest frustration for any travel business is knowing you have the perfect solution for a holidaymaker, but they simply aren't finding you. You're competing with the giants, and Google can sometimes feel like a VIP club where you’re not on the list. The secret isn't "better tech"—it's being helpful. People don't search for "websites," they search for "where is the best place for a quiet half-term break?" or "how do I plan a trek in Peru?" When you start answering those questions, the traffic starts flowing. The Visibility Roadmap: Your 3-Step Plan 1. Talk to the Search Engines Think of Google as a giant filing cabinet. If you haven't told them you exist, they can't file you under "Amazing Travel Expert." You need to "check in" so they know your doors are open. 2. Answer the Questions Travellers Are Asking Instead of just listing prices, tell stories. Write about the "top 5 hidden beaches" or "how to pack for a safari." When you provide the answers, Google rewards you by putting you in front of the people asking. 3. Get Digital Recommendations In the travel world, word of mouth is everything. The digital version is getting other reputable websites to mention yours. It’s like a "thumbs up" that tells search engines you’re a trusted expert. The Traffic Toolkit: How to Drive Visitors Google's Front Page (Organic Search): This is the long game. By regularly adding fresh, helpful advice to your site, you’ll naturally climb the rankings. The "Scroll-Stoppers" (Social Media): Don't just post "Book Now." Post a video of a sunset or a tip on how to skip the queues at the Louvre. Give them a reason to click through to your site. The Local Map: If you have an office or a specific region you cover, appearing on the map is a "quick win" for building trust. Your Travel Tech Stack: Simple Tools for Big Results You don't need to be a coder to use these. They are your eyes and ears on the web.